
Company Settings
Control how DataNinja works, company-wide
Español: Lee esta página en español.
Français : Consultez cette page en français.
This page applies to DataNinja tenants integrated with NetSuite or QuickBooks Online, and to tenants with no finance system integration. The workflow in DataNinja is the same across integrations; where a financial system changes behavior, the integration-specific note calls it out.
Items that are synced with an integration will show the relevant integration's logo. Screenshots on this page may show the NetSuite logo, but tenants integrated with QuickBooks Online will see that logo instead. Tenants with no financial integration won't see any logo.
Every company handles inventory and production a little differently. In addition to the settings on individual parts, Bills of Materials (BOMs) and orders, Company Settings control how DataNinja behaves across your whole company: receiving and shipping defaults, approval roles, how strictly manufacturing mistakes are escalated, picking behavior, your financial system connection, and more.
To open Company Settings, click on the gear icon in the top right, then click "Company Settings". The tabs on the left group the settings by area.
Changes Apply to Everyone Right AwayCompany Settings apply to every user at your company as soon as they're saved, and DataNinja doesn't keep a change history for them. Toggles that appear without a pencil icon (such as the ones in the "Options" and "Advanced" sections) don't have a "Save" button, so treat them as live. Note what you change and why, especially for the Levels of Rigor.
Which tabs and settings you see can depend on your financial system integration and on features enabled for your tenant. If a setting described here doesn't appear for you, open a chat with our Support team.
Company
Company and Contact
The Company section shows your company name and logo. To update your logo, open a chat with us and our Implementation team will upload it for you.
The Contact section holds your accountant, admin and customer service email addresses, your customer service phone number, and your default billing and shipping addresses. Click on a field, or on the pencil icon to the right, to update it.
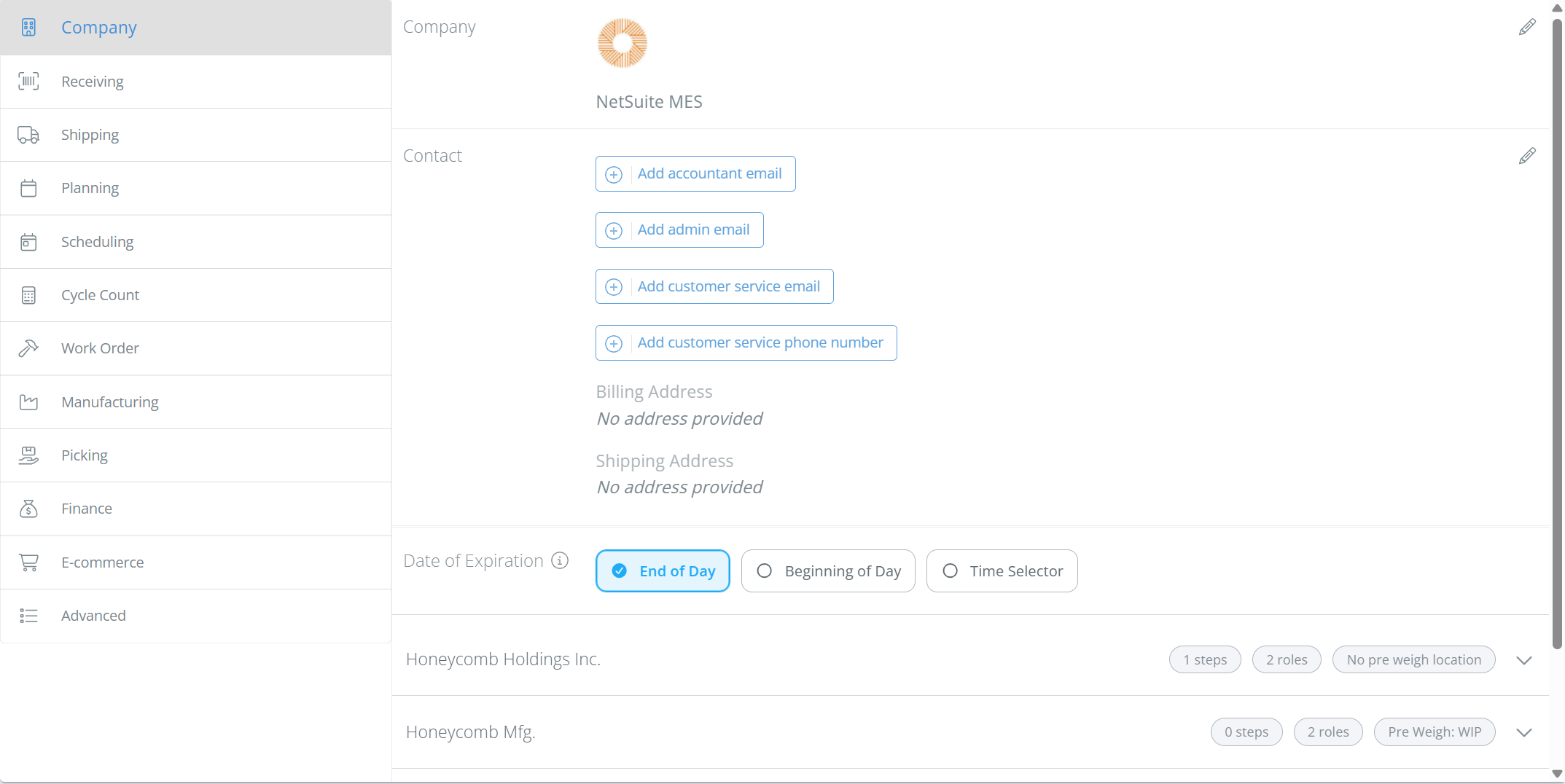
Date of Expiration
This setting controls what time of day a batch expires on its expiration date:
- End of Day – The batch expires at 11:59:59 PM, so it can be used all day on its expiration date.
- Beginning of Day – The batch expires at 12:00:00 AM, so it's already expired for the whole expiration date.
- Time Selector – Users choose an exact time along with the date, for example when material expires a set number of hours after it's made.
Approval Roles, Steps and Pre Weigh Location
Below the Date of Expiration, you choose who can sign approvals, set your default manufacturing approval steps, and pick your Pre Weigh location. Where these settings appear depends on how many companies your tenant has.
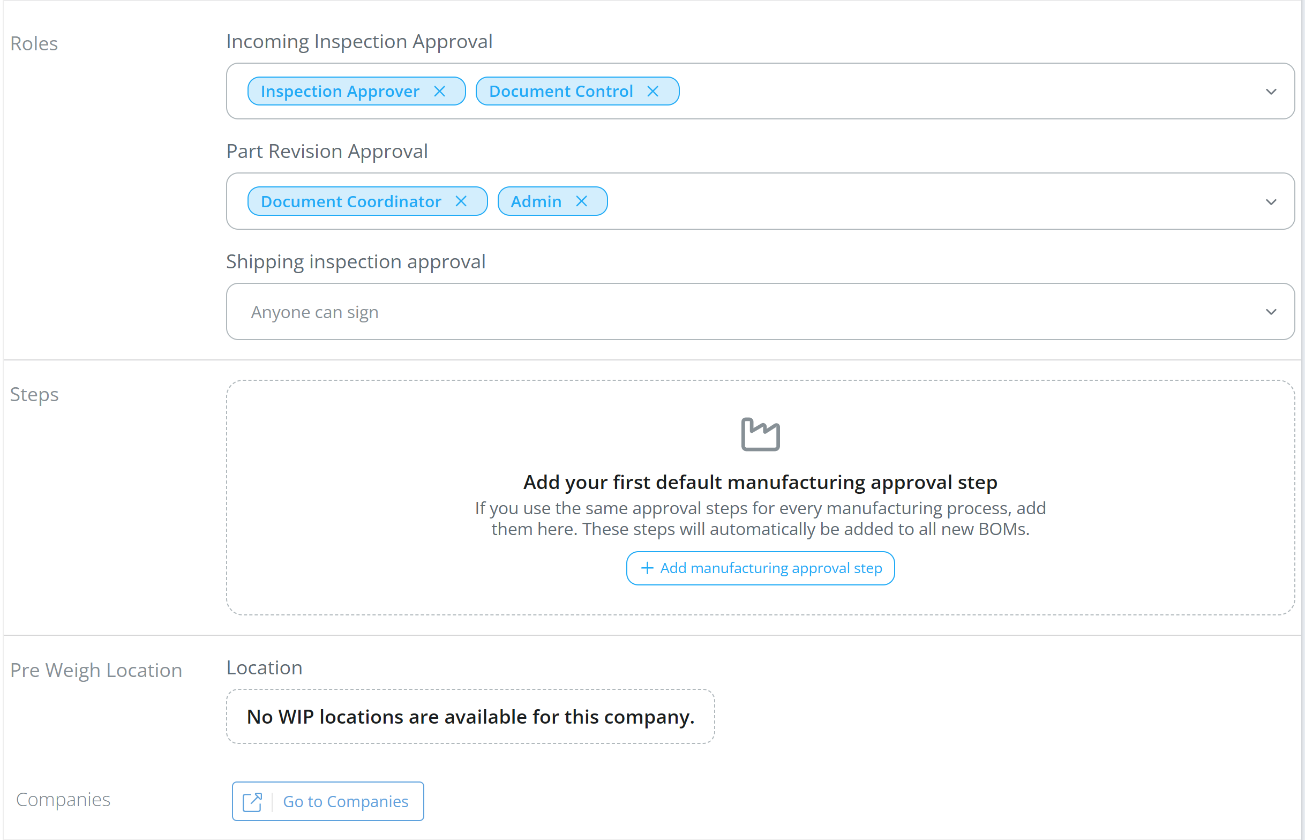
If your tenant has more than one company or subsidiary, each one has its own card. The tags on the card summarize its setup, such as "1 steps", "2 roles" and its Pre Weigh location. Click on a card to expand it.
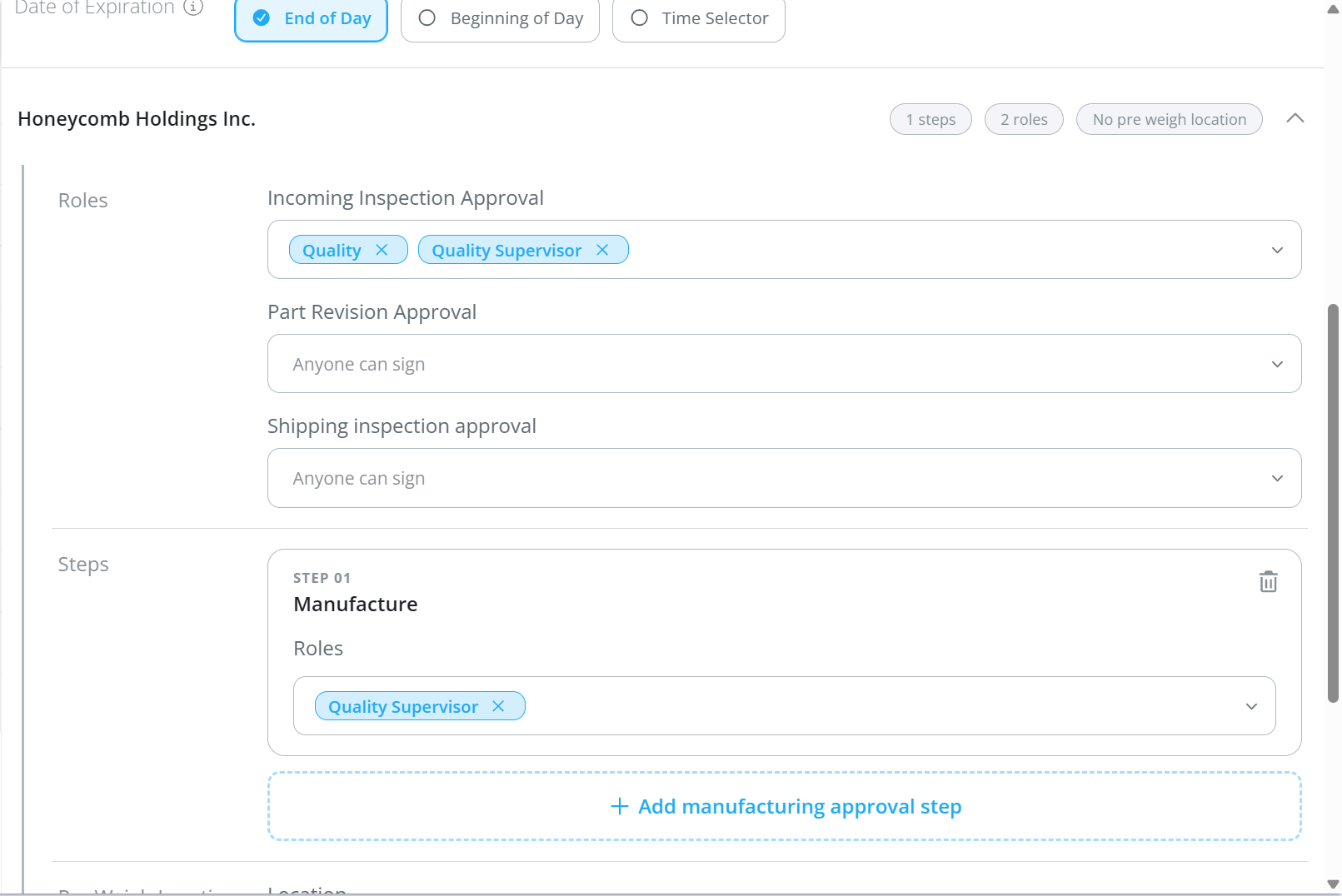
The settings work the same way either way:
- Roles – Choose which roles can sign an "Incoming Inspection Approval", a "Part Revision Approval" and a "Shipping inspection approval" for that company. If no role is selected, the field reads Anyone can sign.
- Steps – Set the manufacturing approval steps for that company. Each step has a name and the roles that can sign it. Click "Add manufacturing approval step" to add one, or click on the trash icon to remove one. These steps are added automatically to all new BOMs. See Approval Steps for how steps work on a manufacturing record.
- Pre Weigh Location – The location where pre-weighed material is staged for that company. See Pre-Weigh.
To add or edit the companies themselves, click "Go to Companies" at the bottom of the tab.
Receiving
Custom Fields
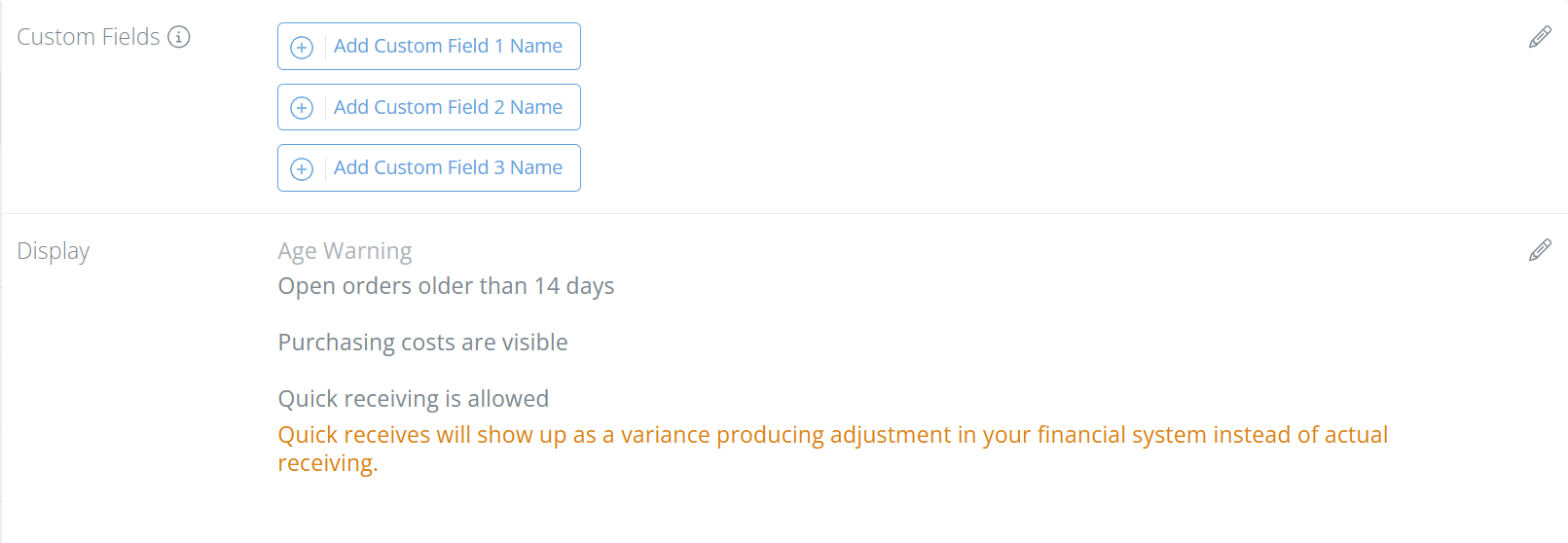
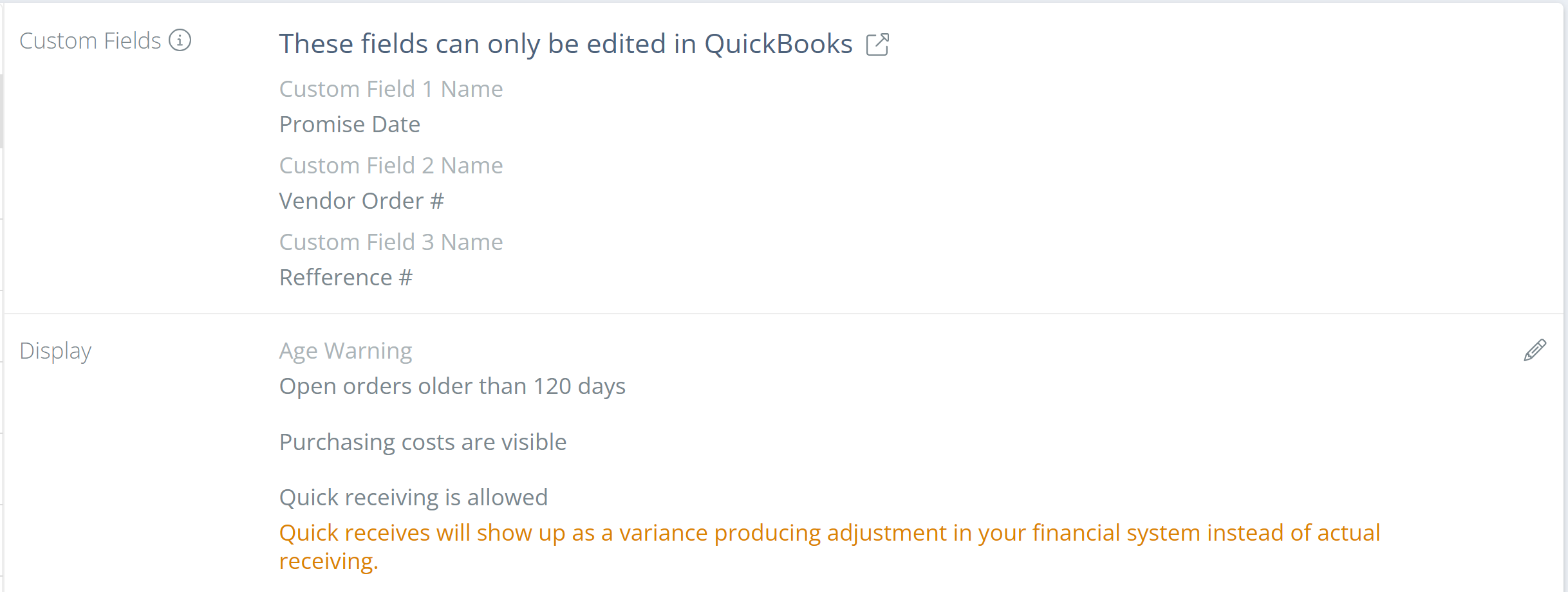
Name up to three custom fields for your purchase orders. For custom fields on other records, see Custom Fields.
QuickBooks Online
The custom field names come from QuickBooks Online, and the tab shows "These fields can only be edited in QuickBooks". To rename a field, change it in QuickBooks Online.
NetSuite
Click "Add Custom Field 1 Name" (or 2, or 3) and type the name you want users to see.
Age Warning
Open orders older than this number of days are highlighted so they stand out. The default is 14 days.
Private Purchasing Costs
Turn this on to hide purchasing costs. When it's off, the Display section reads "Purchasing costs are visible".
Allow Quick Receiving
Quick receiving lets users receive inventory without a purchase order (see Receiving Inventory). As the warning on this setting says, a quick receive shows up in your financial system as a variance-producing adjustment instead of an actual receipt.
Shipping
Custom Fields
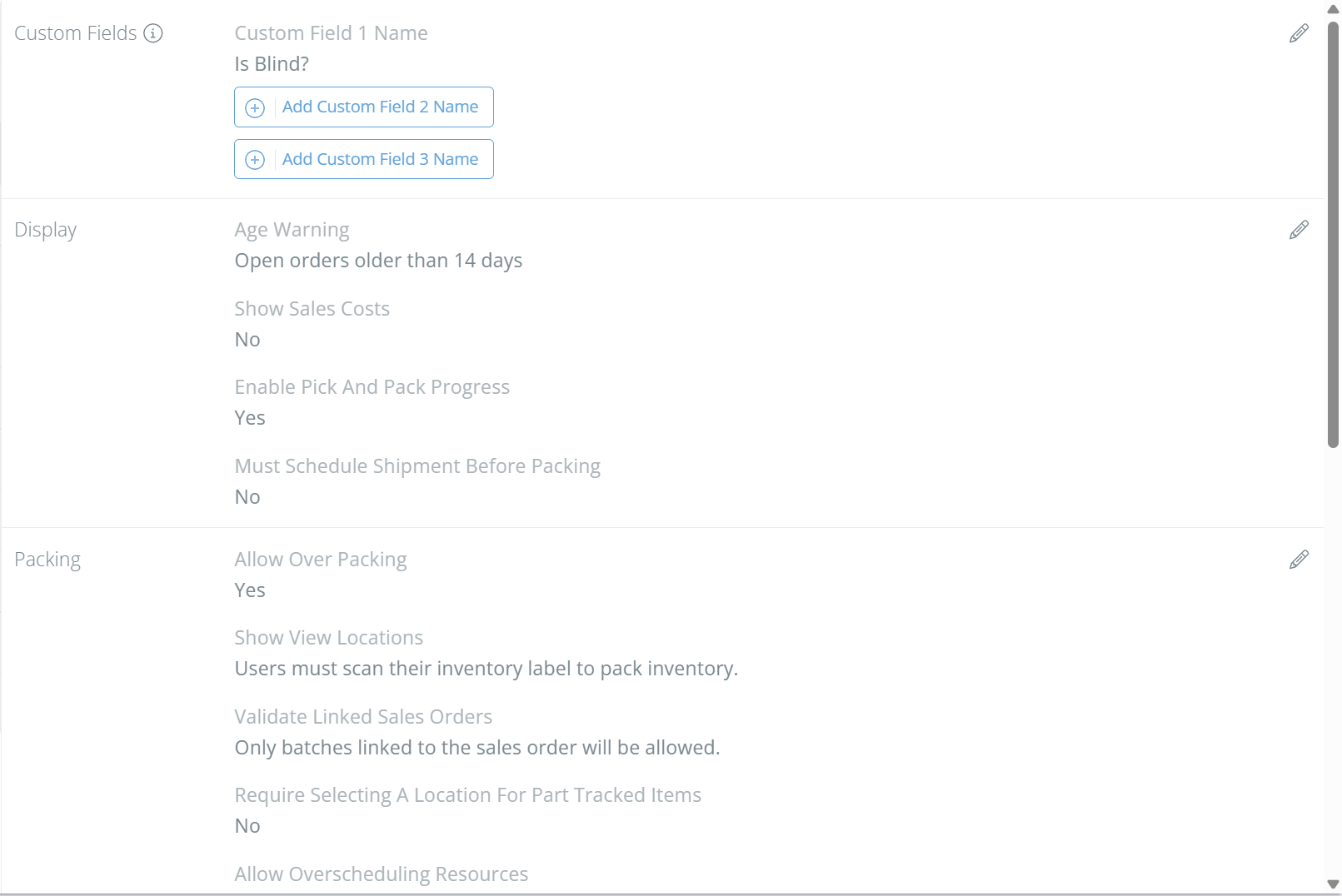
Name up to three custom fields for your sales orders, the same way as on the Receiving tab. On QuickBooks Online tenants, these names also come from QuickBooks Online and can only be changed there.
Display
- Age Warning – Open sales orders older than this number of days are highlighted. The default is 14 days.
- Private Sales Costs – Hides sales costs. The Display section shows this as "Show Sales Costs".
- Enable Pick And Pack Progress – Shows picking and packing progress on sales orders.
- Must Schedule Shipment Before Packing – When on, a shipment has to be scheduled before anyone can pack it.
Packing
- Allow Over Packing – Lets users pack more than the quantity on a sales order line.
- Show View Locations – When on, users can pack inventory by selecting it from the locations list. When off, users must scan their inventory label to pack.
- Validate Linked Sales Order – A batch linked to a sales order can only be packed on that order. For example, if a batch is linked to order #12345, it can only be packed on order #12345.
- Require Selecting A Location For Part Tracked Items – When on, users must choose a location when packing part-tracked items.
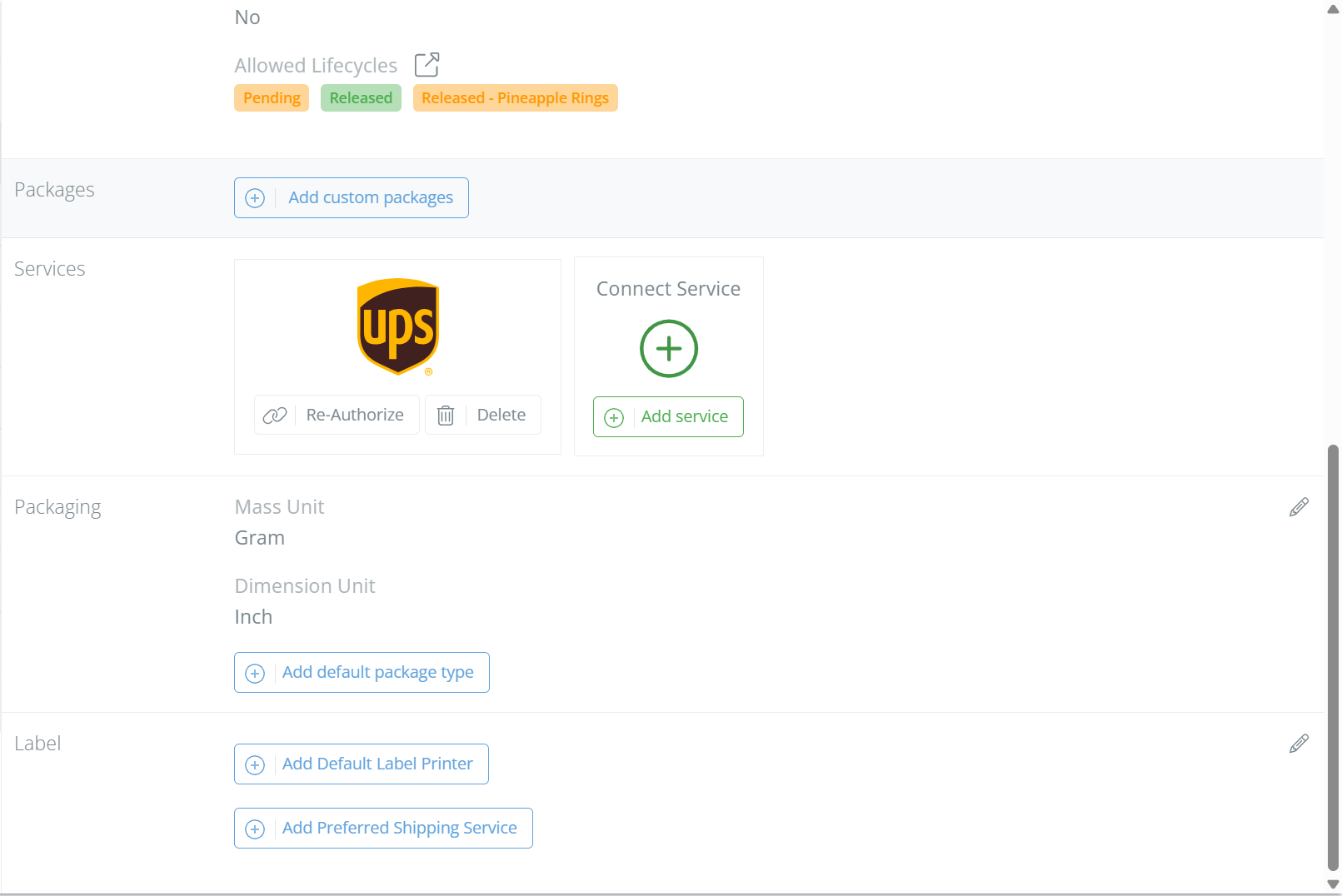
- Allow Overscheduling Resources – When on, more than one shipment can be scheduled for the same pick-up time, and DataNinja shows a warning about the overlap instead of blocking it.
- Allowed Lifecycles – The batch lifecycles (statuses) that can be shipped, such as Released. Click on the link icon next to it to manage your batch lifecycles.
Packages, Services and Packaging
- Packages – Click "Add custom packages" to save the box and package sizes you ship in.
- Services – Connect your shipping carrier accounts to get rates and print shipping labels in DataNinja. Click "Add service" to connect a carrier. On a connected carrier, click "Re-Authorize" to refresh the connection or "Delete" to remove it.
- Packaging – Choose the mass unit and dimension unit for your packages, and add a default package type.
Label
Choose the default 4x6 label printer for shipping labels and your preferred shipping service. Both are optional.
Planning
Calendar
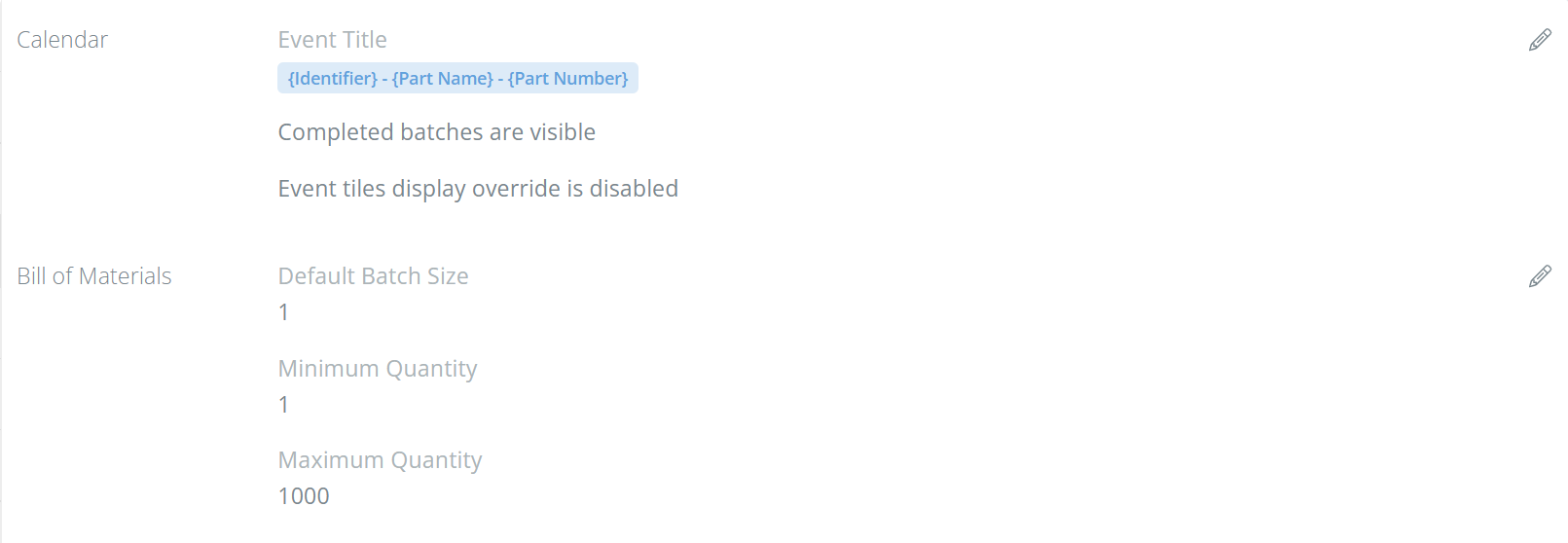
- Event Title – Builds the title of each batch on the production calendar from the fields you pick, such as {Identifier} - {Part Name} - {Part Number}. Click "Add Title Field" to add a field, or click on the trash icon on a field to remove it.
- Show Completed Batches – Shows completed batches on the calendar. When it's on, the section reads "Completed batches are visible".
- Override event tile display – Turns the event tile display override on or off.
Bill of Materials
Set the "Default Batch Size", "Minimum Quantity" and "Maximum Quantity" used for BOMs. See Bills of Materials (BOM).
Scheduling
These settings control what appears on the tiles in Advanced Scheduling. There's a separate tile layout for each view: "Work Center", "Batches" and "Assigned To".
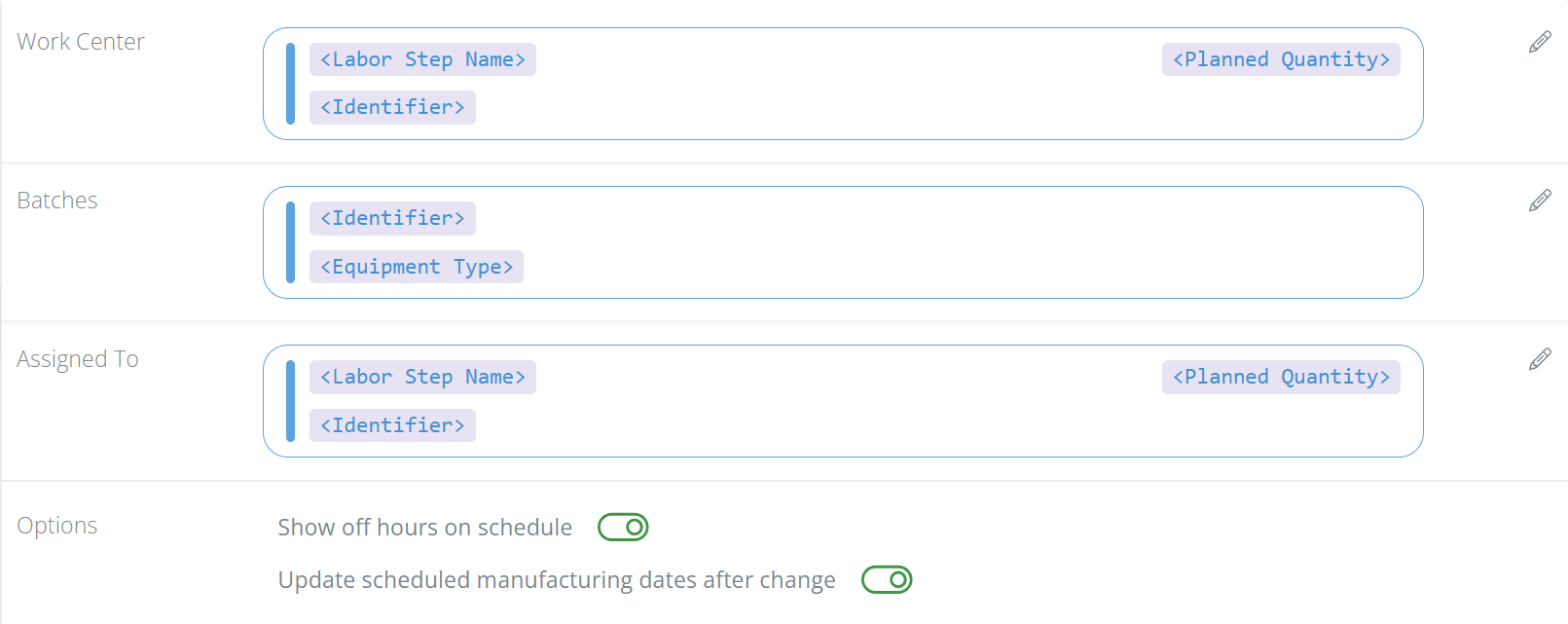
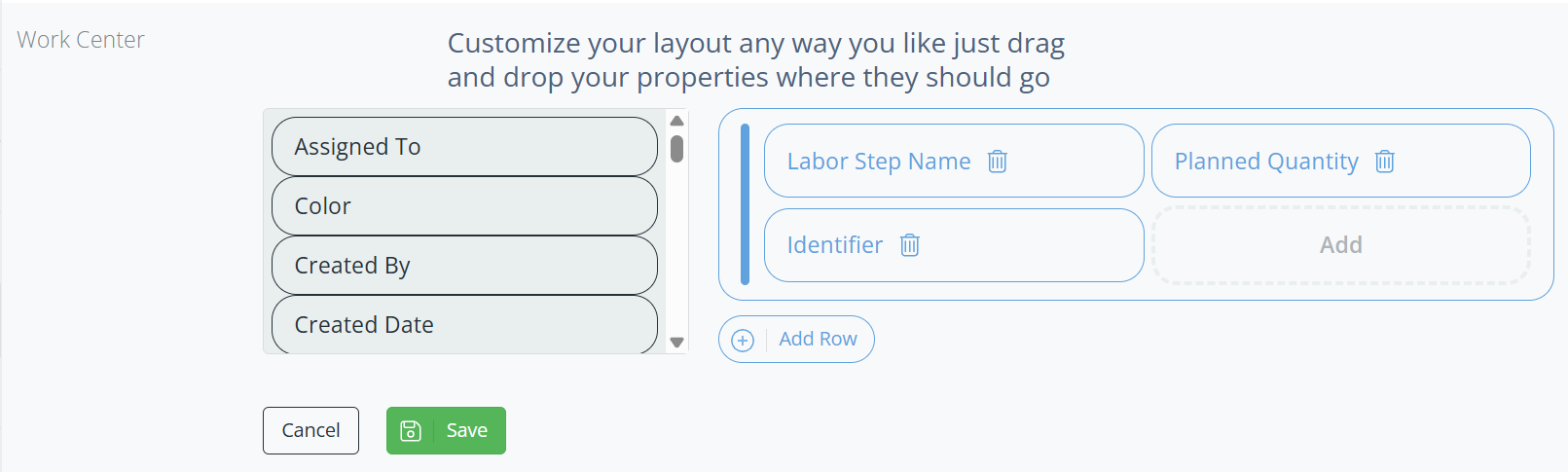
Click on the pencil icon next to a view to edit its layout. Drag properties from the list on the left onto the tile, such as Part Name, Planned Quantity, Equipment Type or Sales Order Number. Click on the trash icon to remove a property, or click "Add Row" to add a line to the tile.
Under Options:
- Show off hours on schedule – Shows hours outside your work schedule on the scheduling grid.
- Update scheduled manufacturing dates after change – When you move a batch on the schedule, its scheduled manufacturing dates are updated to match.
Cycle Count
"Default cycle count task due date" sets how many days after it's created a new cycle count task is due. Enter 0 to make tasks due the same day. The default is 1 day, and changing it doesn't affect tasks that already exist. See Warehouse Tasks.

This tab only appears when blind cycle counts are turned on for your tenant. To get started, reach out to our Implementation team.
Work Order
The Work Order tab only appears on tenants integrated with NetSuite.
NetSuite
"Import Pending Work Orders" controls whether work orders that are still pending in NetSuite are imported into DataNinja.

Manufacturing
Levels of Rigor
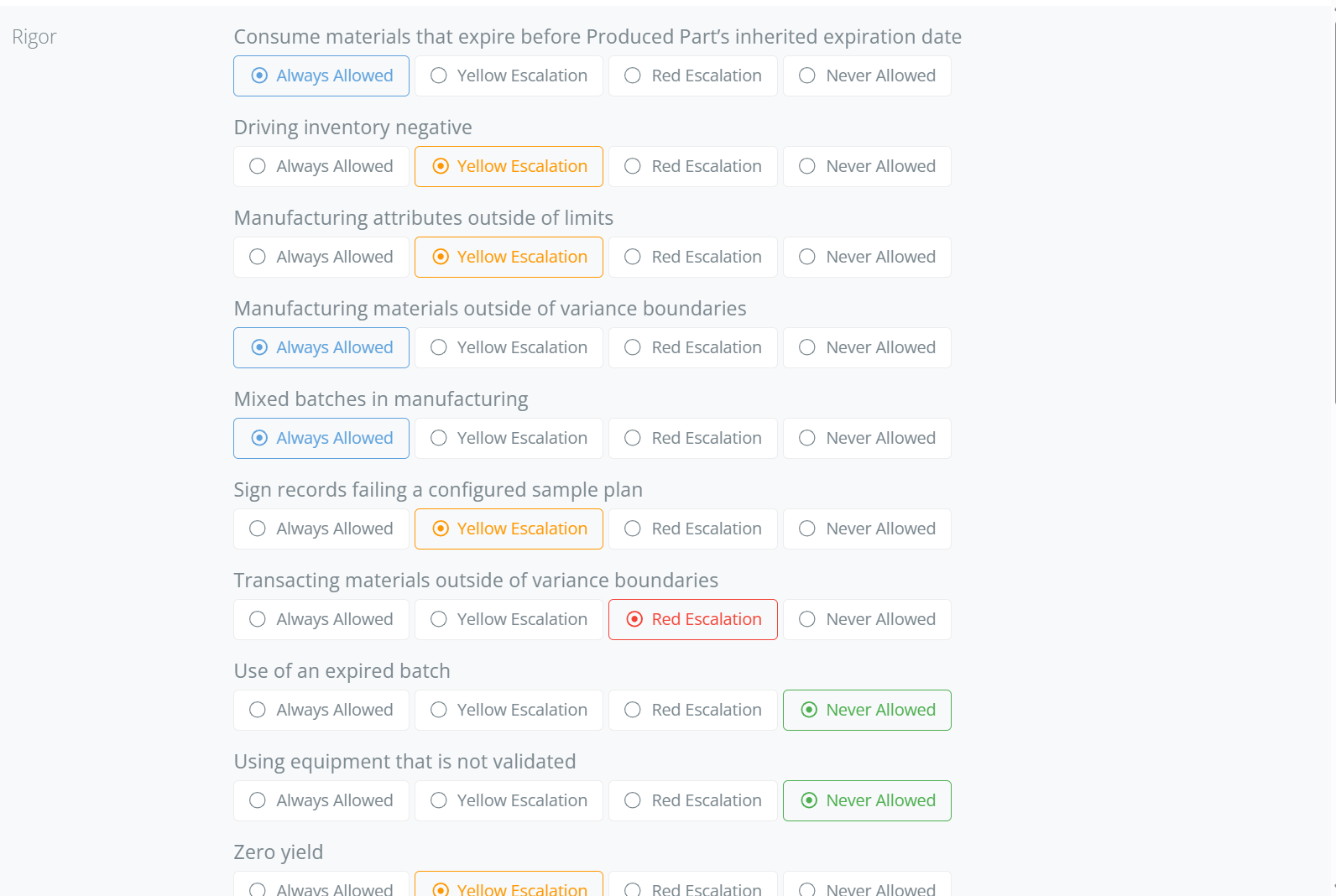
Levels of Rigor control how strictly DataNinja reacts when something goes wrong during manufacturing, such as using an expired batch or driving inventory negative. For each control, you decide whether DataNinja lets it happen, flags it for review with an escalation, or blocks it. To learn more about how these controls support quality, see Quality Control.
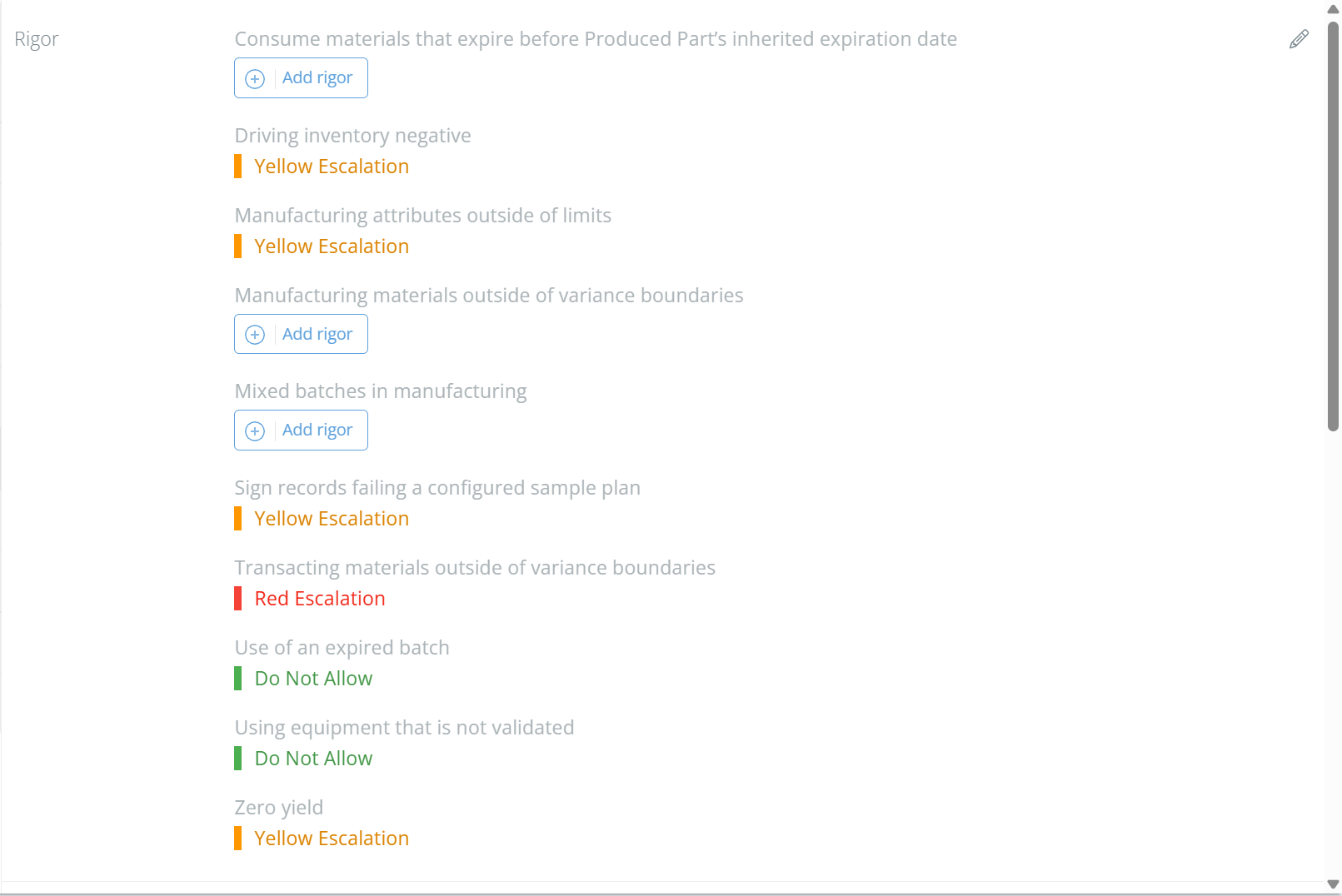
Click on the pencil icon next to Rigor to choose a level for each control:
| Level | What happens |
|---|---|
| Always Allowed | The action goes through with no escalation. Controls set to this level show an "Add rigor" button instead of a level. |
| Yellow Escalation | The action is allowed, but the manufacturing record gets an escalation that someone with the YellowEscalation role must sign. |
| Red Escalation | The action is allowed, but the record gets an escalation that someone with the RedEscalation role must sign. |
| Never Allowed | DataNinja blocks the action. Controls set to this level show Do Not Allow. |
How Escalations Work
When an operator does something that a control is set to escalate, DataNinja shows an "Escalation Triggered!" message with the reason, and the operator clicks "I understand" to continue. When they sign the manufacturing approval, the signing panel lists the escalation reasons. Signing adds a separate yellow or red escalation step to the record, and the record can't be completed until a user with the matching escalation role signs it. The record's escalation reasons stay visible on the manufacturing record.
To let someone sign escalations, give them the YellowEscalation or RedEscalation role in User Management.
Controls
| Control | When it triggers |
|---|---|
| Consume materials that expire before Produced Part's inherited expiration date | A material being consumed expires before the expiration date the produced batch will inherit. |
| Driving inventory negative | A transaction would take a batch's inventory below zero. |
| Manufacturing attributes outside of limits | A recorded manufacturing attribute is outside its configured limits. |
| Manufacturing materials outside of variance boundaries | The produced quantity is outside the "Produced Quantity Variance" range (see Variance below). |
| Mixed batches in manufacturing | More than one batch of the same material is used for a required part. |
| Sign records failing a configured sample plan | A record is signed while it fails its configured sampling plan. |
| Transacting materials outside of variance boundaries | A consumed material's quantity is outside the "Utilized Part Variance" range (see Variance below). |
| Use of an expired batch | An expired batch is consumed. |
| Using equipment that is not validated | Equipment that isn't validated is used on the record. |
| Zero yield | A record is signed with nothing produced. |
Variance
Variance settings define the acceptable range for production and consumption, as a percentage of what's planned. Each one has its own toggle and a "Lower %" and "Upper %" value.
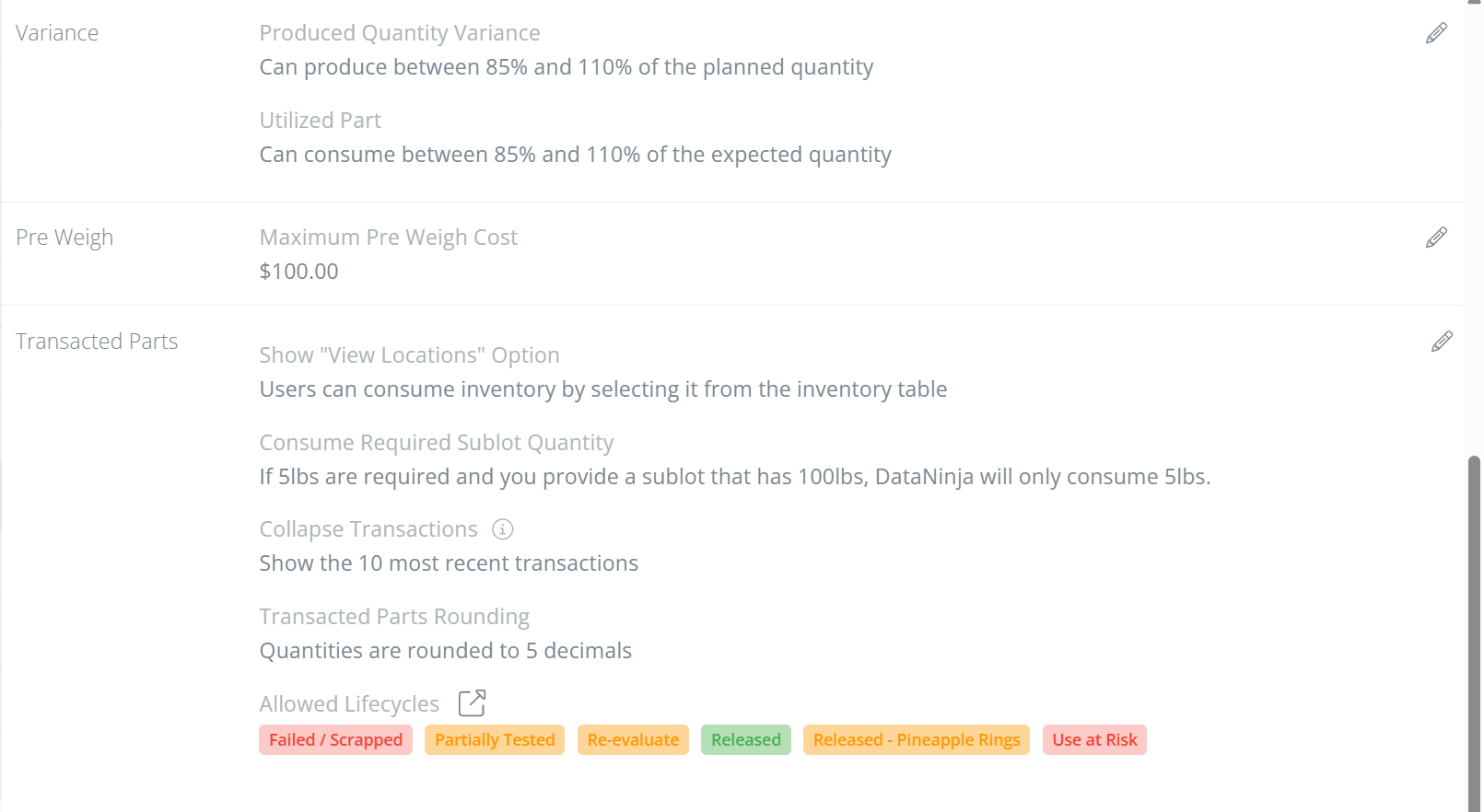
- Produced Quantity Variance – If you plan to produce 100 lbs and the range is 85% to 110%, producing anywhere from 85 lbs to 110 lbs won't cause an escalation. Outside that range, the "Manufacturing materials outside of variance boundaries" control applies.
- Utilized Part Variance – If you expect to consume 100 lbs of a material and the range is 85% to 110%, consuming anywhere from 85 lbs to 110 lbs won't cause an escalation. Outside that range, the "Transacting materials outside of variance boundaries" control applies.
Pre Weigh
"Maximum Pre Weigh Cost" is a hard stop: DataNinja won't allow a pre weigh that costs more than this amount. The cost comes from the material's unit cost, so tenants with no financial system integration need a standard cost on their parts. See Pre-Weigh.
Transacted Parts
- Show View Locations – When on, users can consume inventory by selecting it from the inventory table instead of scanning it.
- Consume Entire Sublot – When off, DataNinja only consumes the quantity still required. For example, if 5 lbs are required and you scan a sublot that has 100 lbs, DataNinja consumes 5 lbs. When on, it consumes the whole sublot.
- Collapse Transactions – Shows only the most recent transactions on a manufacturing record (10 by default). The other transactions still exist; expand the list to see them all.
- Transacted Parts Rounding – The number of decimal places that consumed quantities are rounded to. The edit form shows a preview, such as 5,063.123456789 kg rounded to 5,063.12346 kg at 5 decimals.
- Allowed Lifecycles – The batch lifecycles (statuses) that can be consumed in manufacturing, such as Released or Use at Risk. Click on the link icon next to it to manage your batch lifecycles.
Advanced

- Use gross net tare – Turns on gross, net and tare weights in manufacturing.
- Expand the picking section by default – The picking section on a manufacturing record opens expanded.
- Expand the pre weigh section by default – The Pre Weigh section on a manufacturing record opens expanded. This works the same way as the picking section.
- Show the sublot image before consuming material – Shows the sublot's image before material is consumed.
Picking
Picking settings are set separately for manufacturing picks and shipping picks. See Wave Picking for how picking works.
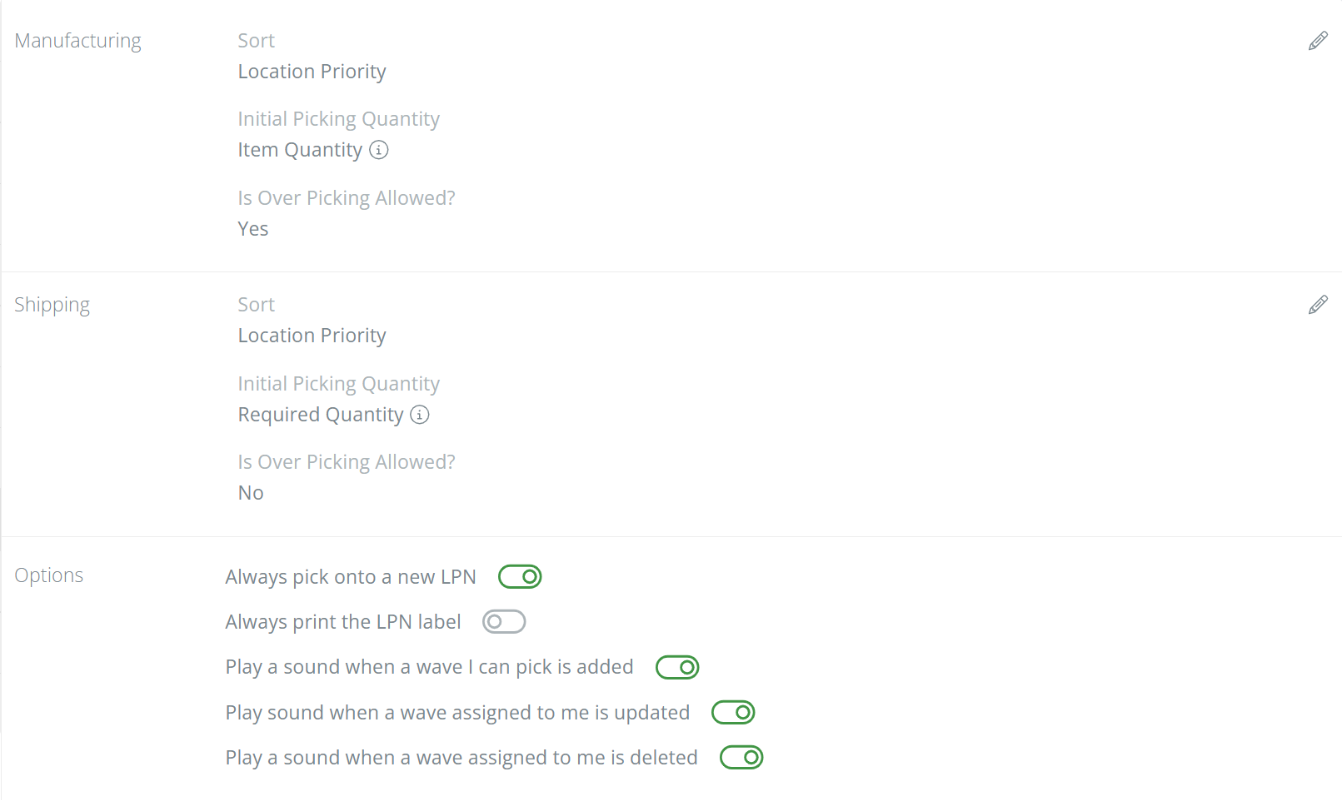
- Sort – The order materials appear in pick requests: Location Priority or Part Number.
- Initial Picking Quantity – The quantity DataNinja fills in when a user picks:
- Item Quantity – The whole quantity in the scanned container. If you need to pick 150 lbs and choose a box that has 255 lbs, DataNinja expects you to use all 255 lbs.
- Required Quantity – Only what's still needed. If you need 150 lbs and choose a box that has 255 lbs, DataNinja expects you to use only 150 lbs.
- None – No quantity is filled in.
- Allow Over Picking – Lets users pick more than requested. Over picking must be allowed when the initial picking quantity is set to Item Quantity.
Under Options, you can choose to always pick onto a new license plate (LPN), always print the LPN label, and play a sound when a wave you can pick is added, or when a wave assigned to you is updated or deleted. See License Plates.
Finance
The Finance tab connects DataNinja to your financial system. What you see here depends on your integration. To connect QuickBooks Online, see Connecting with QuickBooks Online.
QuickBooks Online
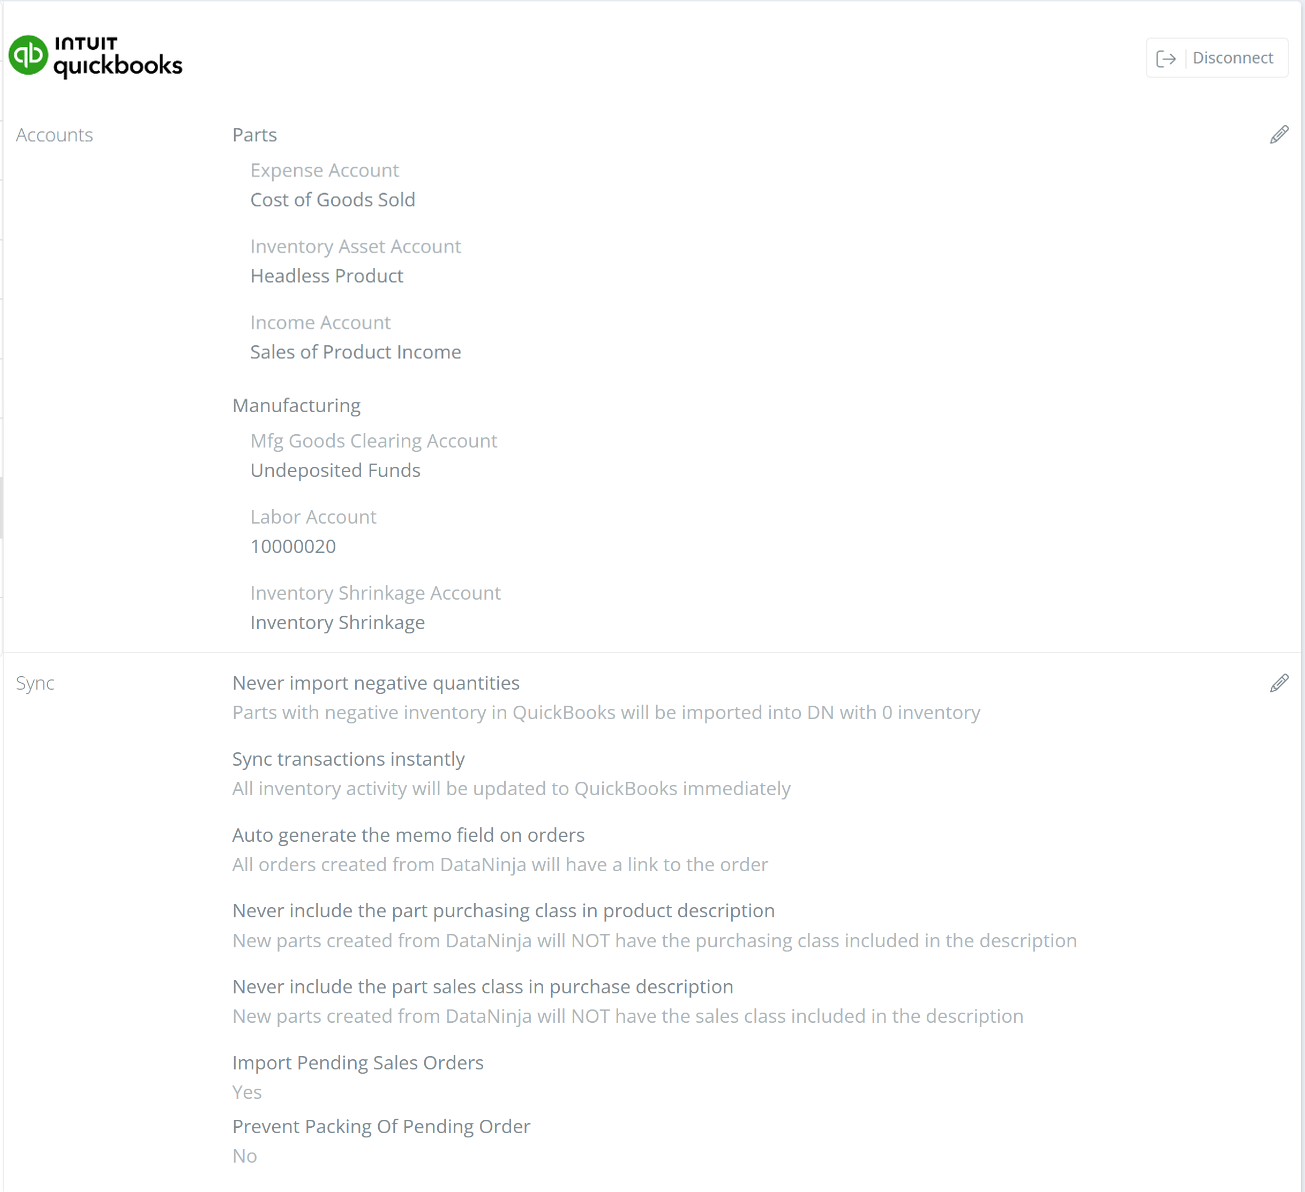
- Accounts – The default QuickBooks Online accounts DataNinja uses. Under Parts, these are the "Expense Account", "Inventory Asset Account" and "Income Account". Under Manufacturing, they're the "Mfg Goods Clearing Account", "Labor Account" and "Inventory Shrinkage Account". Click on the pencil icon to change them.
- Sync – Click on the pencil icon to change how DataNinja syncs with QuickBooks Online:
- Import Negative Quantities – When off, parts with negative inventory in QuickBooks Online are imported into DataNinja with 0 inventory.
- Batch inventory transactions nightly – When off, all inventory activity is sent to QuickBooks Online right away. When on, it's sent in a nightly batch.
- Auto Generate Memos – Orders created from DataNinja get a link to the order in their memo field.
- Include Purchasing Class and Include Sales Class – Adds the part's purchasing or sales class to the descriptions of new parts created from DataNinja.
- Import Pending Sales Orders – Imports pending sales orders from QuickBooks Online.
- Prevent Packing Of Pending Orders – When on, pending orders can't be packed.
NetSuite
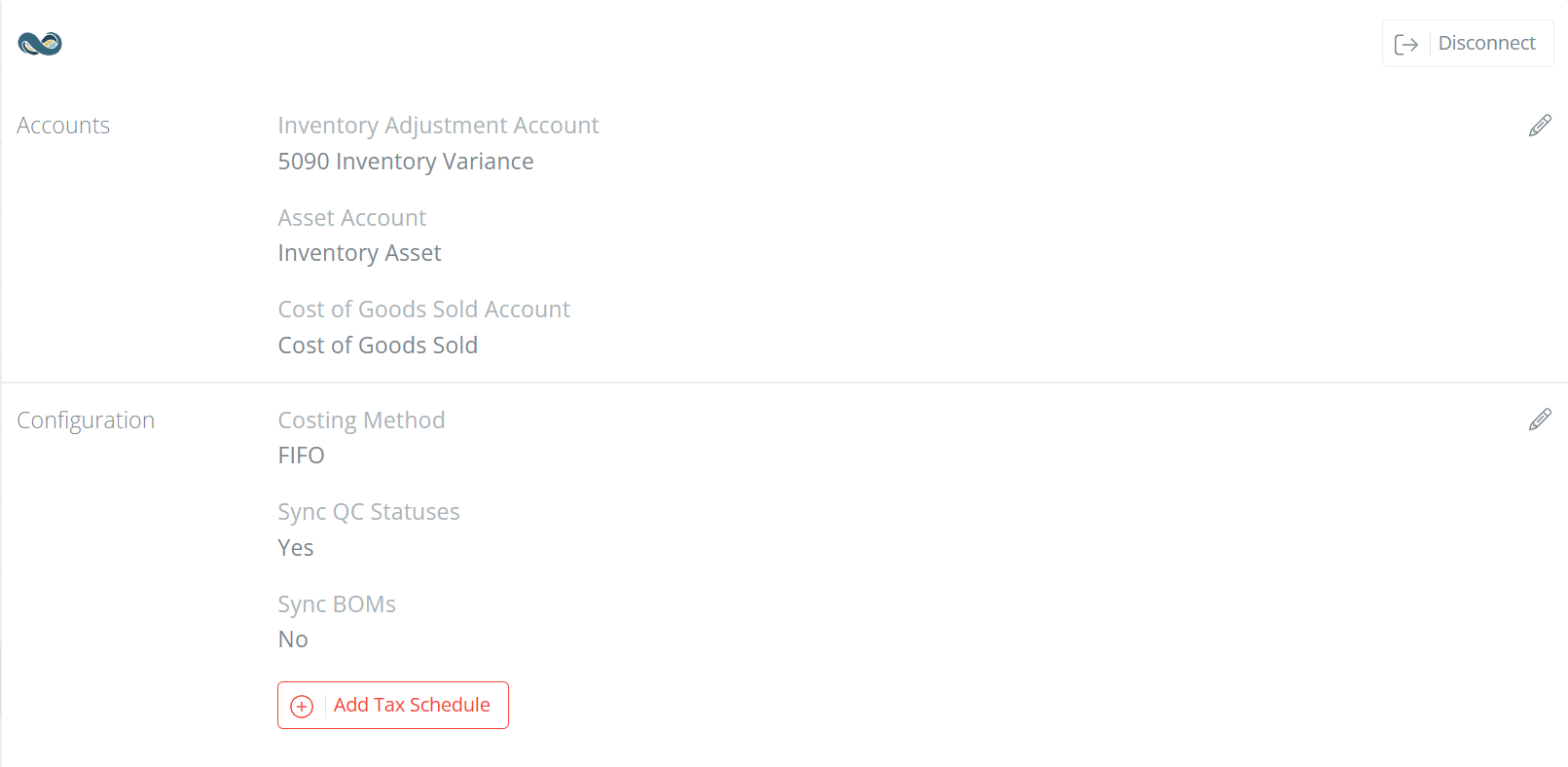
- Accounts – The "Inventory Adjustment Account", "Asset Account" and "Cost of Goods Sold Account" DataNinja uses when it sends transactions to NetSuite.
- Costing Method – FIFO, Average or Standard.
- Sync QC Statuses – Sends batch lifecycle (QC status) changes to NetSuite.
- Sync BOMs – When set to Yes, BOMs are pushed to NetSuite when they're released, and BOM imports from NetSuite are skipped. When set to No, BOMs are created in NetSuite and synced into DataNinja. See Bills of Materials (BOM).
- Tax Schedule – The tax schedule used for records DataNinja creates in NetSuite.
Click "Disconnect" in the top right only if you mean to stop syncing with your financial system.
E-commerce
The E-commerce tab lists other apps DataNinja can connect to, such as Square and Salesforce. Before connecting one, reach out to our Implementation team so they can confirm what will sync.
Advanced
Identifier
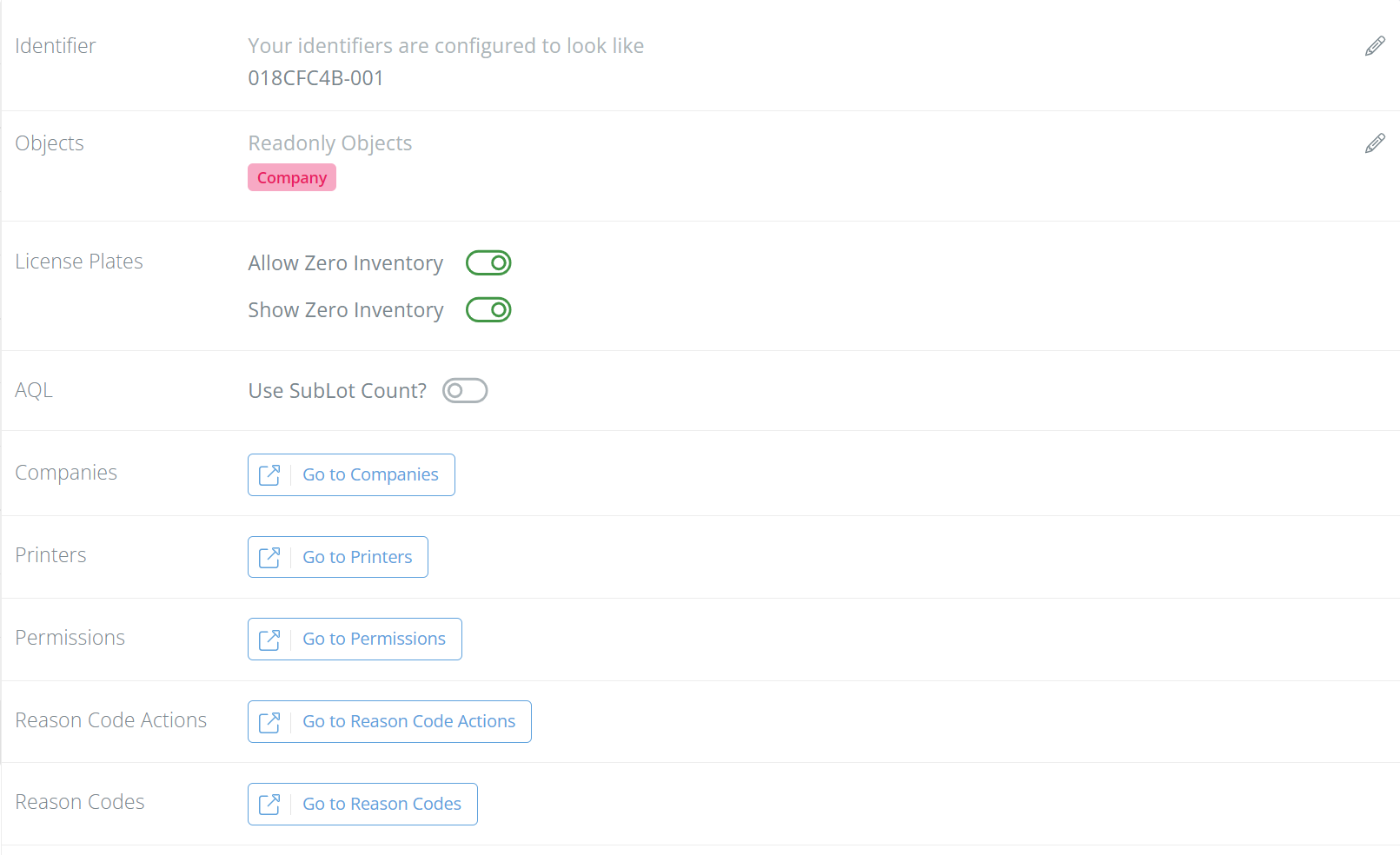
Sets the format of the identifiers DataNinja creates for batches and sublots (see Inventory Barcoding). The "Prefix" length sets how many unique batch identifiers are possible, and the "Suffix" length sets how many sublots one batch can have. For example, an 8-character prefix allows about 4.3 billion identifiers, and a 3-digit suffix allows 999 sublots per batch. The edit form shows a preview, such as 018CFC4B-001.
Read-Only Objects
Choose the types of records that can't be created or edited in DataNinja, such as Company, Part or Vendor. This is usually used for records that your financial system manages.
License Plates
- Allow Zero Inventory – Lets a license plate stay in use with no inventory on it.
- Show Zero Inventory – Shows license plates that have no inventory.
AQL
"Use SubLot Count?" bases the AQL lot size on the number of sublots received (for example, 100 drums) instead of the total quantity (for example, 2,800 kg). See Acceptable Quality Limit.
Related Pages
The bottom of the Advanced tab links to the Companies, Printers, Permissions, Reason Code Actions and Reason Codes pages. See Printers, Permissions, Reason Code Actions and Reason Codes.
Updated 13 days ago