Manufacturing
High-Level steps to complete an electronic manufacturing record in DataNinja.
Before BeginningBefore following these steps you need to have a BOM version configured, released and to have scheduled production.
1. Production Plan
Open the Production Calendar by clicking on the "Production Plan" tab on the left side of the screen.

2. Open the Manufacturing Record
Click on the scheduled batch calendar "colored dot" then click on the identifier (Lot Number) to open the record.

3. Execute!
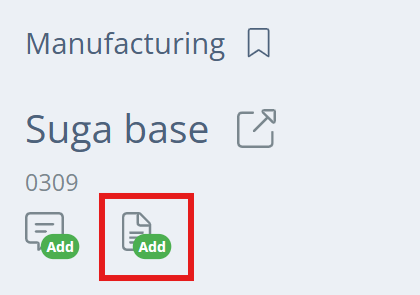
Reference documents can be added as attachments by clicking on the icon of a paper with a folded corner.
Produced Batch Information
This section contains header details about the lot getting produced, as well as links to reference documents attached to the BOM Version or BOM Part, Date of Expiration, Planned Quantity, and more. Aside from the BOM version, Batch Status, and Work Order fields, all fields can be updated.

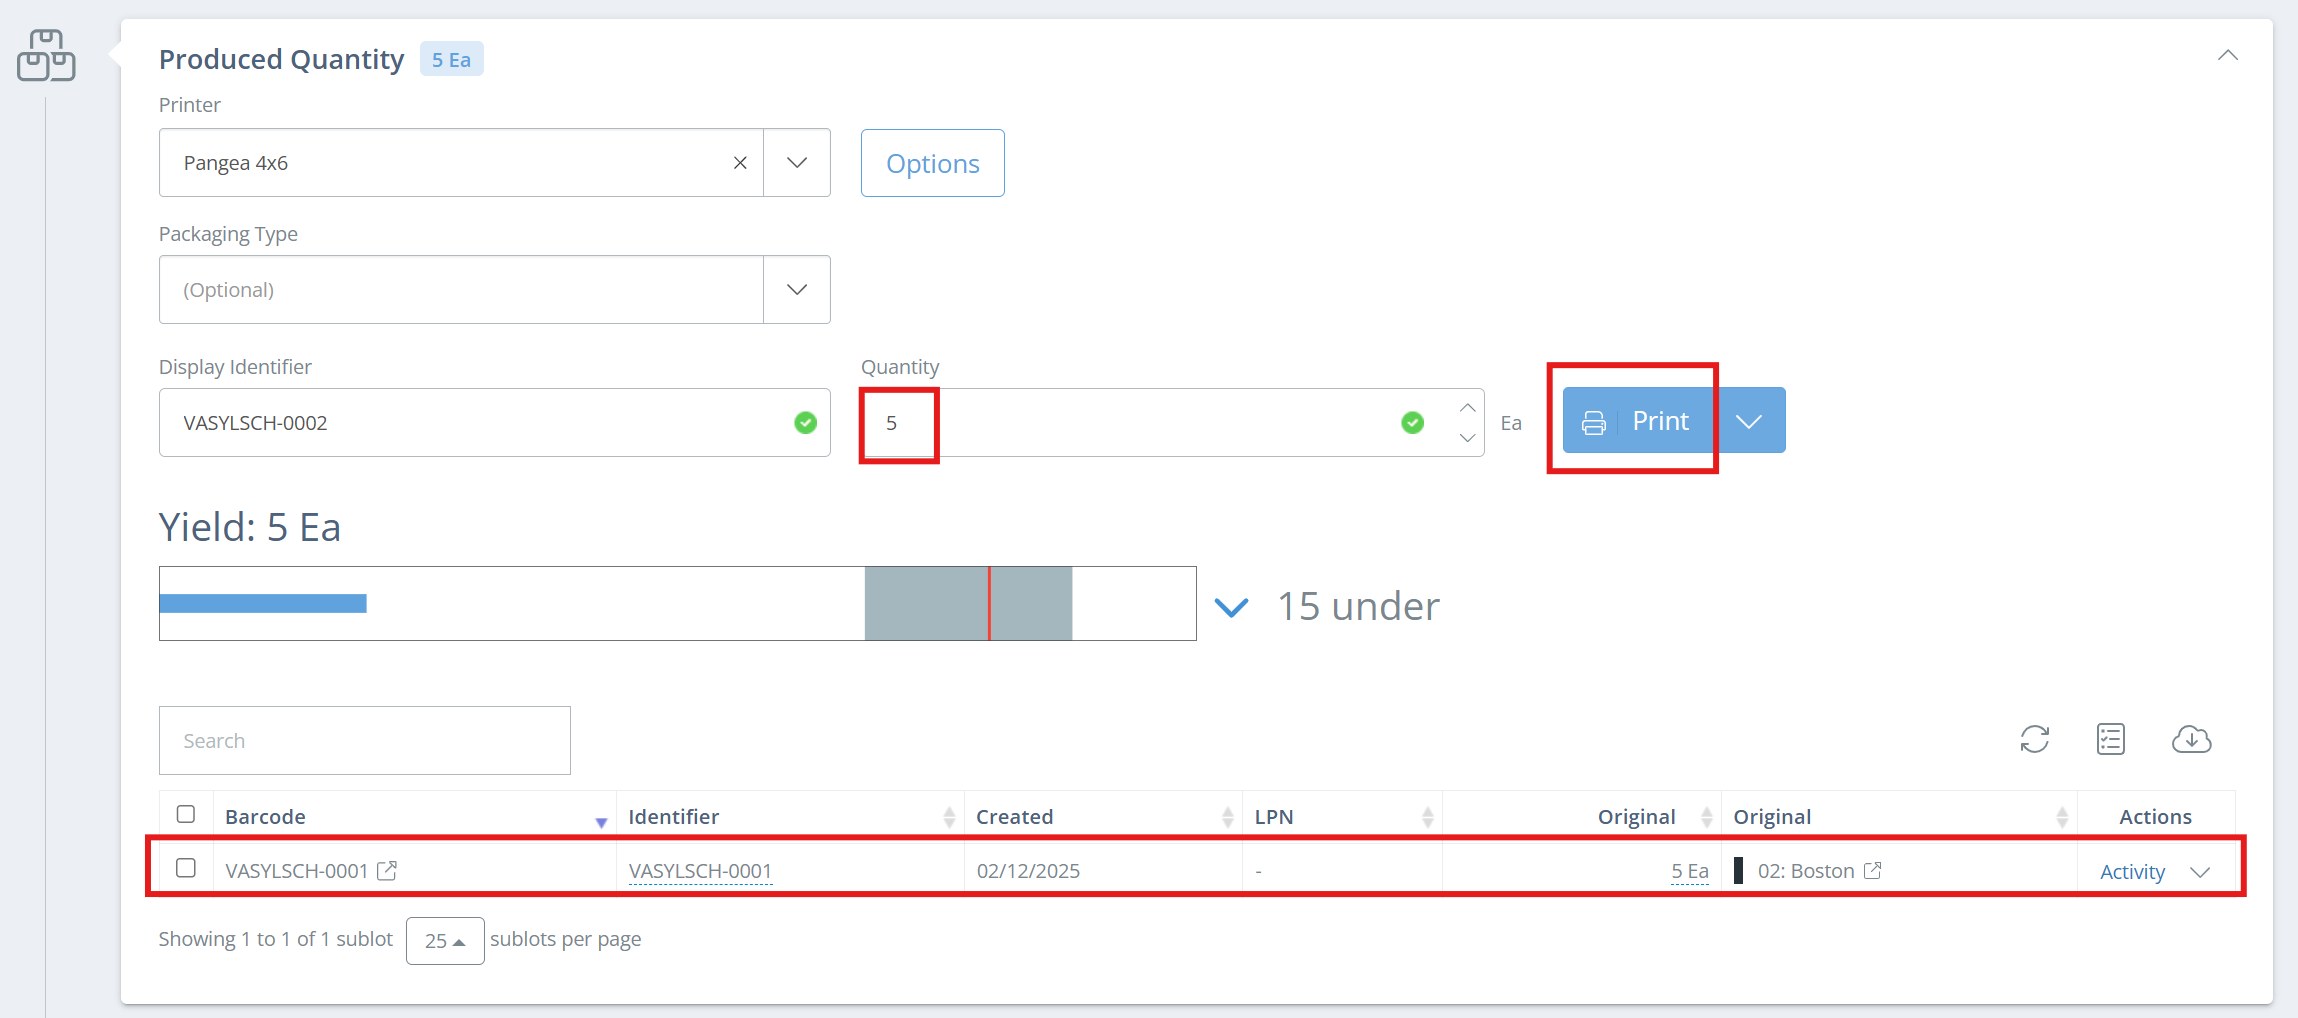
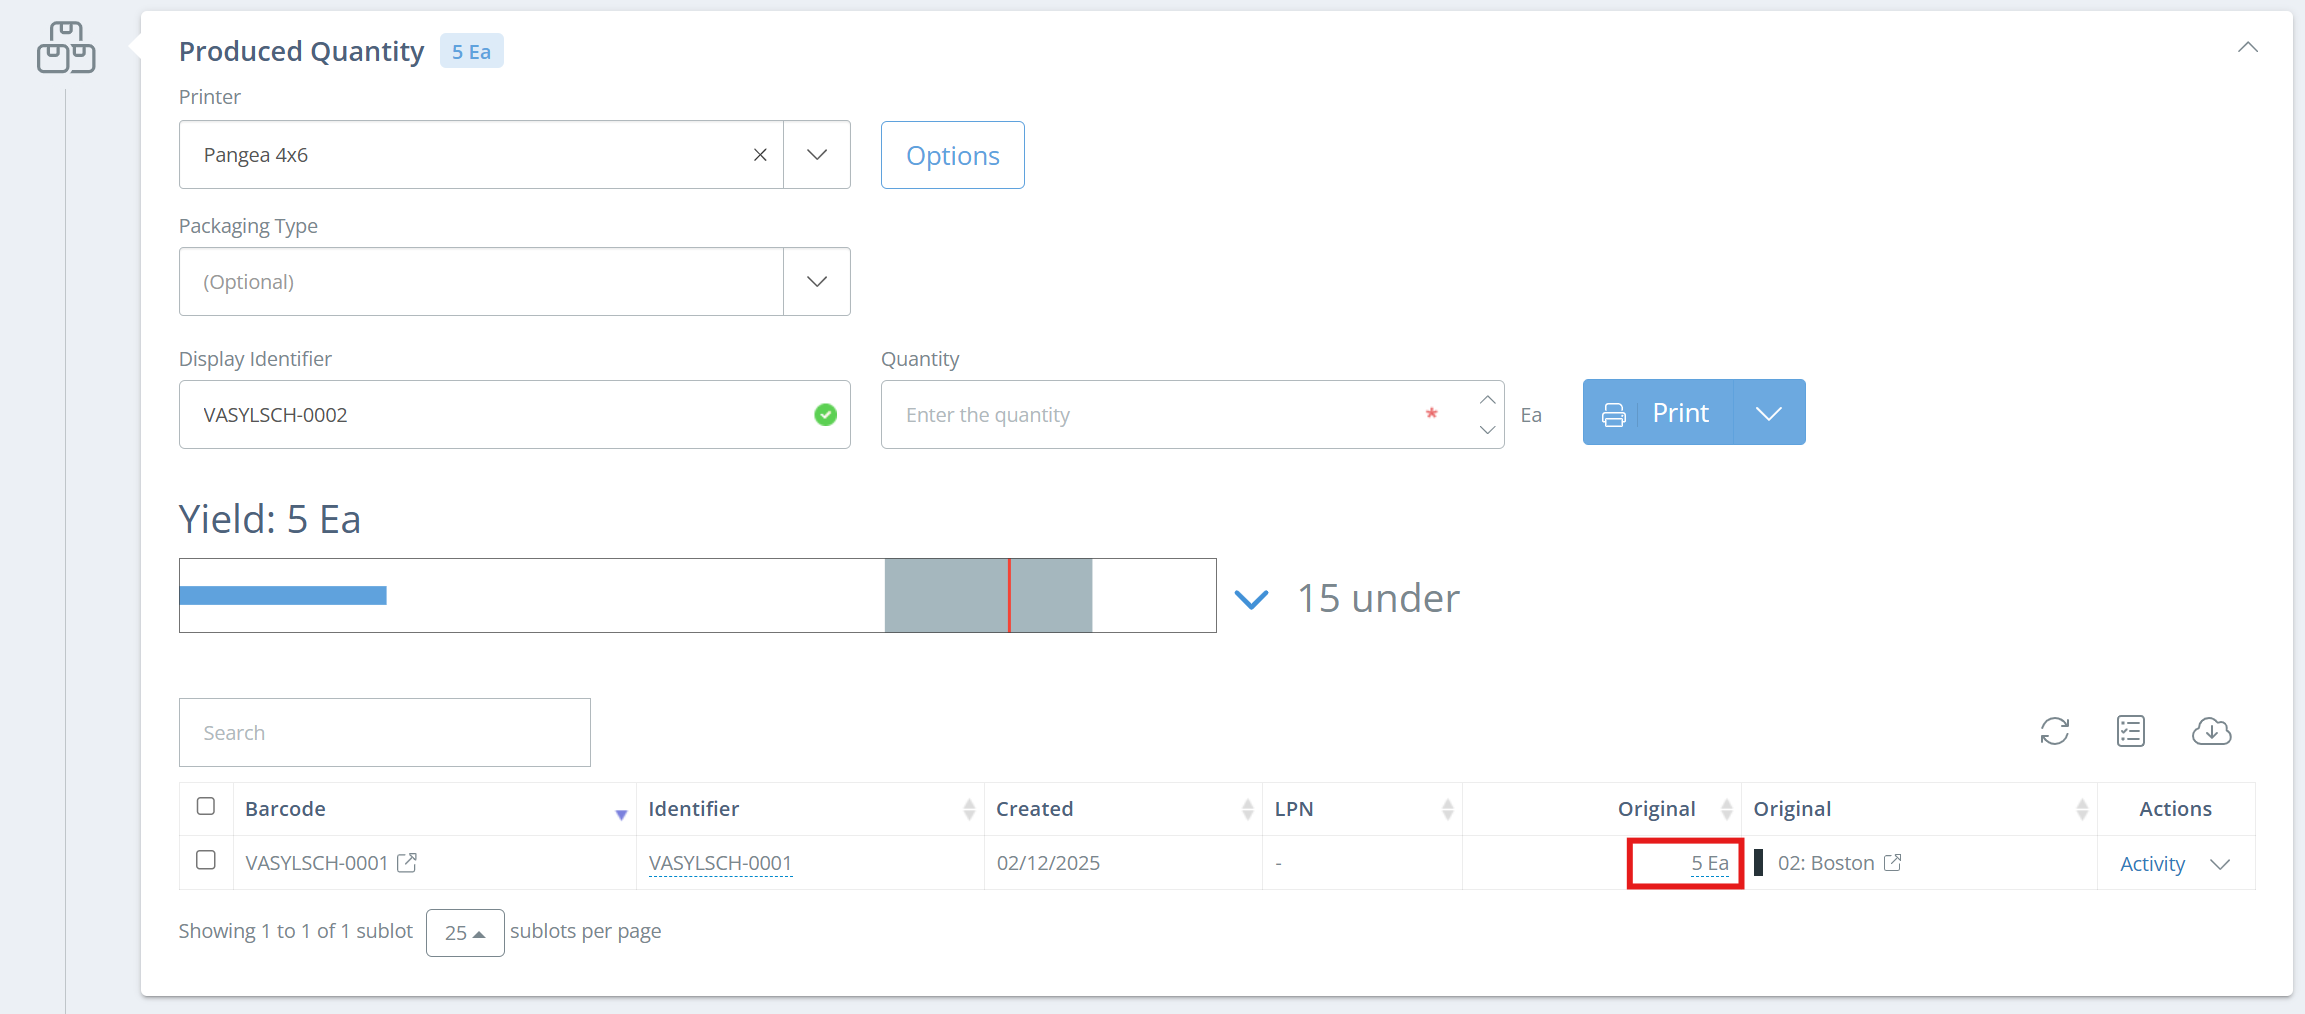
Produced Quantity
Batch yield is recorded in the Produced Quantity section via printing barcodes for the manufactured inventory. You can print one or multiple labels at once, but quantity on labels must be the same if printing multiple. To do one at a time enter your yield quantity and click the blue print button; this will queue a label to be printed later with the specified quantity. Use the "Options" button next to the "Printer" field to set an Into Location or add a License Plate to the label.
Weighing QuantityIf you want to use a scale to weigh the quantity for the label click on "Options" next to the "Printer" field, then select "Use scale for quantities" and select the scale you want to use in the "Scale" field.
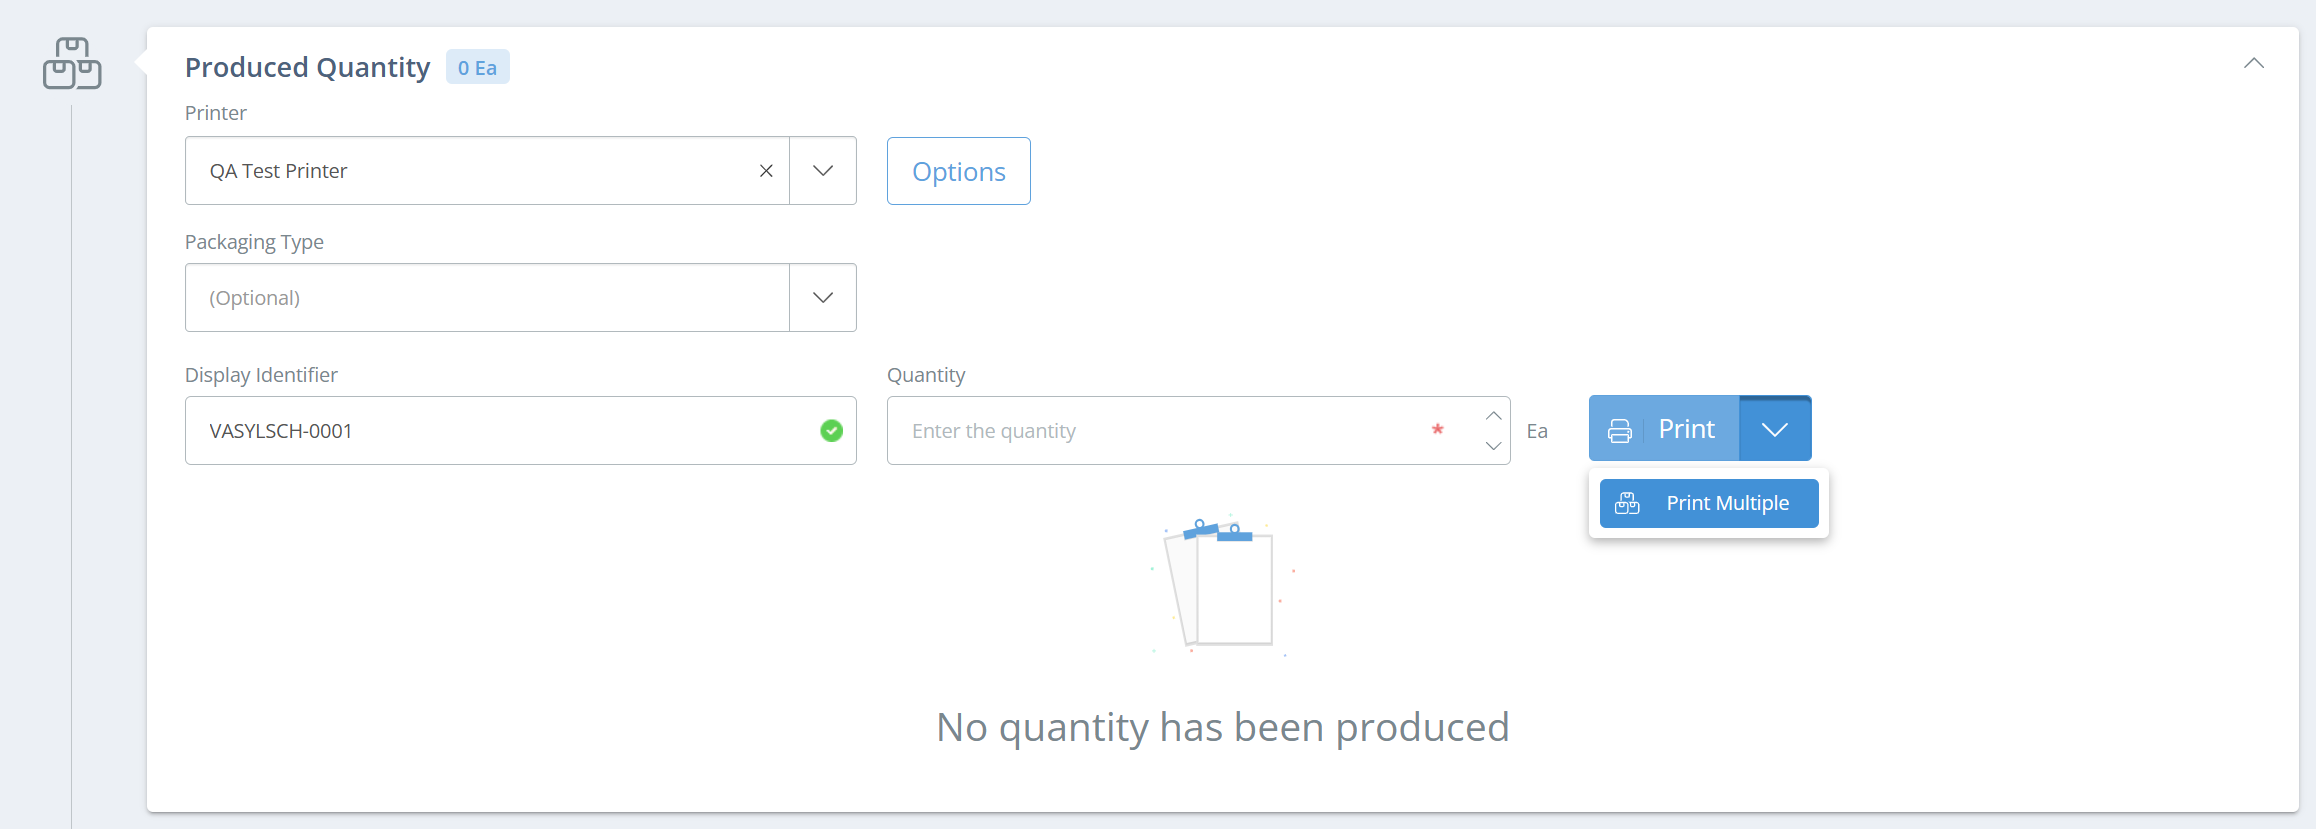
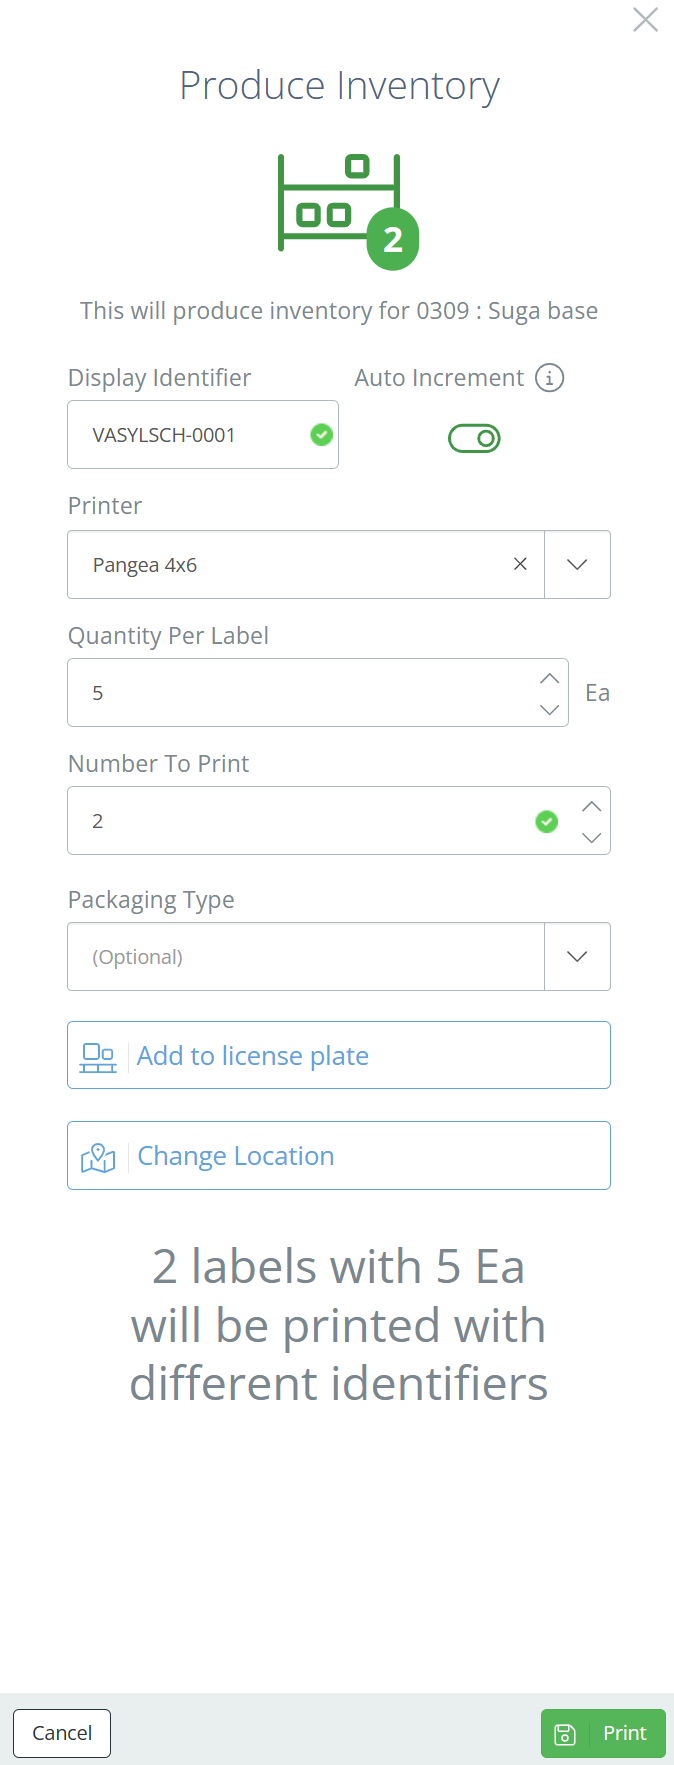
To print multiple labels, click the arrow next to "Print" and select "Print Multiple". This action will display a new side window in which you need to enter the quantity per label, how many labels, and click print. This will auto-increase your yield quantity (number of printed labels times quantity per label equals yield). Within this window, you can also change the printer, assign a License Plate for the printed labels, and change the "Into Location". The "Auto Increment" button in ON by default, as it will add an incrementing number to the end of the identifier for each label that will print.
When Choosing a PrinterOnly printers with the corresponding label template for manufacturing will show in this section, so if the printer you are looking for is not showing up, double check that a manufacturing label template has been selected for the printer. See View Label Templates section for how to check the label templates assigned to a printer.
Something to take into consideration is that the License Plate displayed will be related to as many labels as you print. For better practices, DataNinja suggests one License Plate per pallet.
Edit Produced Quantity DataNinja allows you to easily correct your produced quantities; to do so, go to the barcode line that you need to edit and click on the quantity. This will open an dialog box where you will enter the new quantity and hit "OK" to save the new quantity.

Re-print Produced Labels When there is the need to reprint labels due to damage, changes, or for other reasons, you have the option to either print multiple or one at a time.
To print multiple, mark the checkbox for each one you want to print, then click "Batch Actions" and "Print Batch Label" (you can also print the License Plate label if you associated a LPN with each selected identifier). A new sidebar window will open, where you can select which printer to print from, and how many labels to print per batch (each line with a unique identifier is a batch). Click "Print" to save.
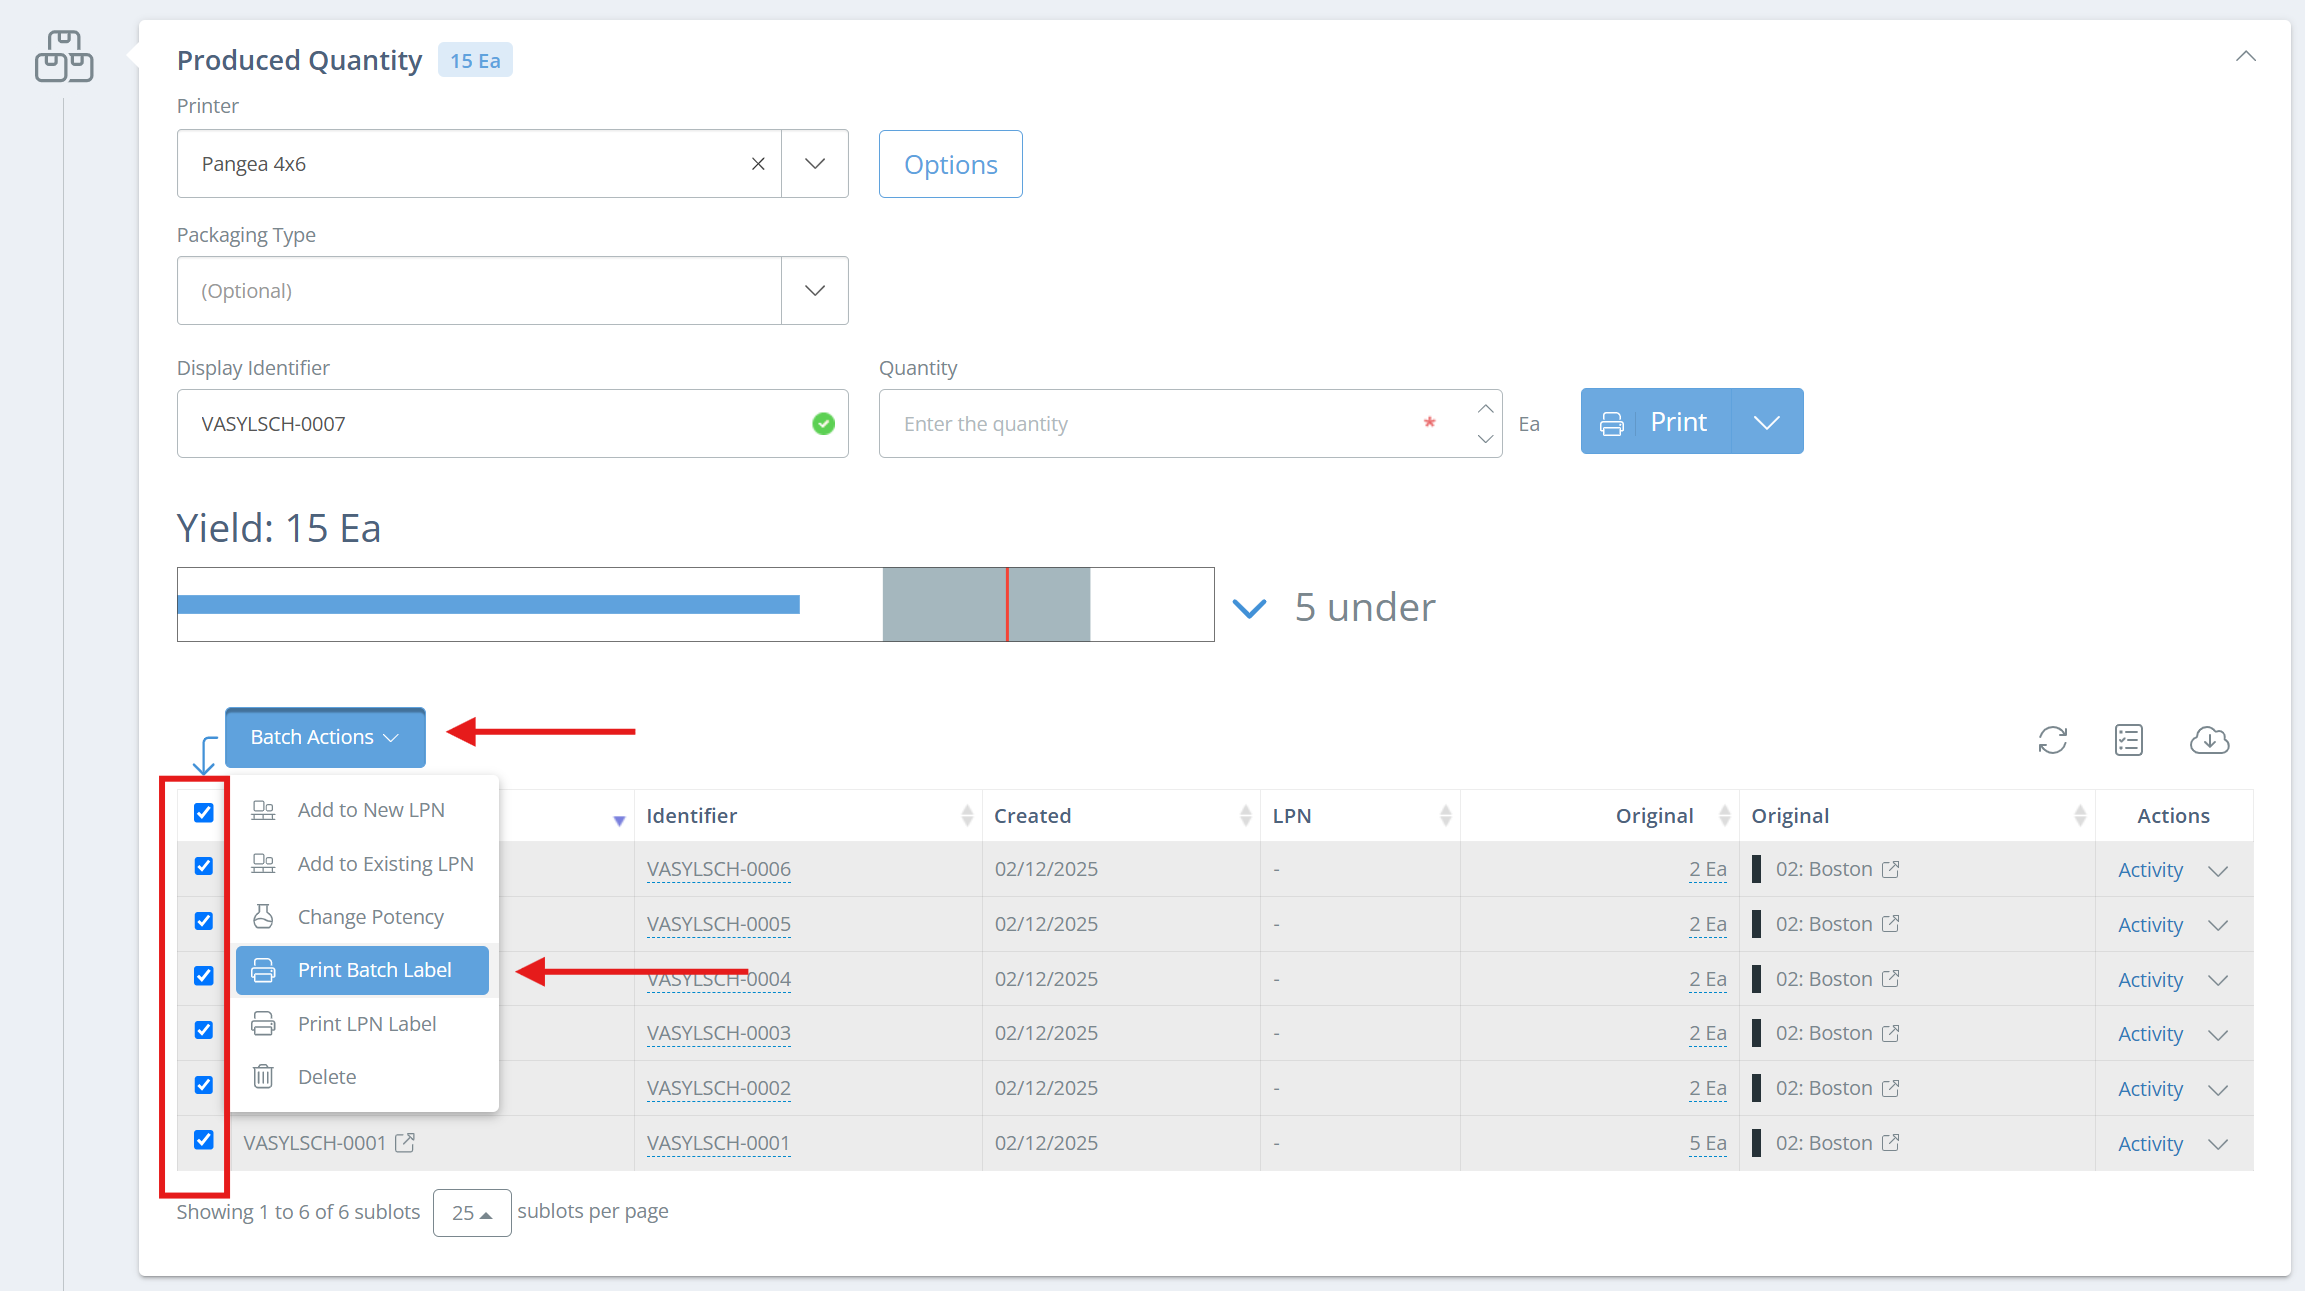
To re-print an individual label, go to the "Actions" column and click the down arrow next to "Activity", then select the "Print Label" option. A new sidebar window will open, where you can select which printer to print from, and how many labels to print.

Picking
Not all companies have electronic picking enabled. If your company does not have it enabled, but would like to have it, reach out to our Implementation team over chat to get started.
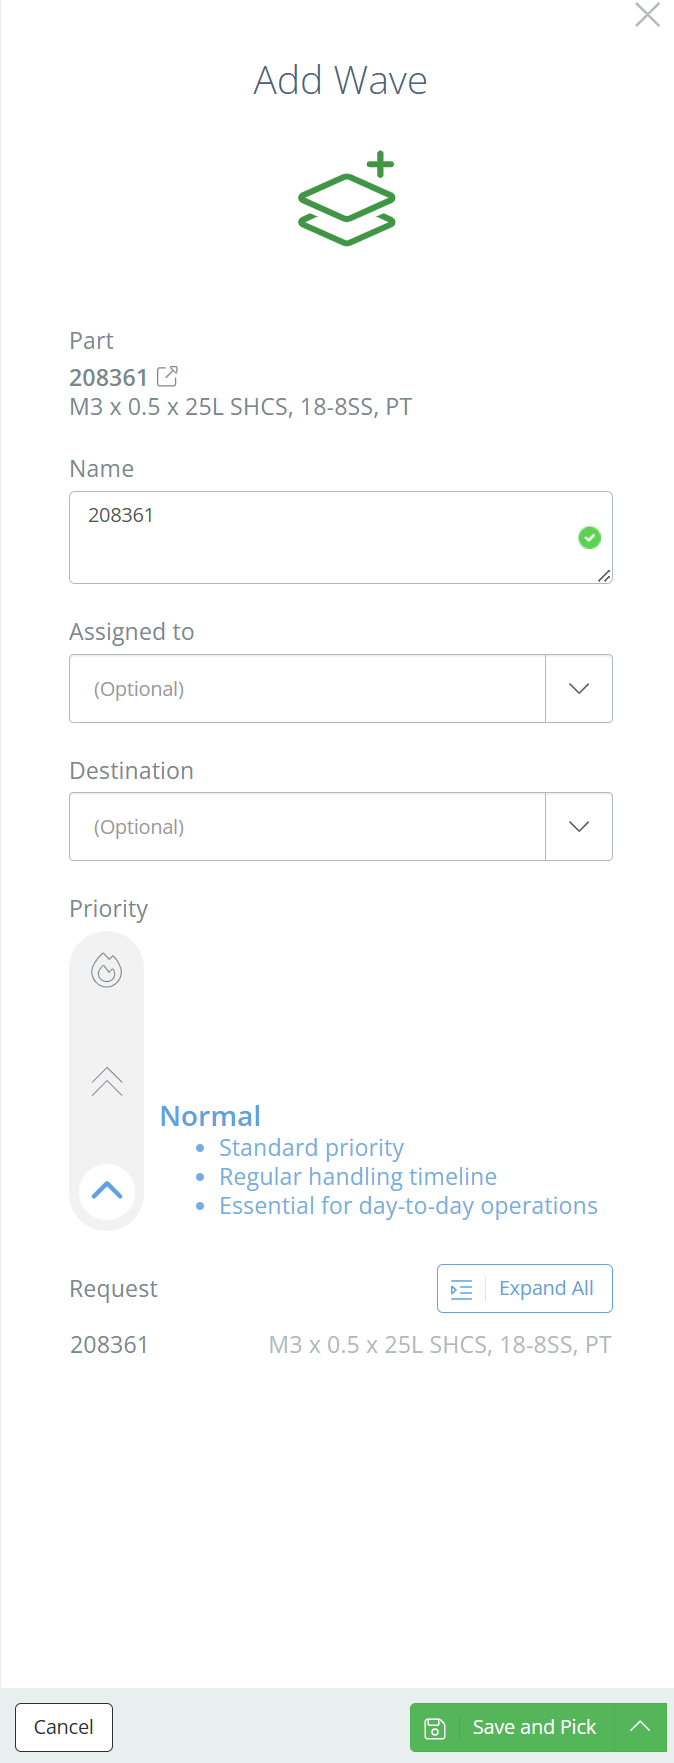
This is where you will select inventory that will be consumed during production. All required parts will be listed in this section, along with any associated process steps and operations. To begin picking, click "Create wave".

This will open a sidebar on the page where you will select a name for the wave (or leave it as the default, which is the name of the part being picked), and select a priority. Normal priority is the default, with standard handling time, but you can increase it to High or Urgent priority if the wave needs to be handled faster. You also have the option to assign the wave to a specific individual or location. Once all information is filled out, click "Save and Pick" or "Save and Close" (click the arrow next to "Save and Pick" to find this option).
If you clicked "Save and Close" then a pick request will be saved in DataNinja and can be fulfilled at any time. The pick request will show on the "Picking" page, which can be accessed by clicking on the "Picking" tab in the lefthand sidebar.
If you clicked "Save and Pick", you will immediately begin the picking process. See our Wave Picking page for specifics on the picking process.
Over-pickingDepending on your company settings, DataNinja allows you to over-pick on waves. To turn over-picking on/off, click the gear icon in the top right, and go to Company Settings. Then click the Picking settings tab, and edit "Is Over Picking Allowed?" for both Manufacturing and Shipping.
Transacted Parts Information
This section is for recording inputs. There are multiple ways to enter utilized materials:

Scan Material (Recommended)
Scan the barcodes on the labels of the materials getting used and the system will automatically allocate and transfer the inventory from the scanned barcode to the MFG record it's getting scanned to. Depending on your company settings, the system will be issued all inventory or just the amount required.
Weigh and Consume
Select a scale, then the material you are weighing, then mark if you want to use positive or subtractive weighing. PositiveWeighing means you add weight to the scale (like pouring a liquid into a container), and SubtractiveWeighing means you remove weight from the scale (like removing powder from a container). Then place the material on the scale, remove weight as needed for SubtractiveWeighing, and hit "Consume" when finished. The consumed material should now show in DataNinja.
View Locations
Consume materials from
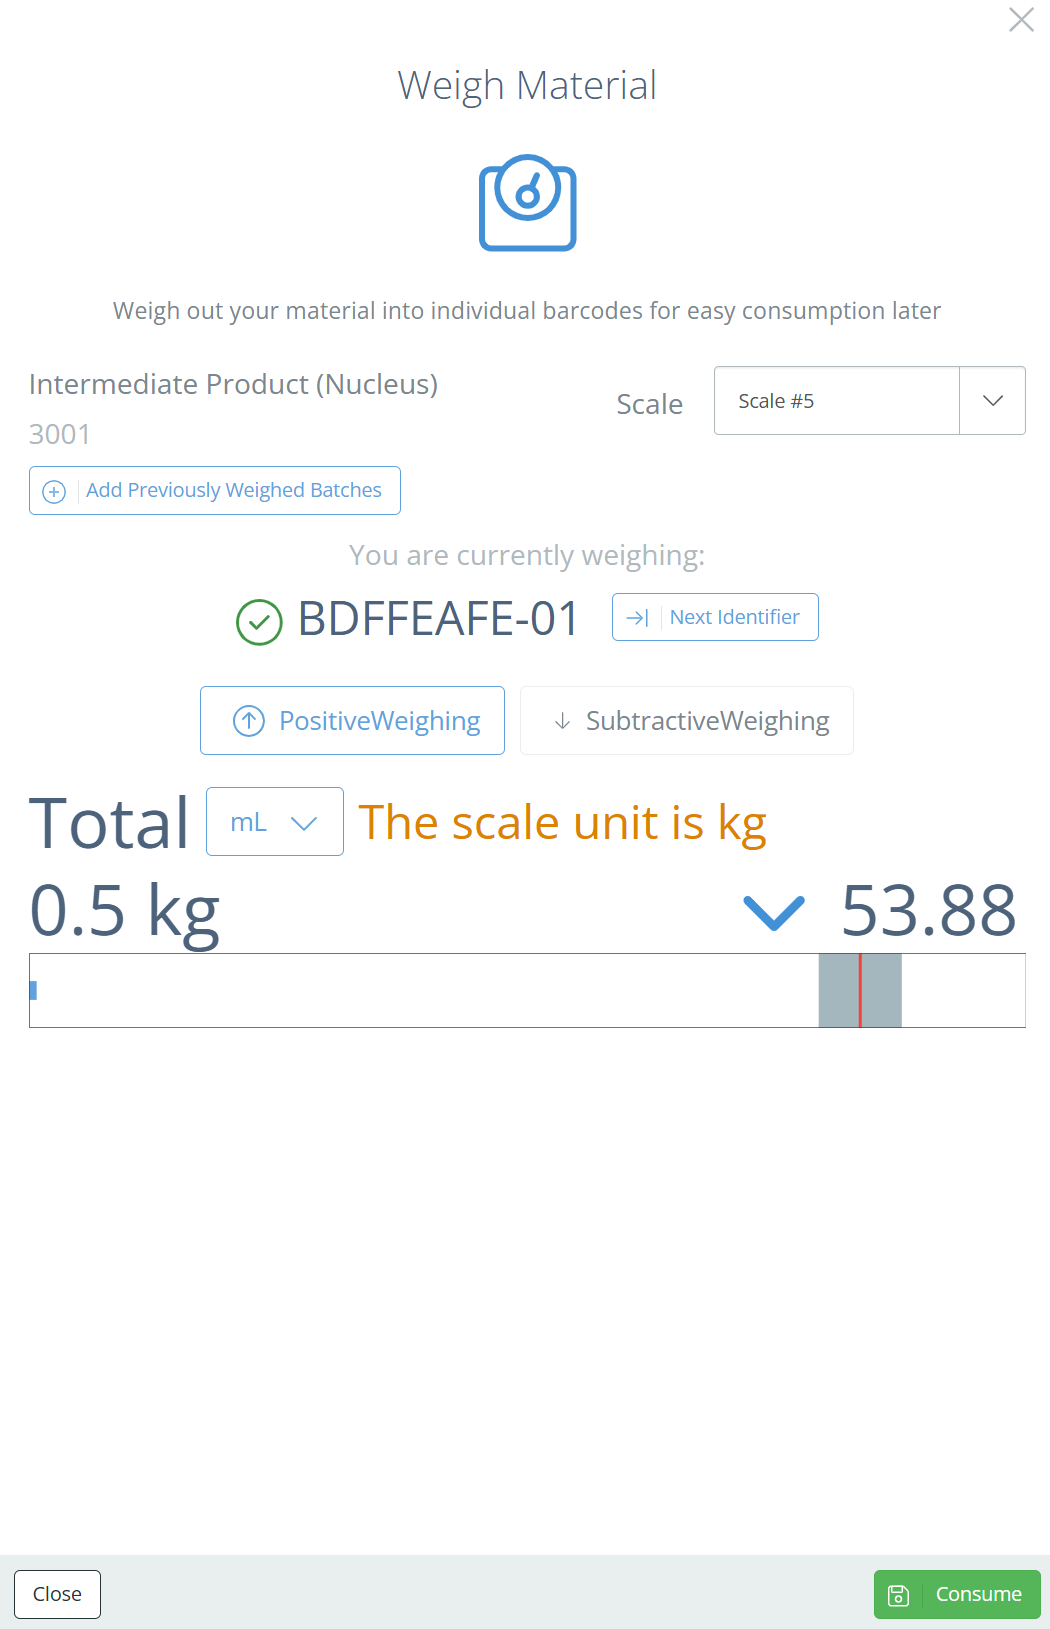
Pre Weigh
Weigh out your material into individual barcodes for easy consumption later. Select a scale, then specify what you are weighing, along with whether you are using PositiveWeighing or SubtractiveWeighing, and pick a printer to print the labels from (optional). Place inventory on the scale, then click "Print Weight" to finish and save to the manufacturing records.
Kanban Issue
Issue materials to a work order based on what is loaded on a resource. Select the Kanban location to pull from, and enter the quantity to consume. Click "Issue Materials" to finish and save to the manufacturing records.
Not all companies have Kanban enabled- if your company does not, and you want it enabled, reach out to our Implementation team to get started. Know that DataNinja will go down for about 5 minutes with the update, so specify a time that would work best for the update to run so production is not interrupted.
Material Reservation
Mark specific materials as reserved for this manufacturing record so they cannot be used elsewhere. Enter in the inventory you want to reserve, and specify the quantity
View Picked Items (Available on version 4.20.261.146 and later)
View inventory that has been picked (based on the waves and picking from the "Picking" section, then consume it on the manufacturing record. Under the percentage of each transacted part, find the "View Picked Items" button. If inventory has been picked for this part on this manufacturing record, it will show in the newly-opened sidebar. To consume the material, click "Use" under the Actions column in the sidebar.
Edit/Update Transacted Parts
To edit the quantity, simply will go to the line for the relevant material you wish to edit and click into the quantity, this will open a popup window where you will enter the new quantity, then select "OK".
Delete transacted parts
To remove transacted materials, go to the line for the relevant material you wish to remove and click the trash icon next to the quantity.
Focus on Recording ActualsVerify/edit each scanned quantity to ensure the manufacturing record matches what was actually used.
Process Steps
This section (or sections if multiple), depends on what was previously entered when the BOM version was configured and released, so the process steps may vary from record to record.
Process steps are a group of fields that require input from the user in order to complete the manufacturing record. This will replace the data collection that was filled out on paper before. Additionally, process steps can capture relevant equipment utilized, work center costing data, and step-specific Transacted Parts, as well as track the actual time to complete the step. A process step can contain as many attributes as are needed.
Attributes can be required or optional, and types can vary- see our process steps page to see all possible attributes.
Equipment
This section exists to record additional equipment utilized in the production process, but is fully optional.

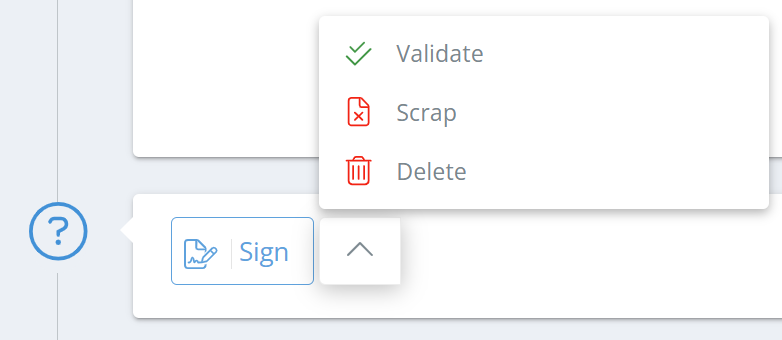
4. Review and Electronic Signatures
Completing the manufacturing record's approval steps will complete the manufacturing record and release the inventory lot. The order and quantity of role-based electronic signatures required are configured in the BOM Approval Steps. To e-sign for the current approval step, tap "Sign" at the bottom right of the Electronic Manufacturing Record.

Enter CFR 21 part 11 compliant electronic signature via entering username and password. The first signature on the record will push the record to the financial system, so we recommend completing it as soon as possible. There can be multiple signatures required on a record.
To verify that everything has been completed on a record, click "Validate" in the options under the arrow to the right of "Sign". "Scrap" will scrap the record and consume all the inventory; this is typically used when there is an issue with the production and no usable inventory will be produced. "Delete" will delete the record, and no inventory will be consumed. Any completed process steps or consumption must be reversed/removed in DataNinja in order to delete the record- otherwise it must be scrapped.
Updated 9 months ago