
Pre-Weigh
Lean Manufacturing Techniques
Español: Lee esta página en español.
Français : Consultez cette page en français.
This page applies to DataNinja tenants integrated with NetSuite or QuickBooks Online, and to tenants with no finance system integration. The workflow in DataNinja is the same across integrations; where a financial system changes behavior, the integration-specific note calls it out.
Items that are synced with an integration will show the relevant integration's logo. Screenshots on this page may show the NetSuite logo, but tenants integrated with QuickBooks Online will see that logo instead. Tenants with no financial integration won't see any logo.
Pre-Weigh has a new workflow. Requests are created for the parts that need them, operators weigh against a target on a connected scale, and a second person can verify the weigh before the material is used. If your site still uses the Manufacturing Required Parts page, skip down to Legacy Pre-Weigh.
What Is Pre-Weigh?
Pre-Weigh is the process of staging and weighing materials for a batch scheduled to be manufactured. DataNinja provides functionality that enables batch and process manufacturers to increase efficiency and accuracy.
New Pre-Weigh
Each Pre-Weigh request identifies a required part and the quantity to weigh for a manufacturing batch. An operator selects the source material, weighs it on a connected scale, stages it at a WIP location, and prints a labeled license plate. You can work from the dedicated Pre Weigh page or from the Pre Weigh section of a manufacturing record. Both open the same weigh workspace, so you'll see the same requests either way.
Before You Start
Every tenant has a default Pre Weigh label available, so you can start setting up the new workflow at any time. Before your operators start weighing, you'll need:
- Parts set up for Pre-Weigh (see the Parts page)
- A connected scale (see Scale Setup)
- A WIP location to stage weighed material (see Locations Management)
- A printer with the "PreWeighLabel" template assigned. Reach out to our Implementation team to get started.
- A test print at your site to confirm the label comes out as expected
Parts That Were Set Up AutomaticallyWhen the new Pre-Weigh was released, every part was given a Pre Weigh setting of No. Parts that showed up on older Pre-Weigh license plates were then changed to Yes. No parts were set to Yes With Confirmation or given a handling unit other than Stocking. Review these settings with your team, since parts whose older license plate IDs followed a different pattern may have been missed.
The Pre Weigh Page
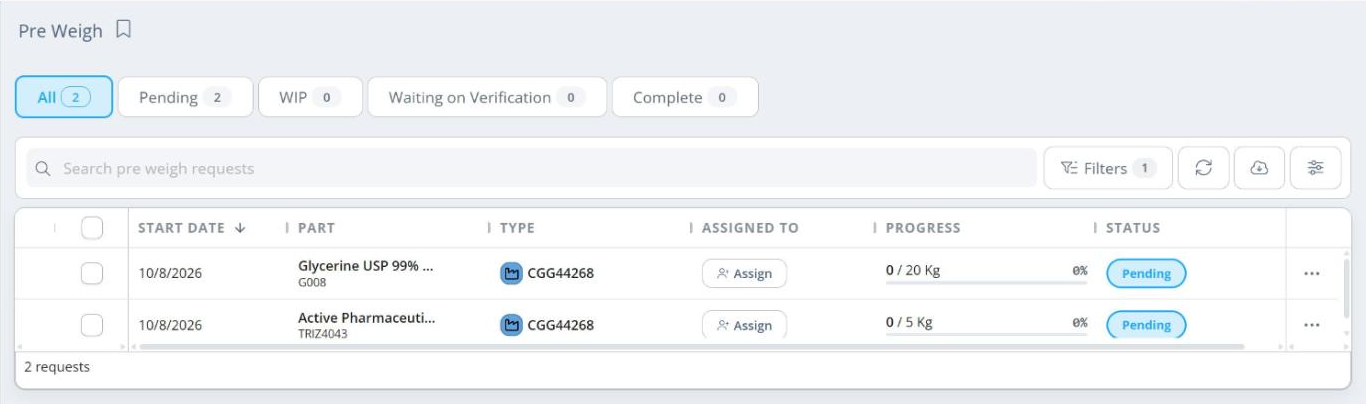
To open the Pre Weigh page, click on the gear icon and open 'All Lists'. On the new page, find the 'Pre Weigh' option and open it. To bookmark the Pre Weigh page so it shows in the left hand sidebar, click the bookmark icon next to the page title.
On the Pre Weigh page, requests are organized into the "All", "Pending", "WIP", "Waiting on Verification", and "Complete" tabs, and you can search or filter by batch, part, or assignee.
Expand a request to see the labels made for it. Each label lists the sublots that were weighed. Double-click a request row to start weighing a new label, or use "Add New Label" to weigh more material. To print an existing label again, use "Reprint" on that label.
Pre Weigh in a Manufacturing Record
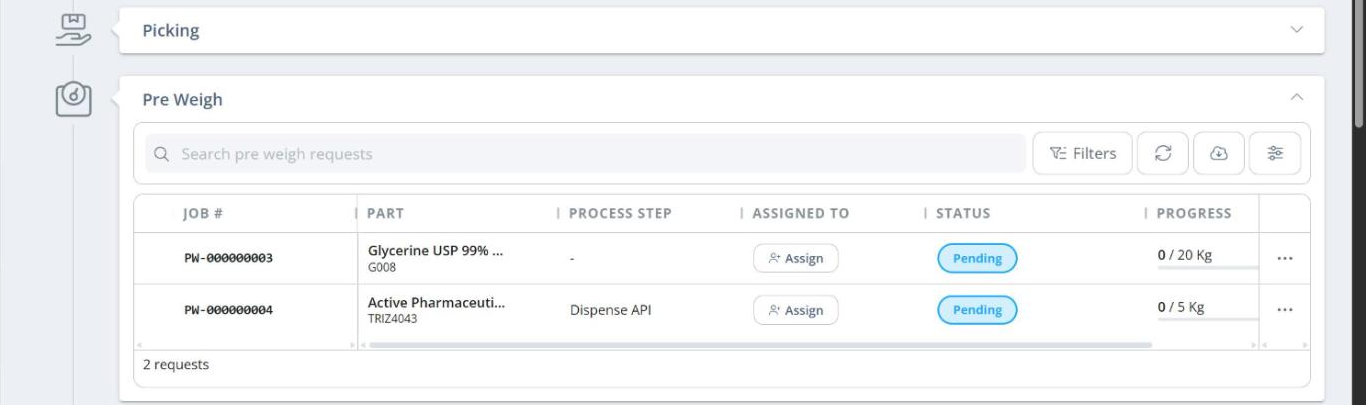
Open a manufacturing record and expand its "Pre Weigh" section to see the batch's requests, identifiers, quantities, and statuses. Open a request to use the same weigh workspace as the Pre Weigh page. See Manufacturing for more on manufacturing records.
To choose whether this section opens expanded or collapsed, click on the gear icon, go to Company Settings, then Manufacturing, and set "Expand Pre Weigh section in manufacturing by default". It works the same way as the Waves section.
Weigh, Stage, and Verify
-
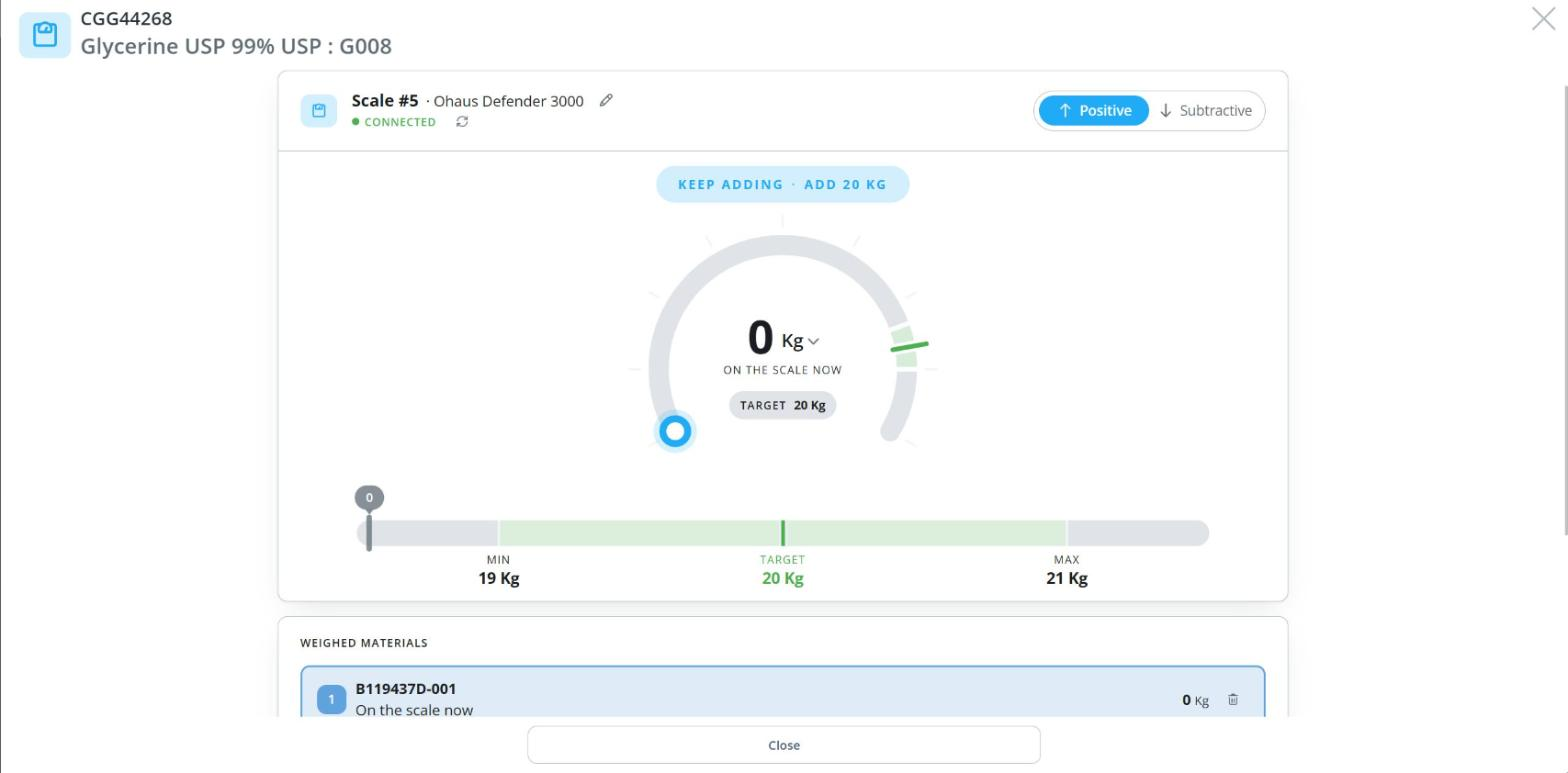
Open the request from the Pre Weigh page or a manufacturing record, then select a connected scale.
-
Scan or select the source lot or sublot. Review the available material, target, and tolerance.
-
Weigh with the positive method (adding material to the scale) or the subtractive method (removing material from a container on the scale). You can add more than one source lot if needed, so review the staged material before saving.
-
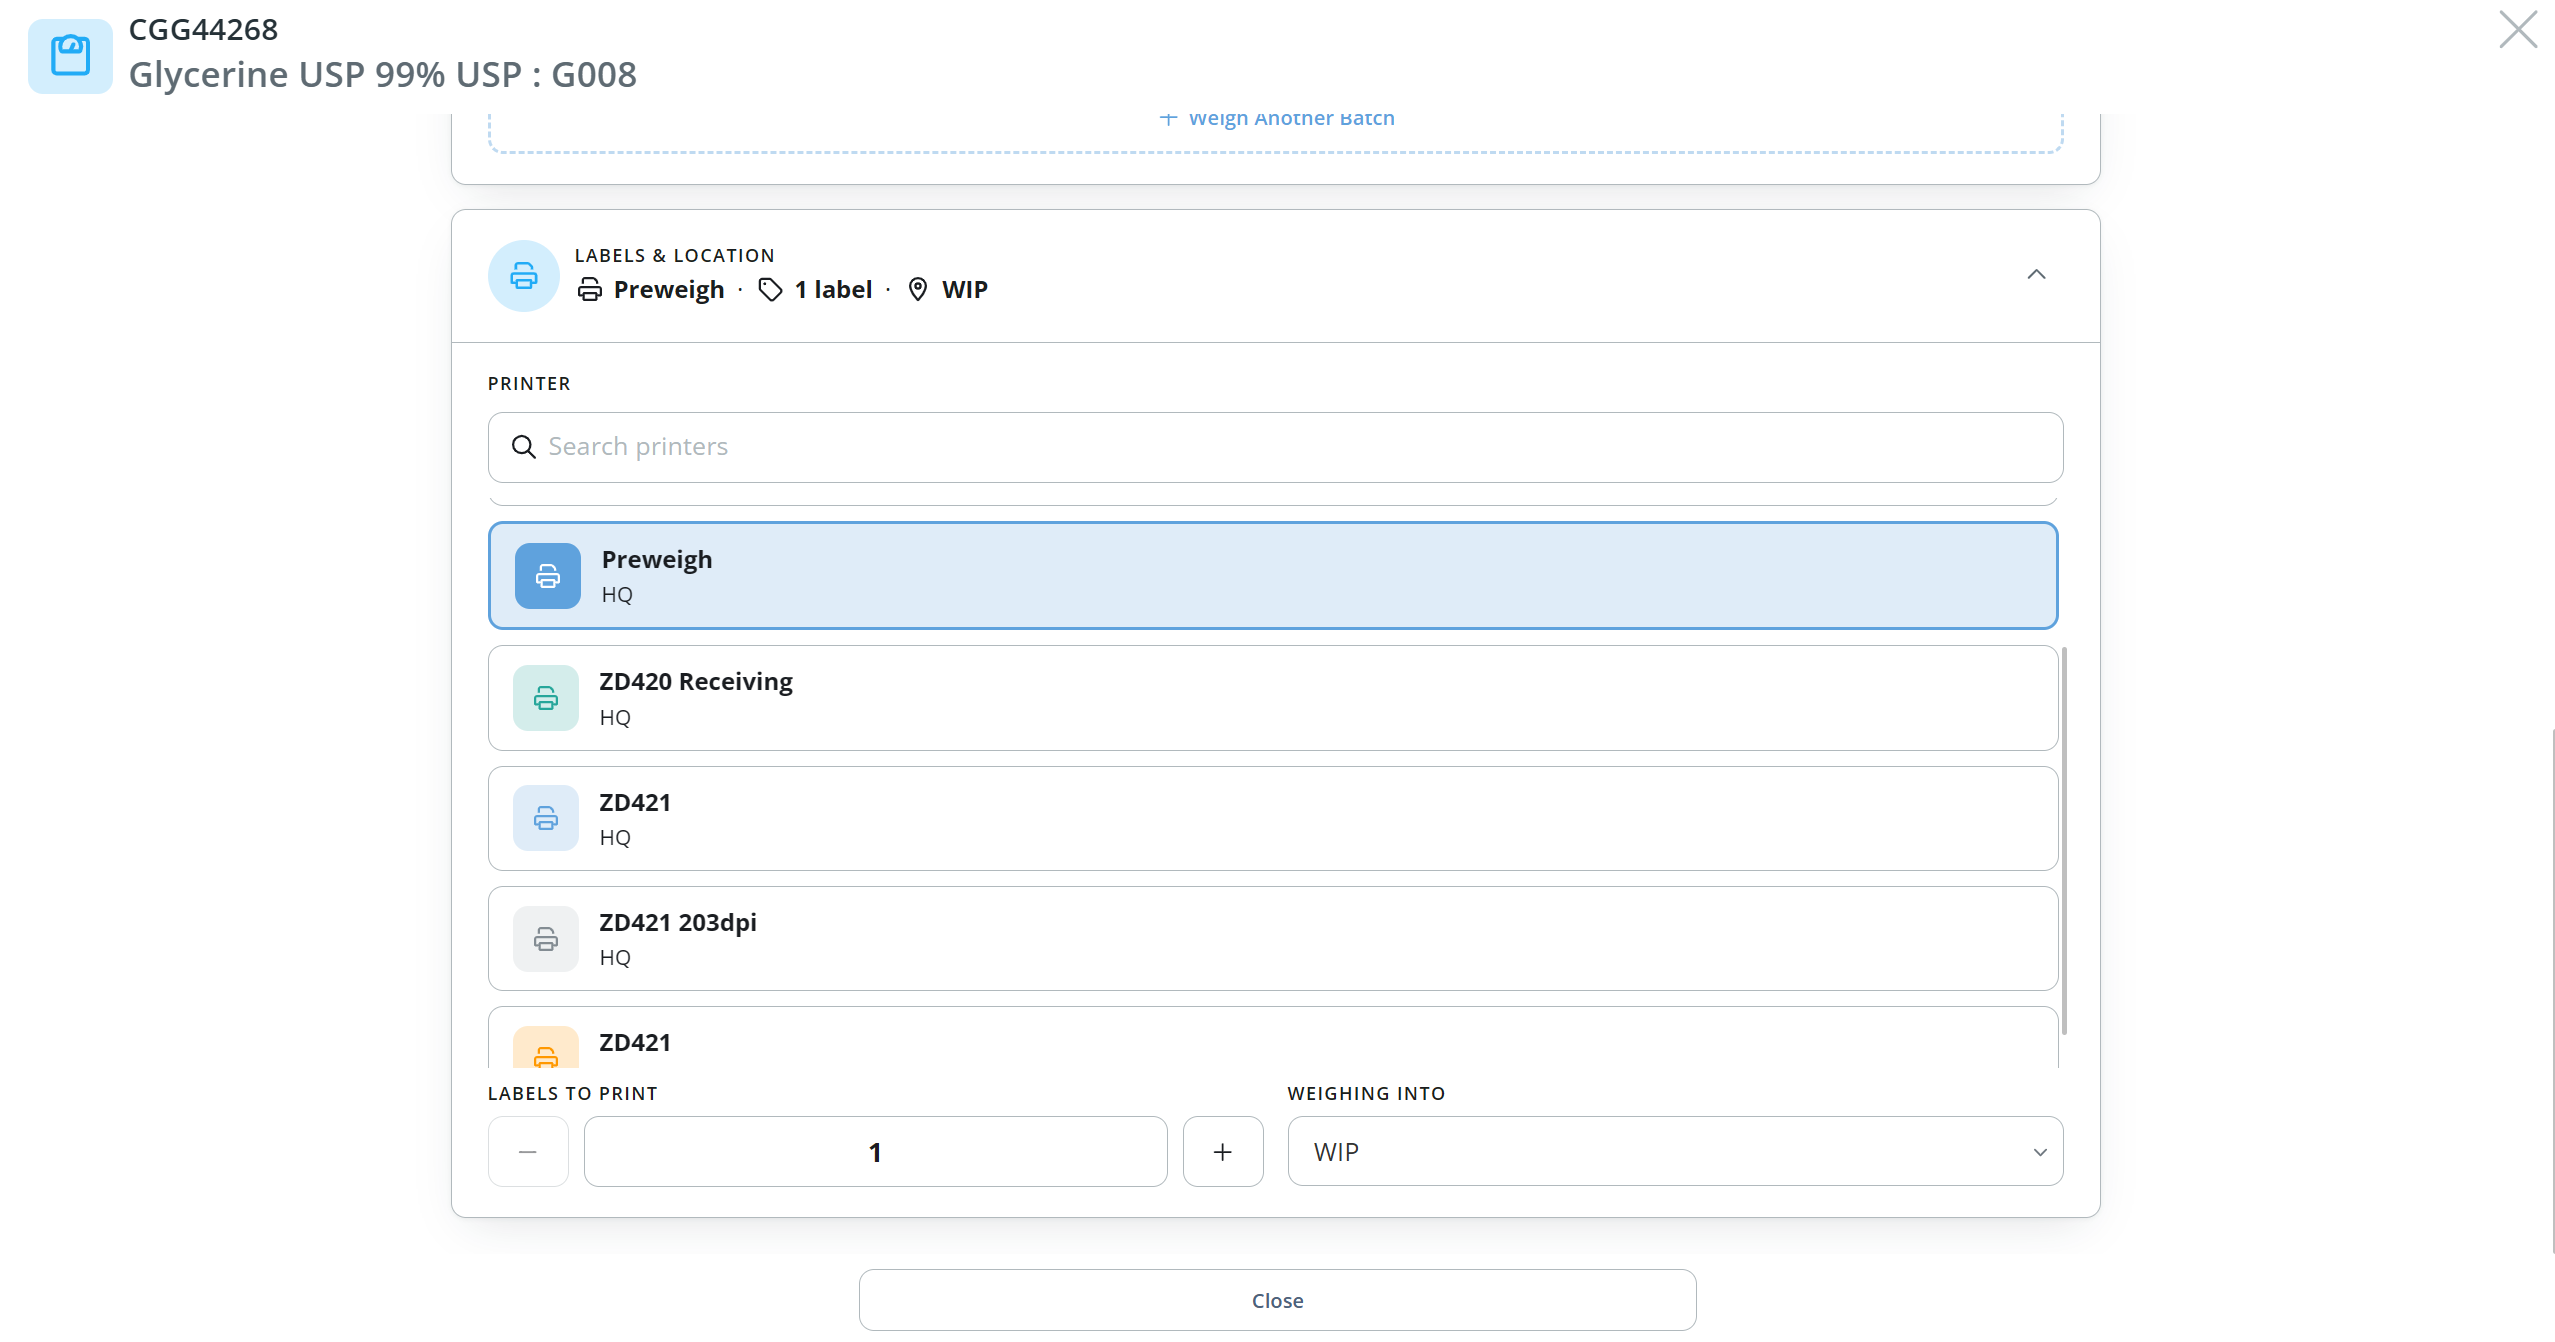
In "Labels & Location", select the WIP location, printer, and label count, then save the label. A WIP type location is required.
-
If the part is set to Yes With Confirmation, another user verifies or rejects the weigh. Check the status before the material is used.
Saving Doesn't Mean a Label PrintedIf no printer is selected, DataNinja will ask whether you want to continue without a label. A saved Pre-Weigh doesn't guarantee a physical label printed, so check the printer selection if a label is missing.
Reservations and Quantity Alerts
Pre-Weigh respects Material Reservations for other batches. If you scan a sublot that's reserved for another batch, and that reservation covers the material the other batch needs, Pre-Weigh blocks the scan and shows the competing batch when it can. You'll also see a warning when other reservations reduce the amount available for your request. Choose a different sublot, or resolve the reservation before continuing.
Pre-Weigh also checks the live scale weight against the maximum you're allowed to use. When other reservations mean you can't overweigh, going over that maximum gives a blocking alert, and the message tells you whether the limit comes from a reservation or from the available quantity. Correct the weigh or the material you selected before saving. The alert isn't permission to use another batch's reserved material.
Second Person Verification
When a part is set to Yes With Confirmation, its label is queued for another user to verify. If you need to get someone's attention, use "Notify Again" on the verification panel.
Users on the Pre Weigh page see a live banner with the request and equipment, and users viewing the related manufacturing record get an alert sound as well. Notifications only show up in those two places, so a verifier working elsewhere in DataNinja should check the verification queue.
When Verification Is Rejected
A rejected label goes back to be reweighed. Reopen the rejected label, review its staged material and location, adjust the weigh, and click "Finish Weighing" to resubmit. DataNinja can restore the scale and sublot you used before. If someone rejects the label while you have it open, you'll see a warning and the label resets.
The same label is reused, so the new attempt isn't recorded as an unrelated label. Check the final verification status before consuming the material.
Training Videos
Weigh a Request
This video was created with AI on a DataNinja test site. Your site may look slightly different depending on site settings and version.
Verify and Record
This video was created with AI on a DataNinja test site. Your site may look slightly different depending on site settings and version.
Pre Weigh Labels
Every Pre Weigh label shows the part name and number, total weight, the batch it's for ("For Blend"), license plate code, source lot details, expiration date, and who weighed the material. Labels for parts set to Yes With Confirmation also show who verified the weigh ("Verified By"). The label uses the "PreWeighLabel" template (see Printer Labels).
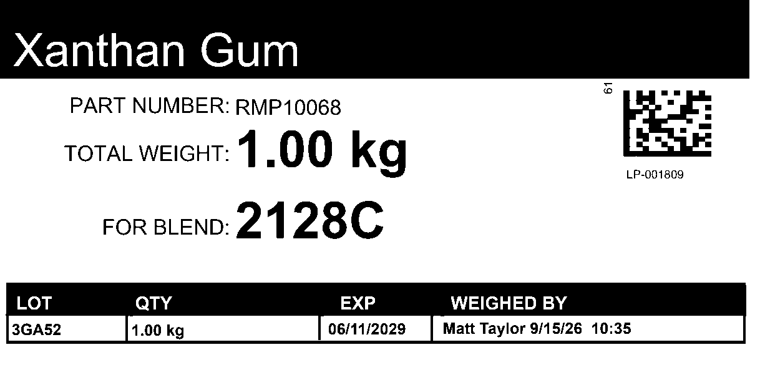
PreWeigh label with no verification
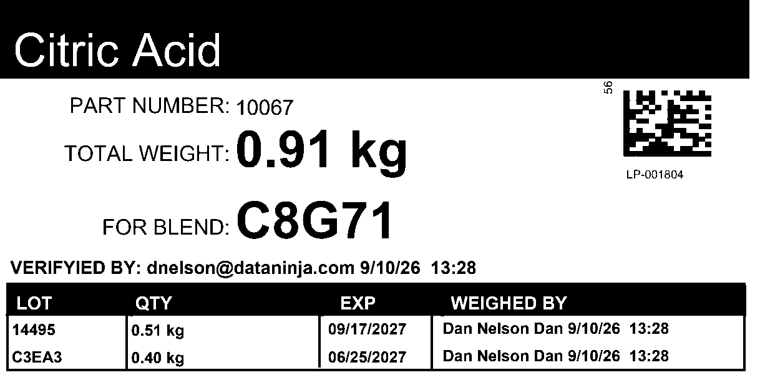
PreWeigh label with verification
Troubleshoot a Label That Won't Print
- Check "Labels & Location". Was a printer selected, or did the operator continue without printing?
- If the printer list is empty, make sure a printer has the "PreWeighLabel" template assigned. Printers without it don't show in the list.
- Confirm the site, Hub, physical printer, label stock, and network connection are all working.
- Confirm a WIP type location is selected. The label can't be saved without one.
- If the Pre-Weigh was saved, use "Reprint" on the label. Remember that "Print Label" on the request row prints an LPN label instead.
If the label still won't print, see Troubleshooting Label Printing or open a chat with our Support team.
Legacy Pre-Weigh
Legacy Pre-Weigh uses the Manufacturing Required Parts page. Use this section if your tenant hasn't moved to the new Pre-Weigh workflow yet.
Access Pre-Weigh
To pre-weigh materials, there must first be a scheduled BOM. All required parts and quantities on the BOM will be automatically added to the Manufacturing Required Parts page. To access the Manufacturing Required Parts page, click on the gear icon in the top right, then "All Lists". Then scroll down or search for "Pre Weigh", and click to open the Manufacturing Required Parts page.
To streamline access to this page, like all other pages in DataNinja, select the bookmark icon next to the page title to have the page link show in the left-hand sidebar.
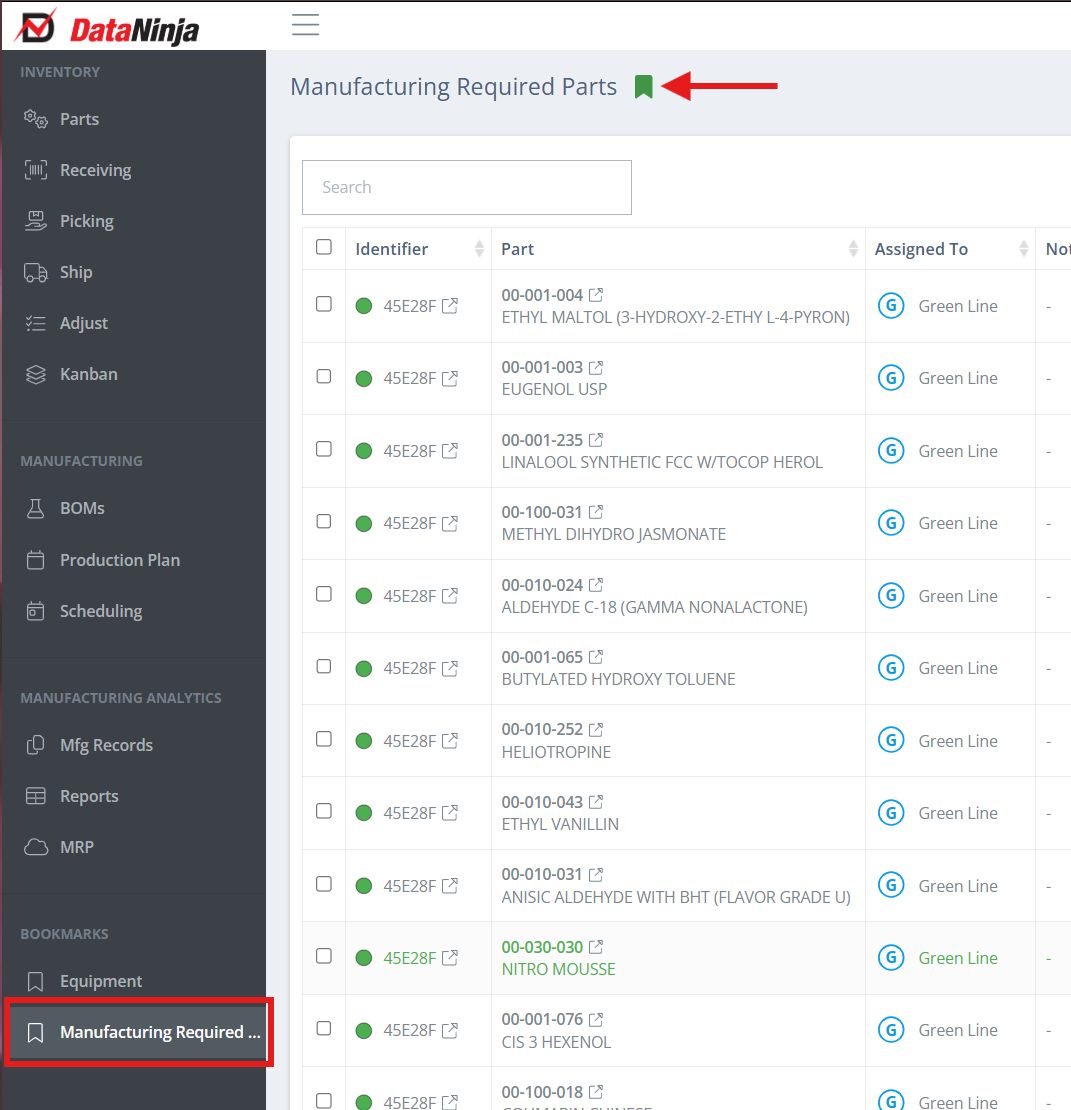
How to Pre-Weigh
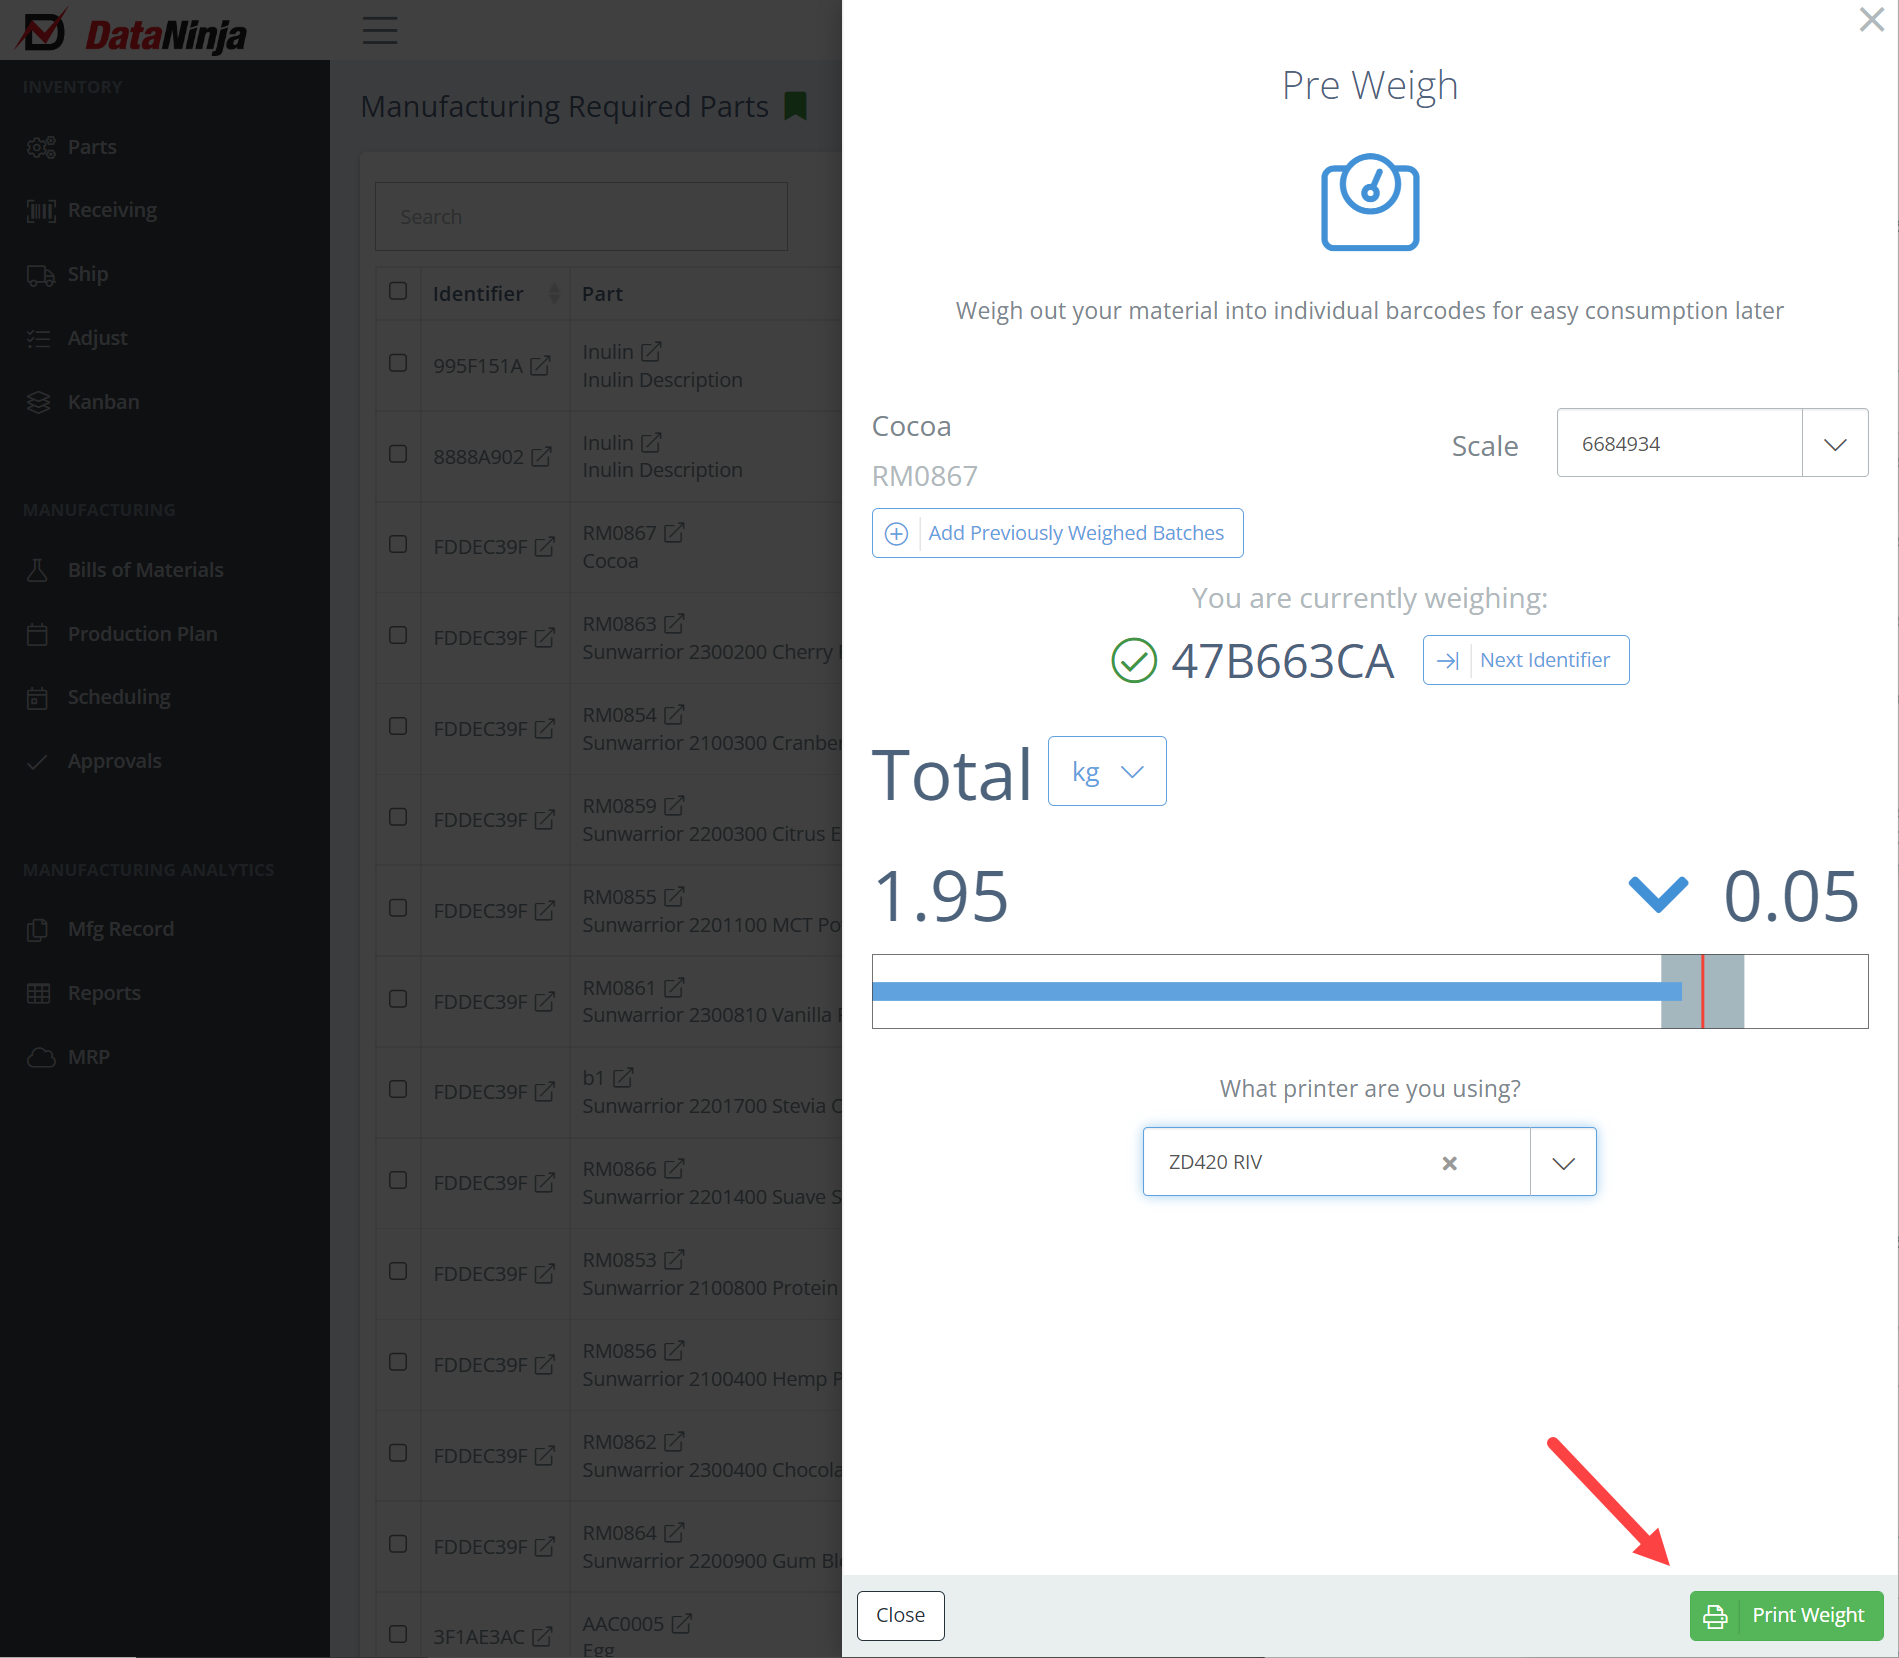
On the Manufacturing Required Parts page, you can search for parts by job or weigh out all of the same part across jobs. To begin pre-weigh select the part and then the scale you are using. Then scan the material you are weighing out. The "Add Previously Weighed Batches" button allows the user to combine multiple lots of material while maintaining traceability.
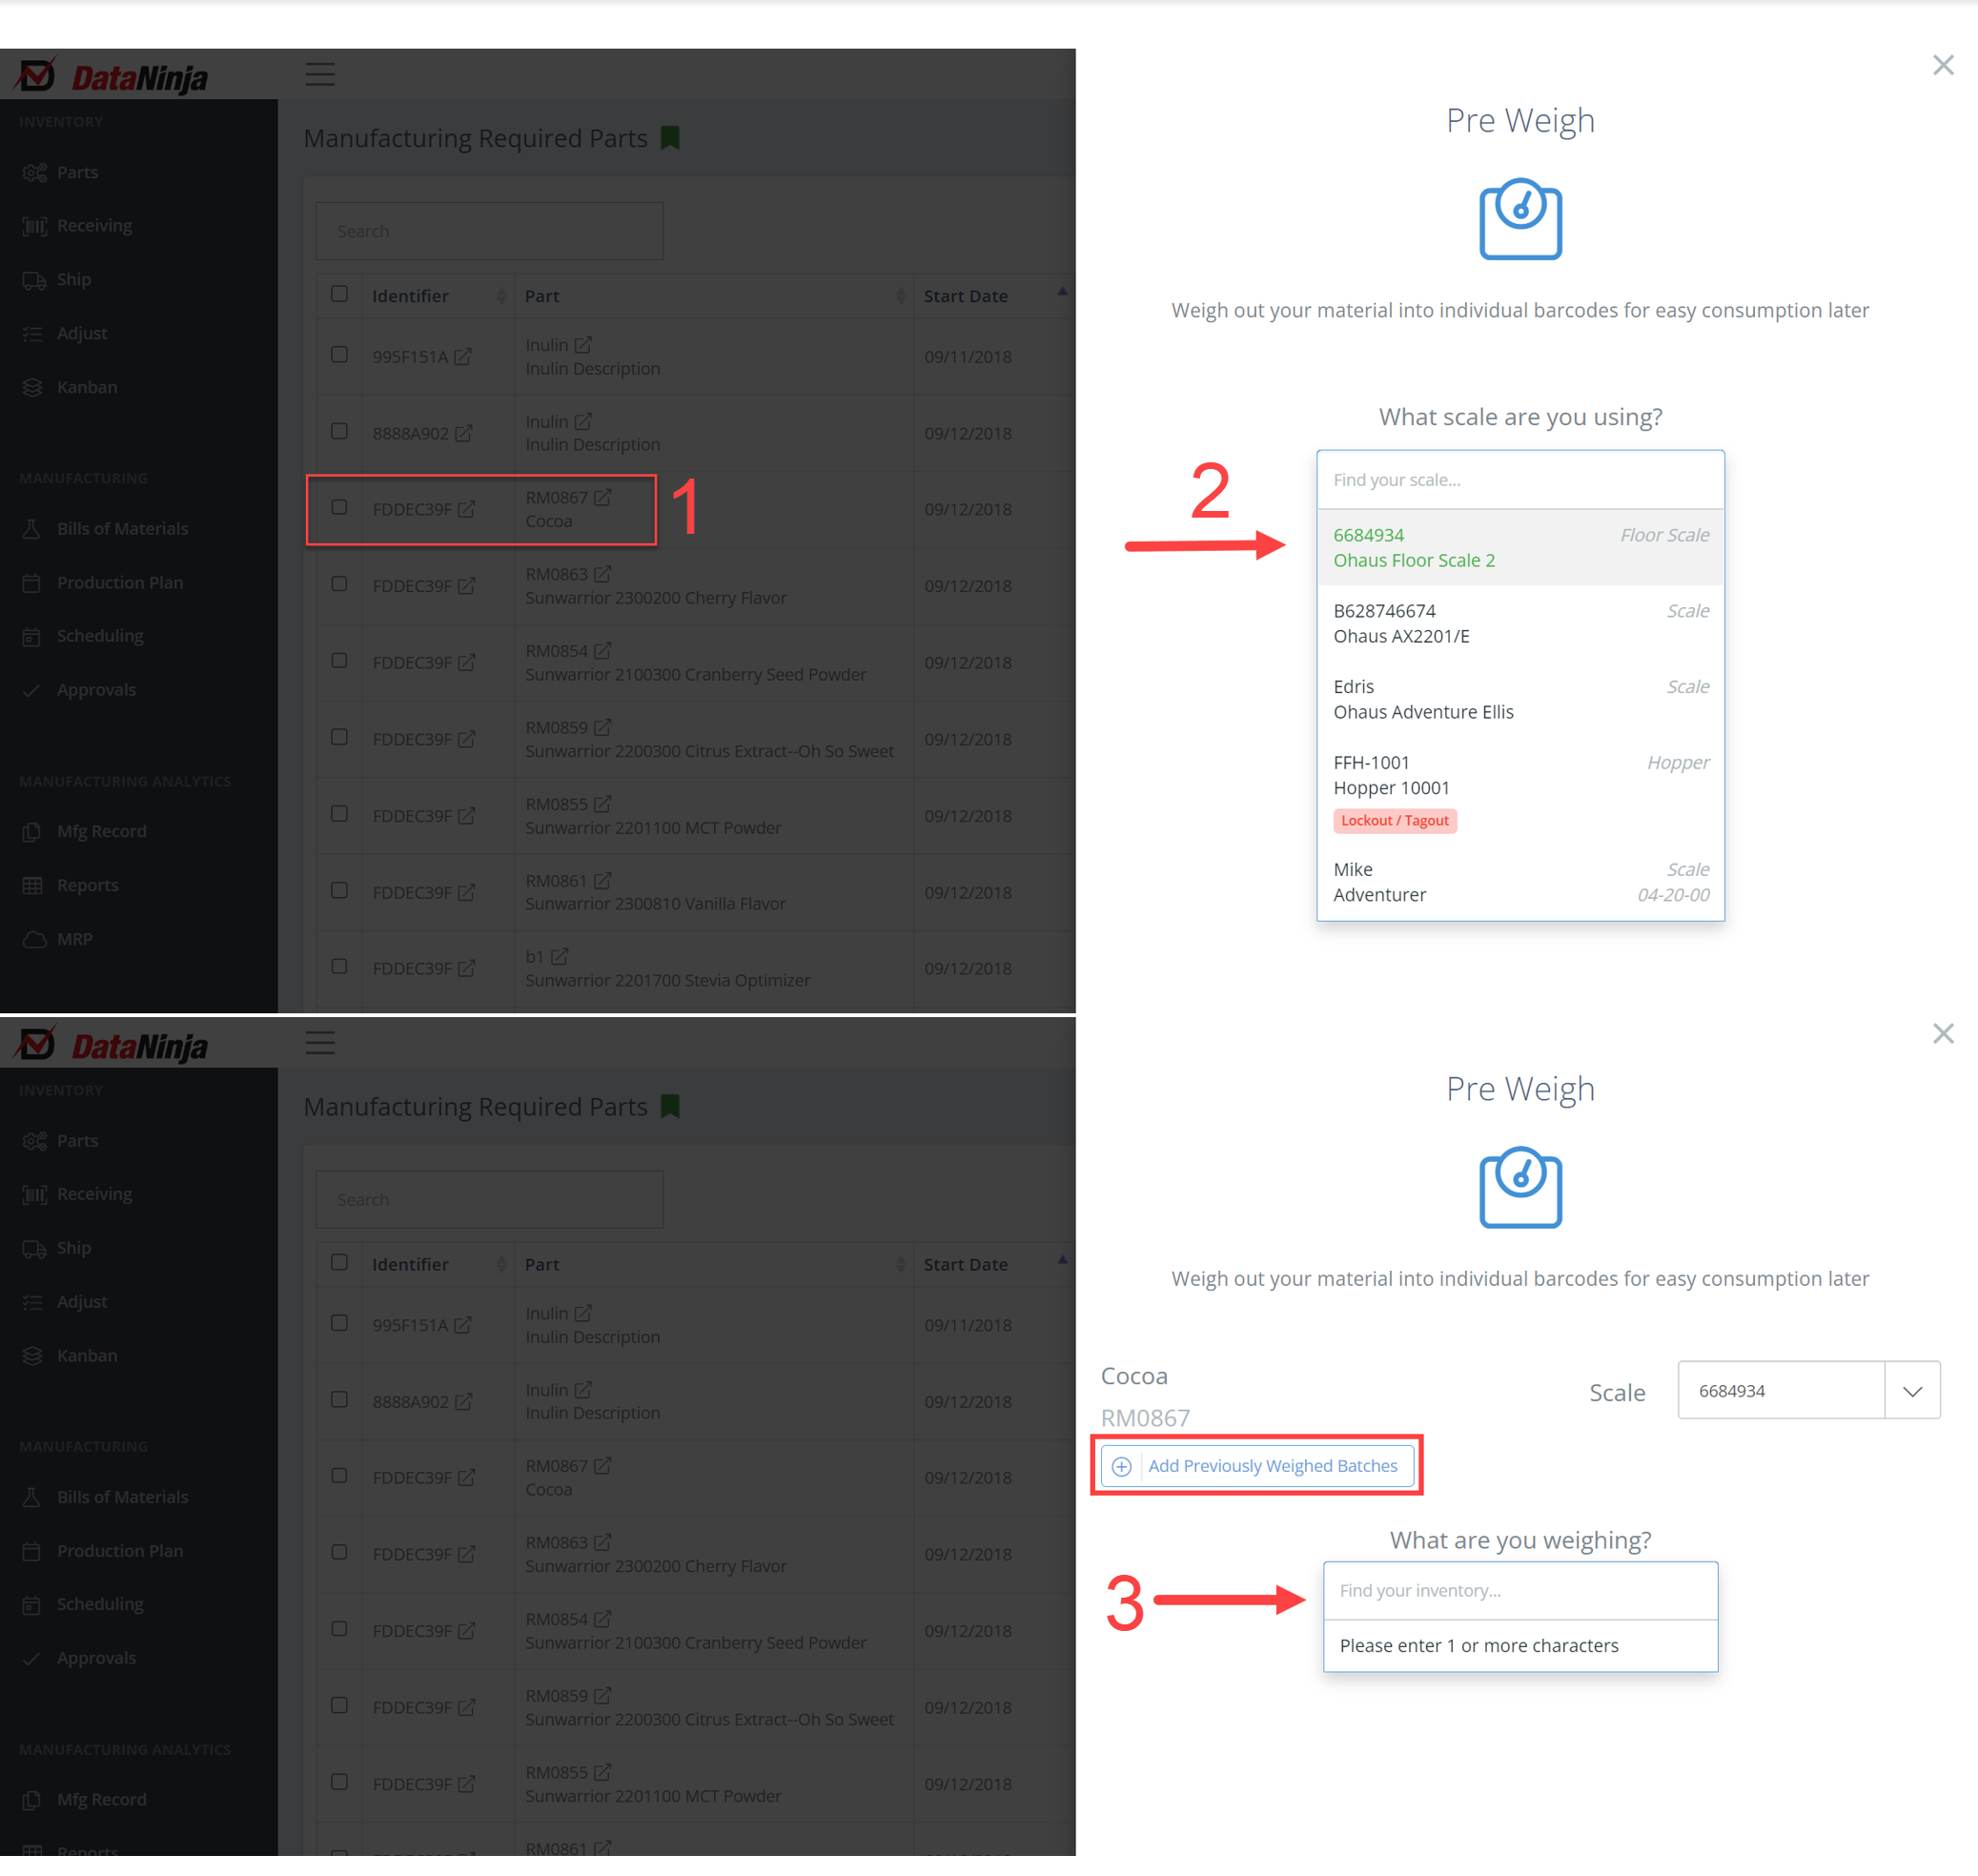
Select the part to pre-weigh, then the scale in use, and lastly scan the lot being weighed out.
With a connected scale, DataNinja will provide real-time weight so you can easily see how under- or over-weight the material is. Once the weight is correct, select "Print Weight" for a new label so the material can be consumed in the BOM. The material pre-weighed for a job will be allocated for that BOM, but it can be consumed for other BOMs if needed.
Updated about 2 hours ago