Jump to Content
DataNinjaGuides
GuidesAPI ReferenceChangelog
v5.0

GuidesLog InDataNinja
Log In
v5.0

Implementation Guide

  • The Beginning
  • Initial Data Load Spreadsheet
    • Raw Materials
    • Sub Assembly
    • Finished Goods
    • Inventory Locations
  • Hub Setup
    • Hub Upgrade Instructions
  • Printer Setup
    • Printer WiFi Setup
    • Factory Reset Zebra Printers
    • DataNinja Hub and Printer Configuration
    • Troubleshooting Label Printing
  • Scanner Setup
    • Scanner Reset
    • Scanner Instruction Manuals
  • Parts
    • Part Configuration
    • Default Bin Location
    • Default Shelf Life
    • Tracking Type
    • Units of Measure
    • Unit of Measure Sets
    • Part Classifications
    • Part Lifecycle
    • Acceptable Quality Limit (AQL)
  • Bills of Materials (BOM)
    • Setting Up Your First BOM
    • Required Parts
    • Process Steps
    • Approvals
    • BOM Lifecycle
    • Workcenter
    • Scheduling Production
    • Creating a BOM copy
  • User Management
    • Permissions
    • Team Roles
    • Contractors
  • 21 CFR part 11
  • Printing Setup
  • First Physical Inventory
  • Manufacturing
  • Software Validation
  • Forecast
  • Leveraging DataNinja Query Language and API

NetSuite Integration

  • NetSuite + DataNinja Overview
  • DataNinja + NetSuite Sync Overview

NetSuite and DataNinja

  • Receiving Inventory
  • Progressive Receiving
  • Inventory Barcoding
    • Custom Lot Numbers

QuickBooks Online Integration

  • DataNinja + QuickBooks Online Sync Overview
  • Getting Ready to Connect with QuickBooks Online
  • Connecting with QuickBooks Online
  • Understanding DataNinja's QuickBooks Entries
  • Inventory Turnover
  • Shopify + DataNinja + QuickBooks

QuickBooks Enterprise Integration

  • Connecting with QuickBooks Enterprise

QuickBooks

  • Progressive Receiving
  • Receiving Inventory
  • Progressive Shipping
  • Inventory Barcoding
    • Custom Lot Numbers
  • Barcode Scanning
  • Warehouse Management
    • Inventory Locations
    • Location Restrictions
    • Picking Priority
    • Inventory Location Transfer
    • Printing Location Labels
    • License Plates
    • Cycle Count
    • Inventory Adjustments
    • Reprinting License Plate Labels
  • MRP
    • MRP for Orders
    • Best Practices with MRP
  • Accounting Basics
    • Inventory Adjustments
    • Sales Orders
    • Purchase Orders
    • Production
  • Quality Control
    • Part Settings
    • Approvals
    • Incoming Inspection
    • Editing Date of Expiration and Supplier Lot Number
    • Shelf Life Days
    • How to Do a Mock Recall
    • Changing the Status of a Part
  • Paperless Operations
  • Reporting
    • Packing List
  • Custom Fields
  • Equipment Management
    • How to add equipment in DataNinja
    • How to Schedule Maintenance
  • Kanban
    • Why use eKanban
    • How to Add a Kanban
    • Kanban Use Cases
  • Reconcile Inventory
    • Open Inventory Receipts
    • Open Utilized Parts
    • Open Produced Batches
    • Open Shipments
  • Year-end Best Practices

Industry Niche Use Cases

  • Pedigree/T3 Software with QuickBooks
  • Cannabis Processing Traceability
  • Coffee Roasting
  • Food Manufacturing

Scanner Reset

Suggest Edits

📘

One Easy Step

The barcode scanner can be reset in one Easy Step

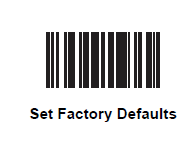
Simply scan the barcode below.

That has returned your scanner to it's factory default settings.
If you want to set up specific settings, you can use a tool called zebra 123scan-utility. You can download it at the link below.

https://www.zebra.com/us/en/support-downloads/software/utilities/123scan-utility.html

Updated 9 months ago