Bills of Materials (BOM)
Where it all comes together
Anything you want to track inventory of needs a part number. The part number uniquely identifies what the inventory item is, while the BOM tracks the "recipe" for how to make the inventory, if a particular part is generated via the consumption of other parts (like a Finished Good or Sub-Assembly).
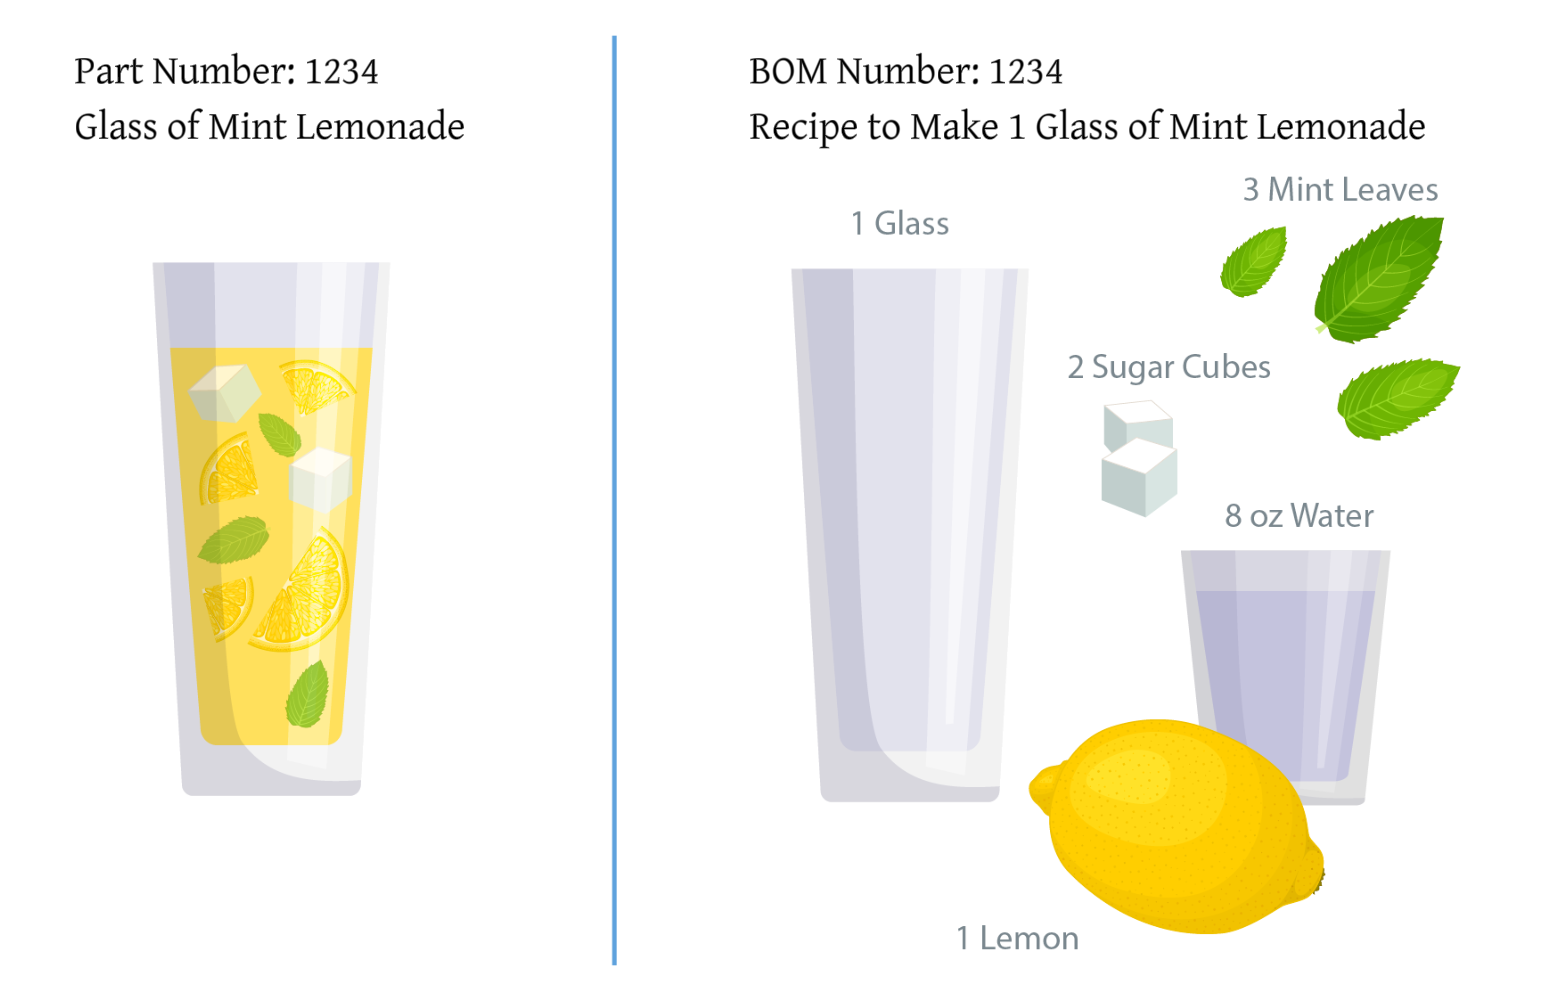
The BOM number is the part number that will be produced
The BOM is where you map your manufacturing process in DataNinja so that you can control how ingredients come together to produce inventory of a product.
A DataNinja BOM contains:
- Configuration
- Required parts
- Attributes (customizable data collection and verification web-form building blocks)
- Sampling (AQL)
- Approvals
- Equipment
LingoDepending on your business processes, one or more of the following terms may be synonymous with what DataNinja means when referring to a BOM: Recipe, Formulation, Routing, MMR etc.
Creating a BOM in DataNinja
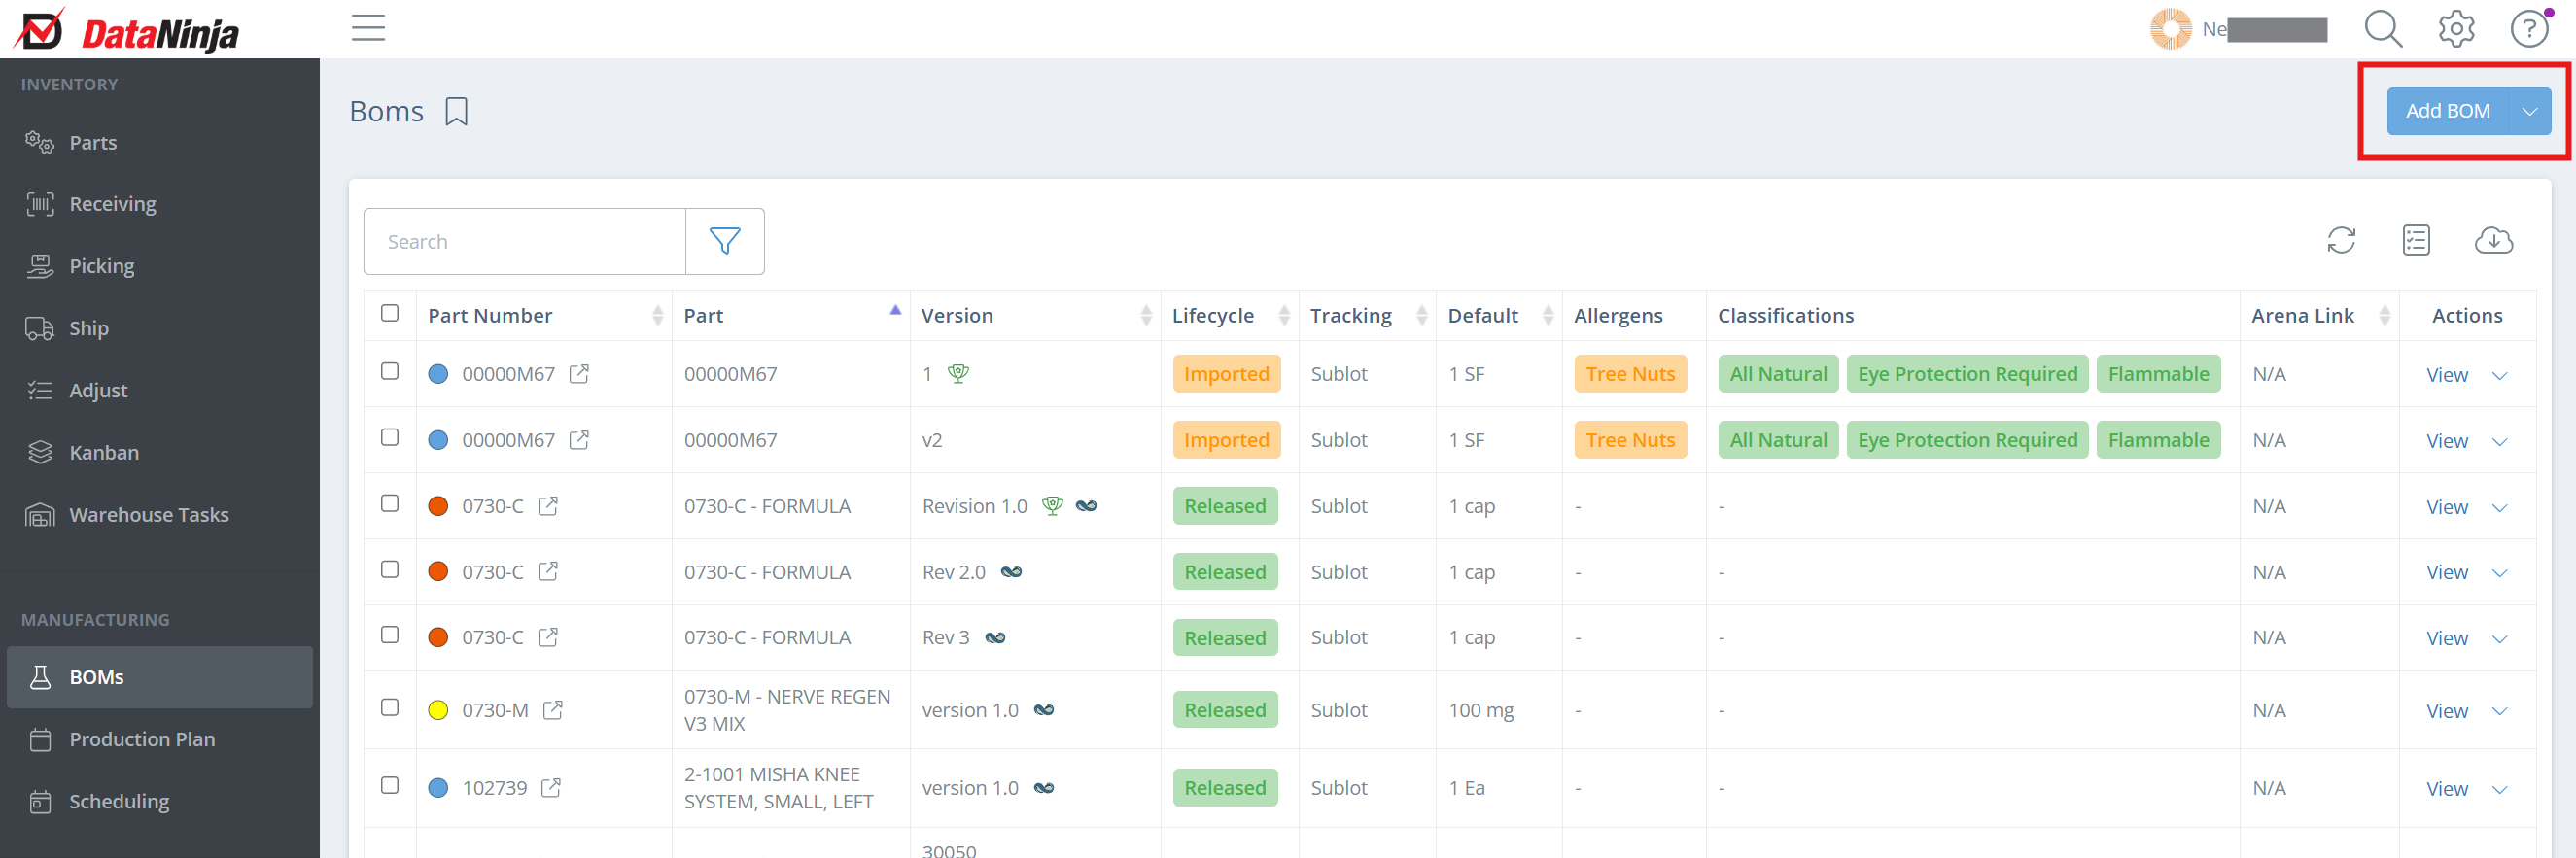
To create a new Bill of Materials, click on the 'BOMs' tab in the left-hand sidebar, then click "Add BOM" in the top right.
Screencap from v4.21.264.294
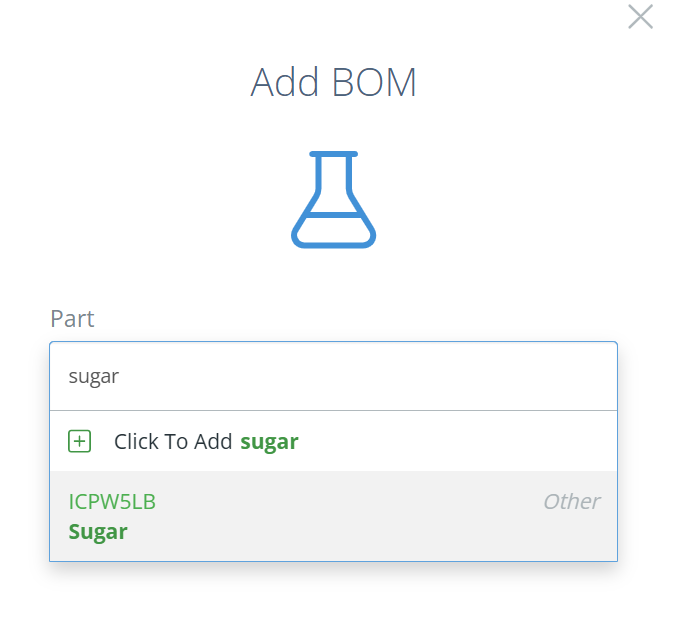
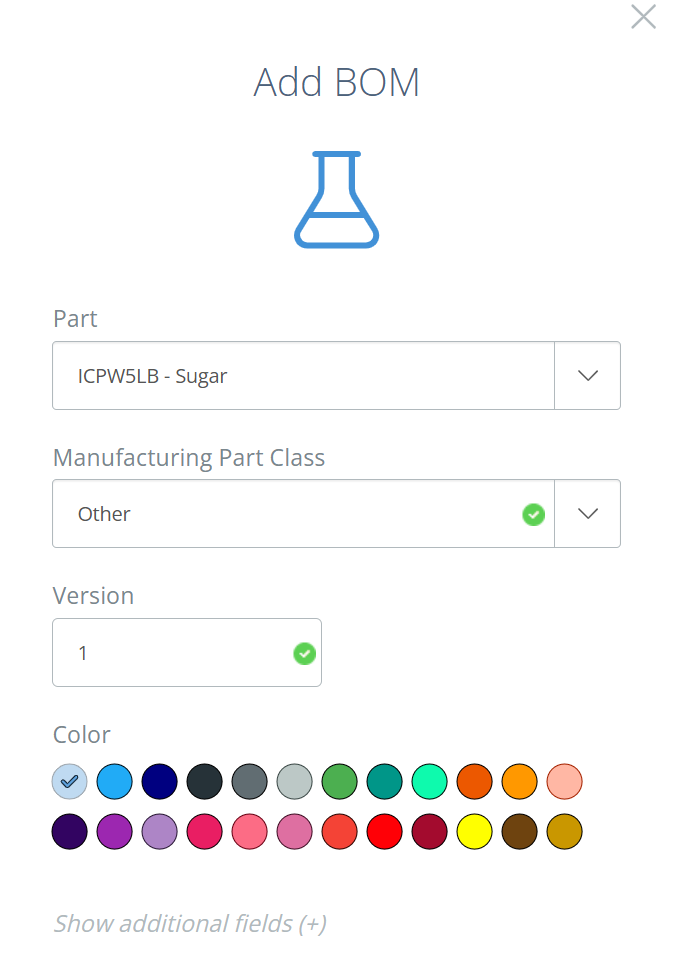
In the new aside, select the part that will be produced when this BOM is scheduled. The part should be either a Finished Good or a Sub-Assembly.
Screencap from v4.21.264.294
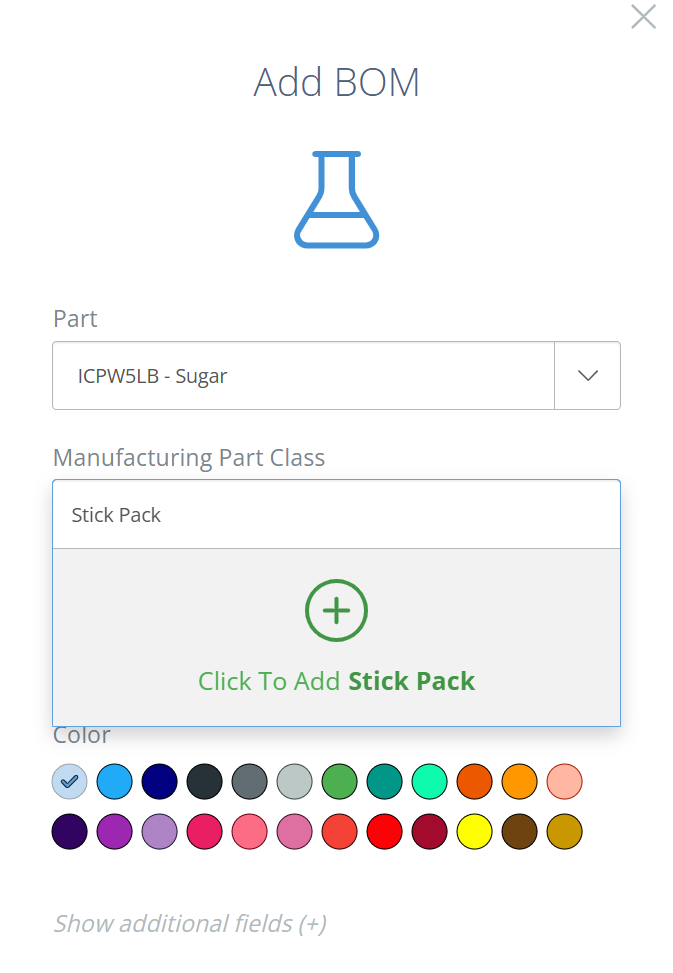
The Manufacturing Part Class field is an organizational strata for reporting purposes (e.g., Capsules, Stick Pack, etc.). If you don't have any Manufacturing Part Classes set up yet, you can add one by typing the name in the field and clicking Add, or leave it as Other.
Screencap from v4.21.264.294
The Version is the unique variant of the BOM, for traceability purposes. Once a BOM has at least 1 scheduled manufacturing run associated with it, it can no longer be modified and a copy of the BOM (with a new version number) must be created. Having multiple versions of a BOM also allows flexibility if there is more than one valid way to produce inventory of the BOM Part Number. For simplicity, start with version '1' or '1.0'.
Once the version field has been filled, select a color for the BOM. Selecting a color can help with categorizing, but you can also leave all BOMs the same color.
Screencap from v4.21.264.294
Additional Fields on BOMs
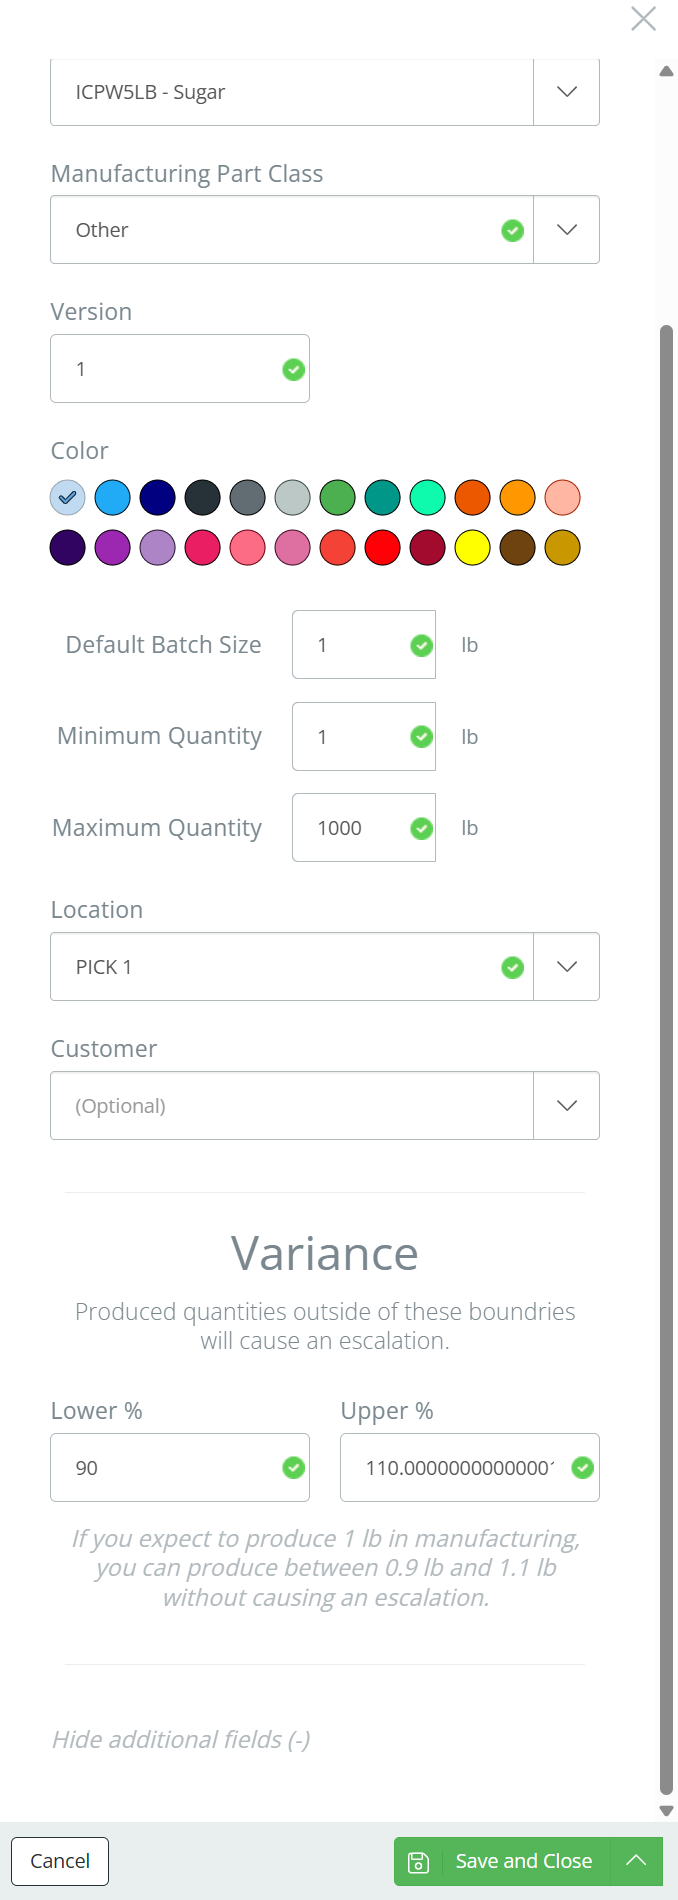
By clicking 'Show additional fields (+)' when creating/editing a BOM, you can specify some additional settings.
Default Batch Size
This specifies the default quantity to produce when the BOM is being schedule for production. The standard default is 1, but if following this BOM will typically create a greater or lesser quantity of the part, then adjust the number accordingly. This field uses the same Unit of Measure (UOM) as the part.
Minimum Quantity
This specifies the minimum quantity that you can schedule to be produced. The standard default is 1, but if the Default Batch Size is greater than 1, you can adjust the Minimum Quantity to be greater than 1, so long as it is less than or equal to the Default Batch Size. This field uses the same Unit of Measure (UOM) as the part.
Maximum Quantity
This specifies the maximum quantity that you can schedule to be produced per batch. The standard default is 1000, but can be adjusted as long as it is greater than or equal to the Default Batch Size. This field uses the same Unit of Measure (UOM) as the part.
Location
The standard default is the location associated with the part. This is where inventory will be produced into once the BOM is used in production.
Customer
If this part is going to be sold or shipped directly to a specific customer, you can select which customer in this field, or leave it blank.
Variance
The standard default variance is between 90 and 110 percent. Going above the maximum or under the minimum will trigger an escalation. The percent is based on the scheduled quantity, per batch. You can adjust both the upper and lower limits, if you need to be more or less strict about the amount produced in an order.
Screencap from v4.21.264.294
Click 'Save and Close' when all changes have been made.
Copy a BOM
Copying a BOM makes BOM edits easier, as you don't have to start from scratch to create a new BOM. It's also helpful when multiple parts have similar manufacturing processes or consume similar parts, since you can copy required parts and process steps to a BOM that produces a completely different part. Copies can be made from BOMs in any status.
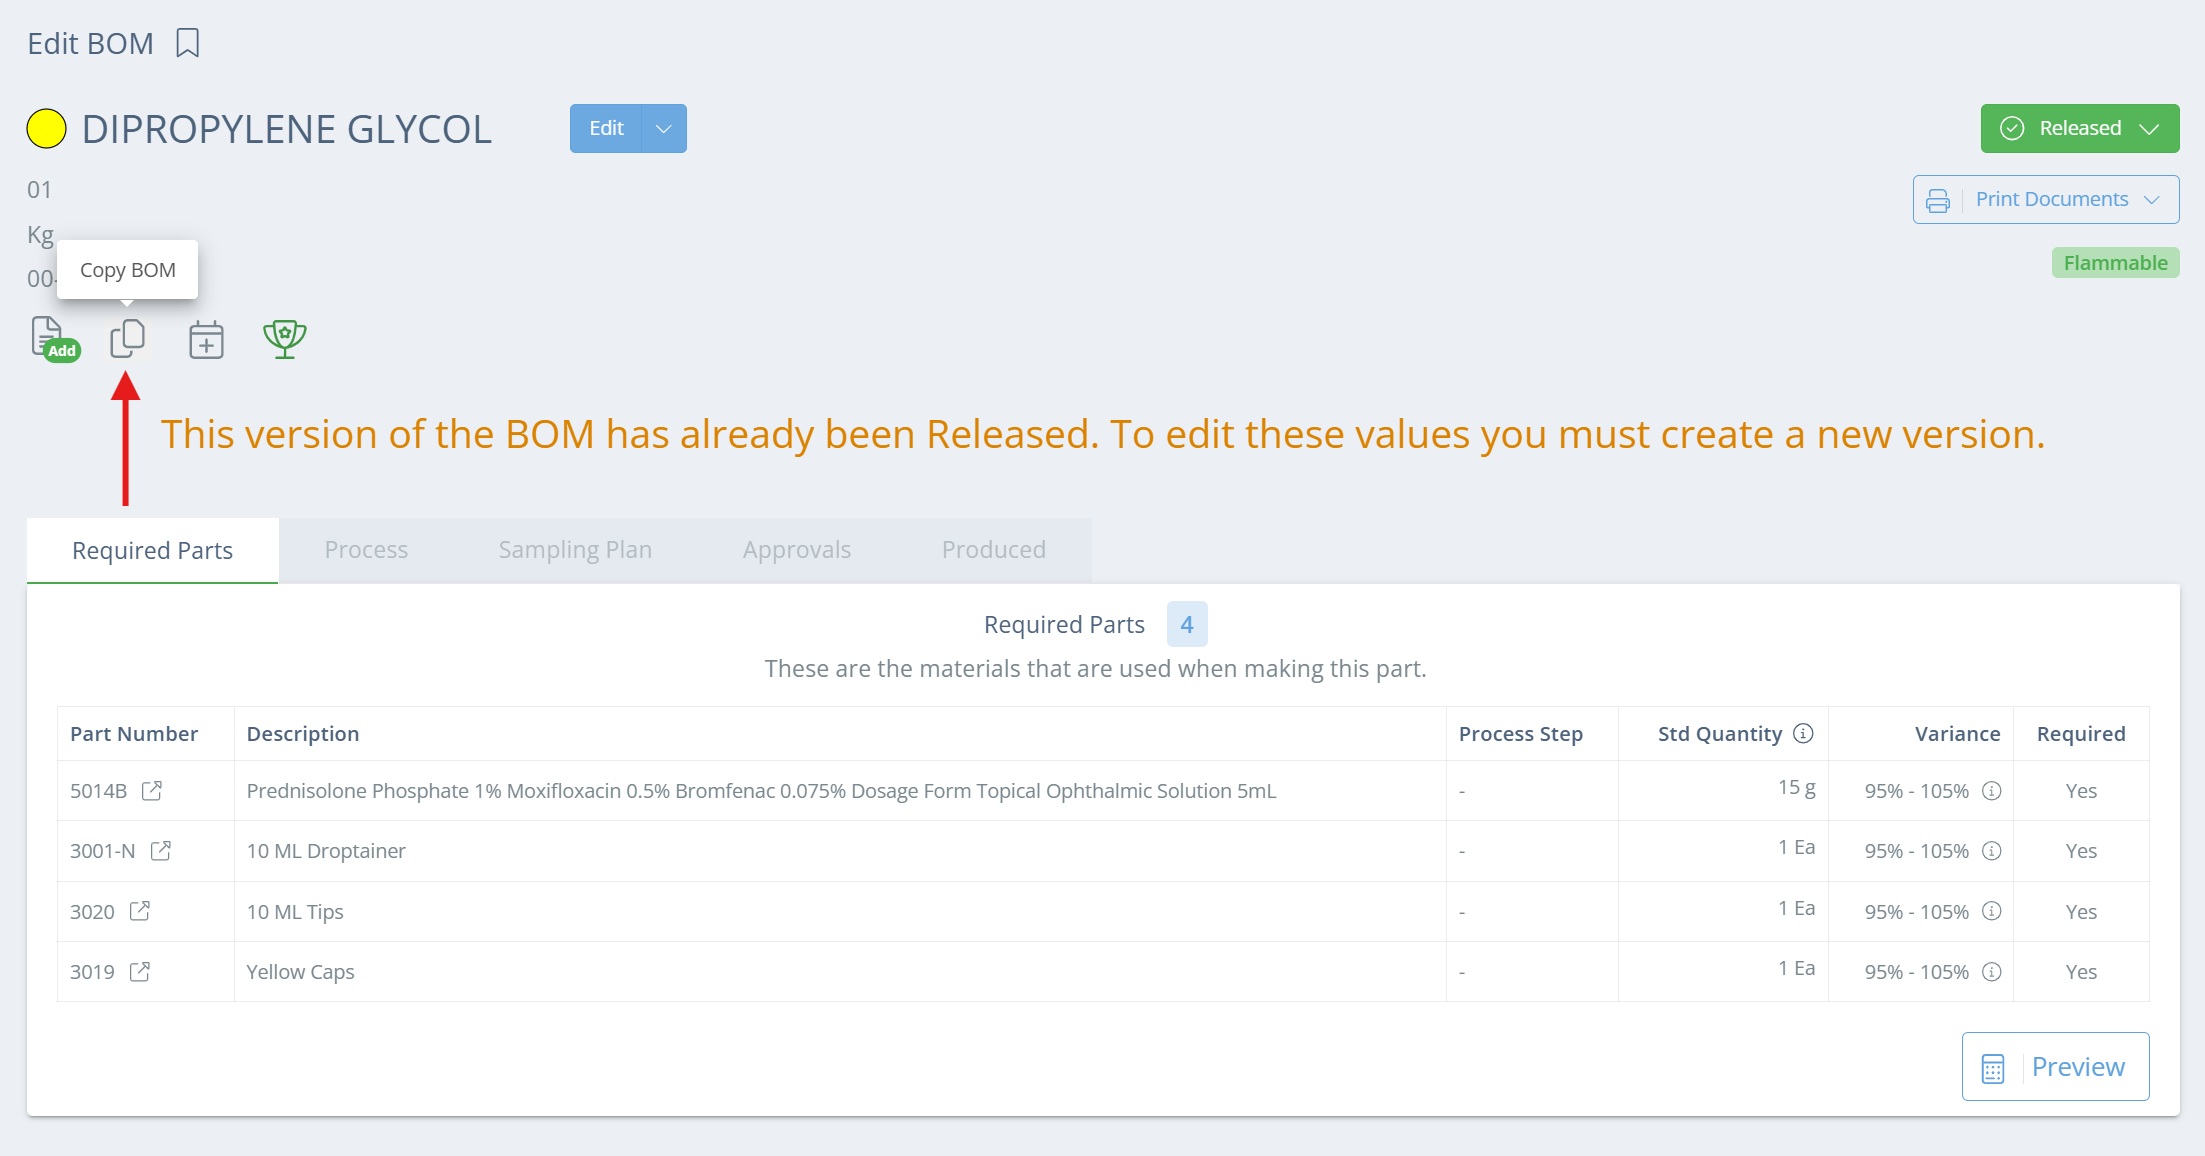
To copy a BOM, click on the BOMs tab and open the relevant BOM. Below the BOM name on the Edit BOM page, find the copy icon and click on it.
Screencap from v4.21.264.294
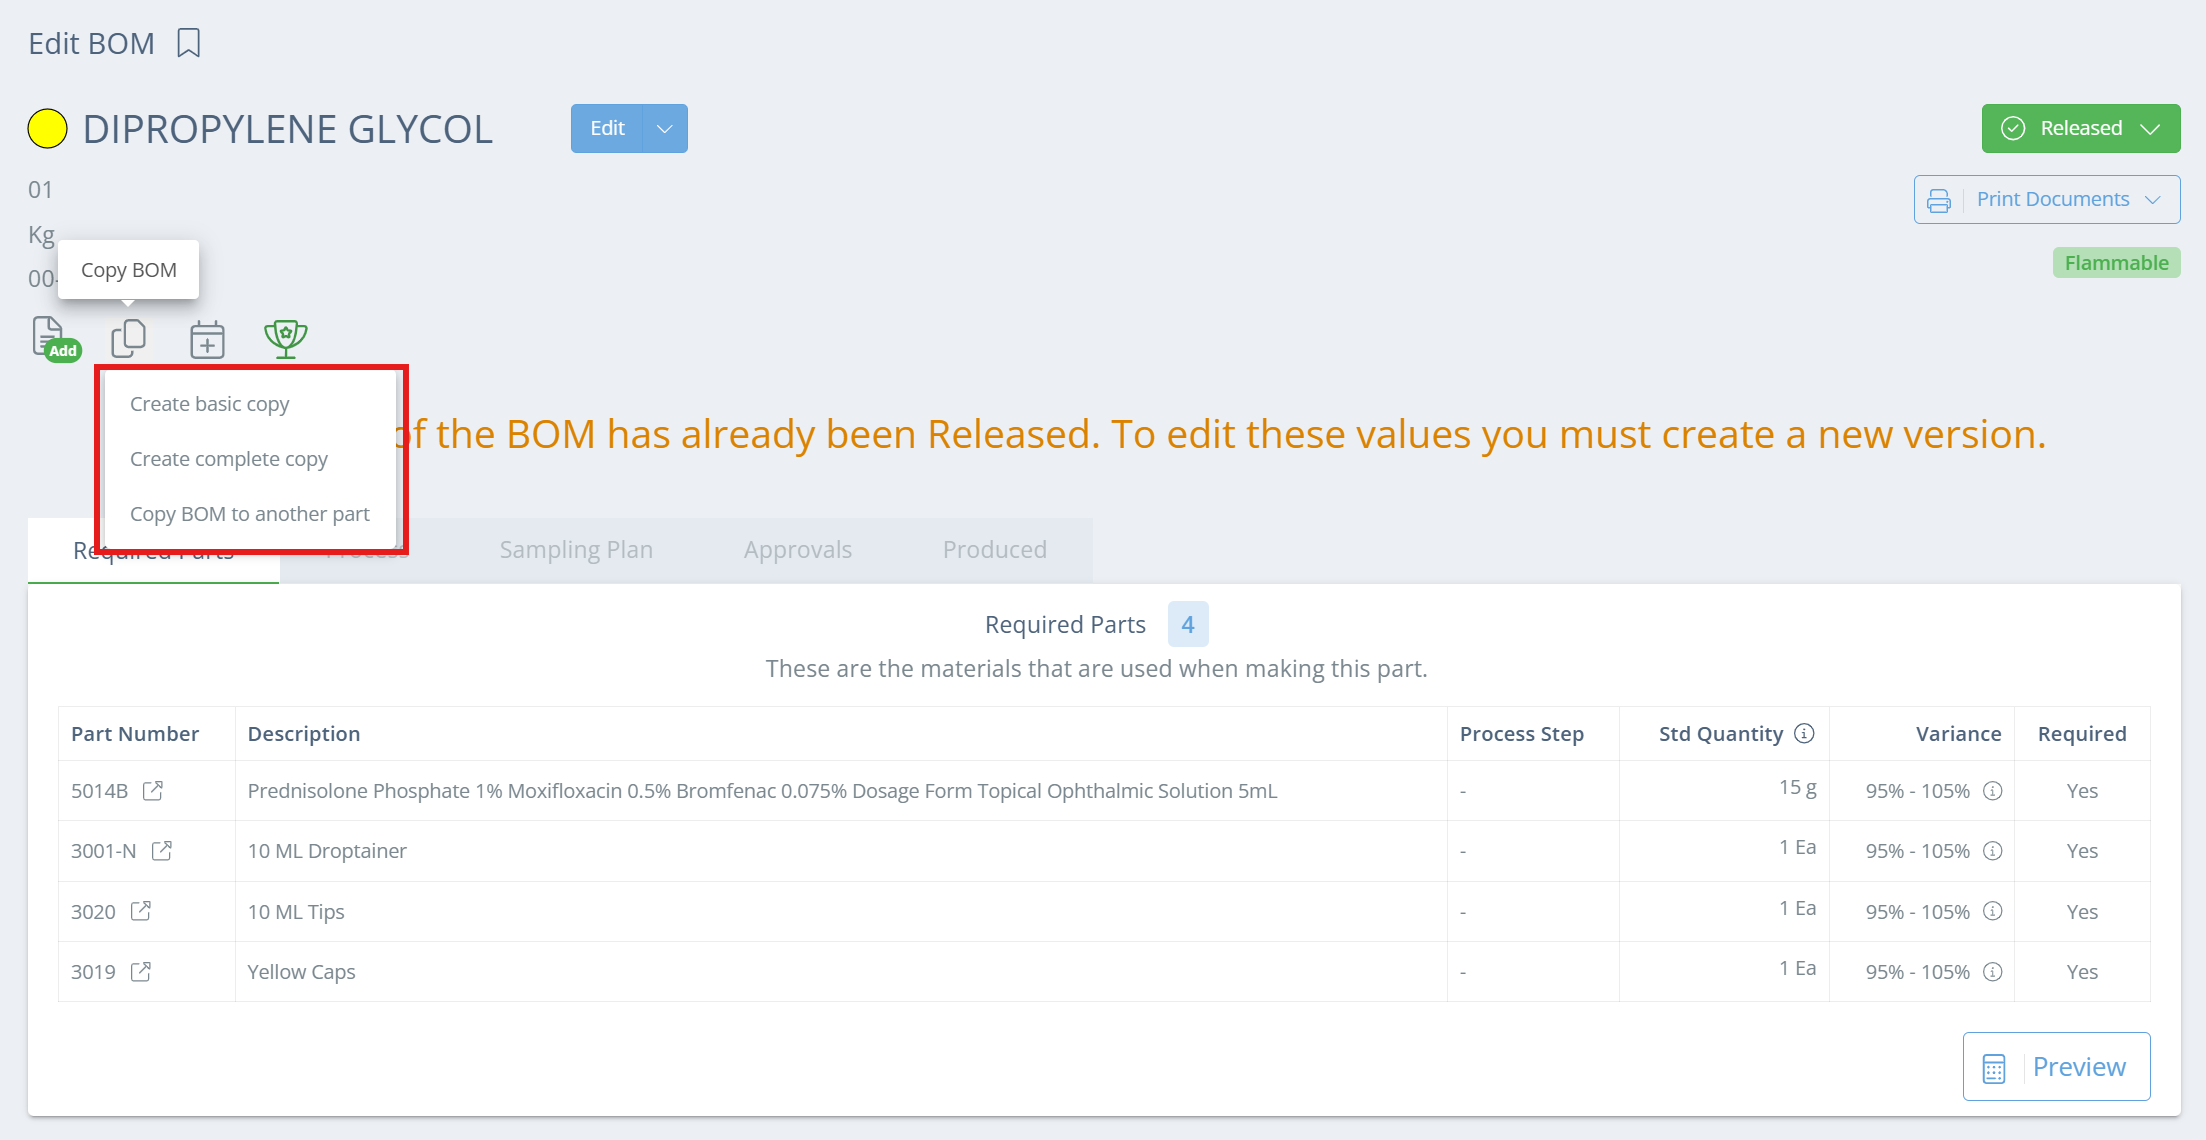
In the dropdown that appears choose from one of the three copy options.
Screencap from v4.21.264.294
| Copy Type | What the Copy Does | Next Required Step |
|---|---|---|
| Create basic copy | Copies only the produced part | Enter new version number |
| Create complete copy | Creates an identical copy of current BOM, under different version | Enter new version number |
| Copy BOM to another part | Creates an identical copy of current BOM, but the produced part is different | Select new produced part, enter new version number |
Make any needed changes to the BOM, then change the Lifecycle (status) to 'Released' so the BOM can be scheduled for production.
Discontinue a BOMIf the BOM you copy from will be obsolete after your updates to the new version, it's a good idea to set the Lifecycle of the old BOM version to Discontinued. That way the production team can't accidentally select the old version when scheduling, but the version will still exist for traceability.
Updated 3 months ago