Year-end Best Practices
Follow these steps for a clean financial finish to the year!
Cycle Count
Start by getting a true picture of current inventory. You must ensure that the part-level inventory quantities in DataNinja match physical inventory on hand. Use Cycle Counting to bulk correct any variances by inventory location. See The Ultimate Guide to Cycle Counts for detailed instructions.
Tip - Divide and CONQUERSplit-up by inventory location to complete the cycle count as efficiently as possible. If some staff are not qualified yet to enter cycle counts directly, consider arming them with the "Physical Inventory Count Sheet" printed out from the Reports page. This way ANYONE can contribute. Qualified individuals can manually enter their results in a Cycle Count.
Inventory Reconciliation
Inventory Reconciliation will tidy up any loose ends so all the financial information in QuickBooks is accurate. Here is how you can ensure clean inventory financials for heading into the new year with an inventory reconciliation in DataNinja.
Step 1
Go to the Parts Page.
Step 2
Look for parts that have a small triangle icon next to the quantity. Click on the triangle.

Step 3
Use the Reconcile Inventory Links to:
Complete Open Receipts
Process the Consumption of Utilized Parts
Complete Esignatures for Manufacturing Records
Close completed Shipments
Health Check Inventory Accounts and Valuation
Step 1 Confirm Inventory Account Mapping in QuickBooks Online
Verify all inventory items are mapped to the correct Inventory Asset Account (if you only have one inventory asset account skip this step.)
- In QuickBooks, click on the Gear icon
- Select ‘Products and Services’ under ‘Lists’
- Verify each item is set to transact in the appropriate inventory asset account.
Step 2 Compare QuickBooks Online Inventory Valuation to Inventory Asset Accounts on Balance Sheet
For each Inventory Asset Account, get an apples-to-apples comparison between inventory valuation and the inventory asset balance.
-
In QuickBooks, click on ‘Reports’
-
Select ‘Inventory Valuation Detail’
-
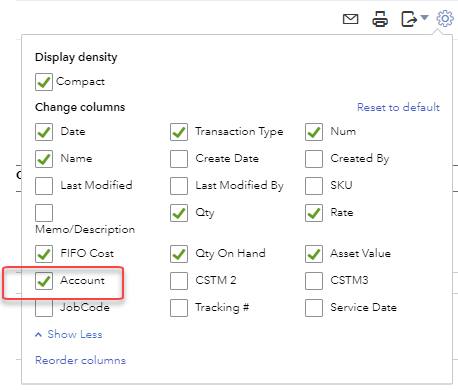
Click on the gear in the report

-
Click ‘Show More’, be sure the ‘Account’ box is checked.
The total of asset values from the valuation detail report should equal the corresponding inventory asset account balance.
Step 3 Correct Balance Sheet to Match QuickBooks Online Inventory Valuation
True-up the inventory asset based on up-to-date inventory valuation. This year-end adjustment should offset to COGS. Inventory Shrinkage is the recommended default inventory offset account.
You can decrease the magnitude of this year-end adjustment by making sure only valid transactions using actual inventory items are supporting your inventory asset account balance.
Updated 9 months ago